
Basic Workday Studio Terminologies Every Beginner Needs
Last updated on Nov 19, 2026
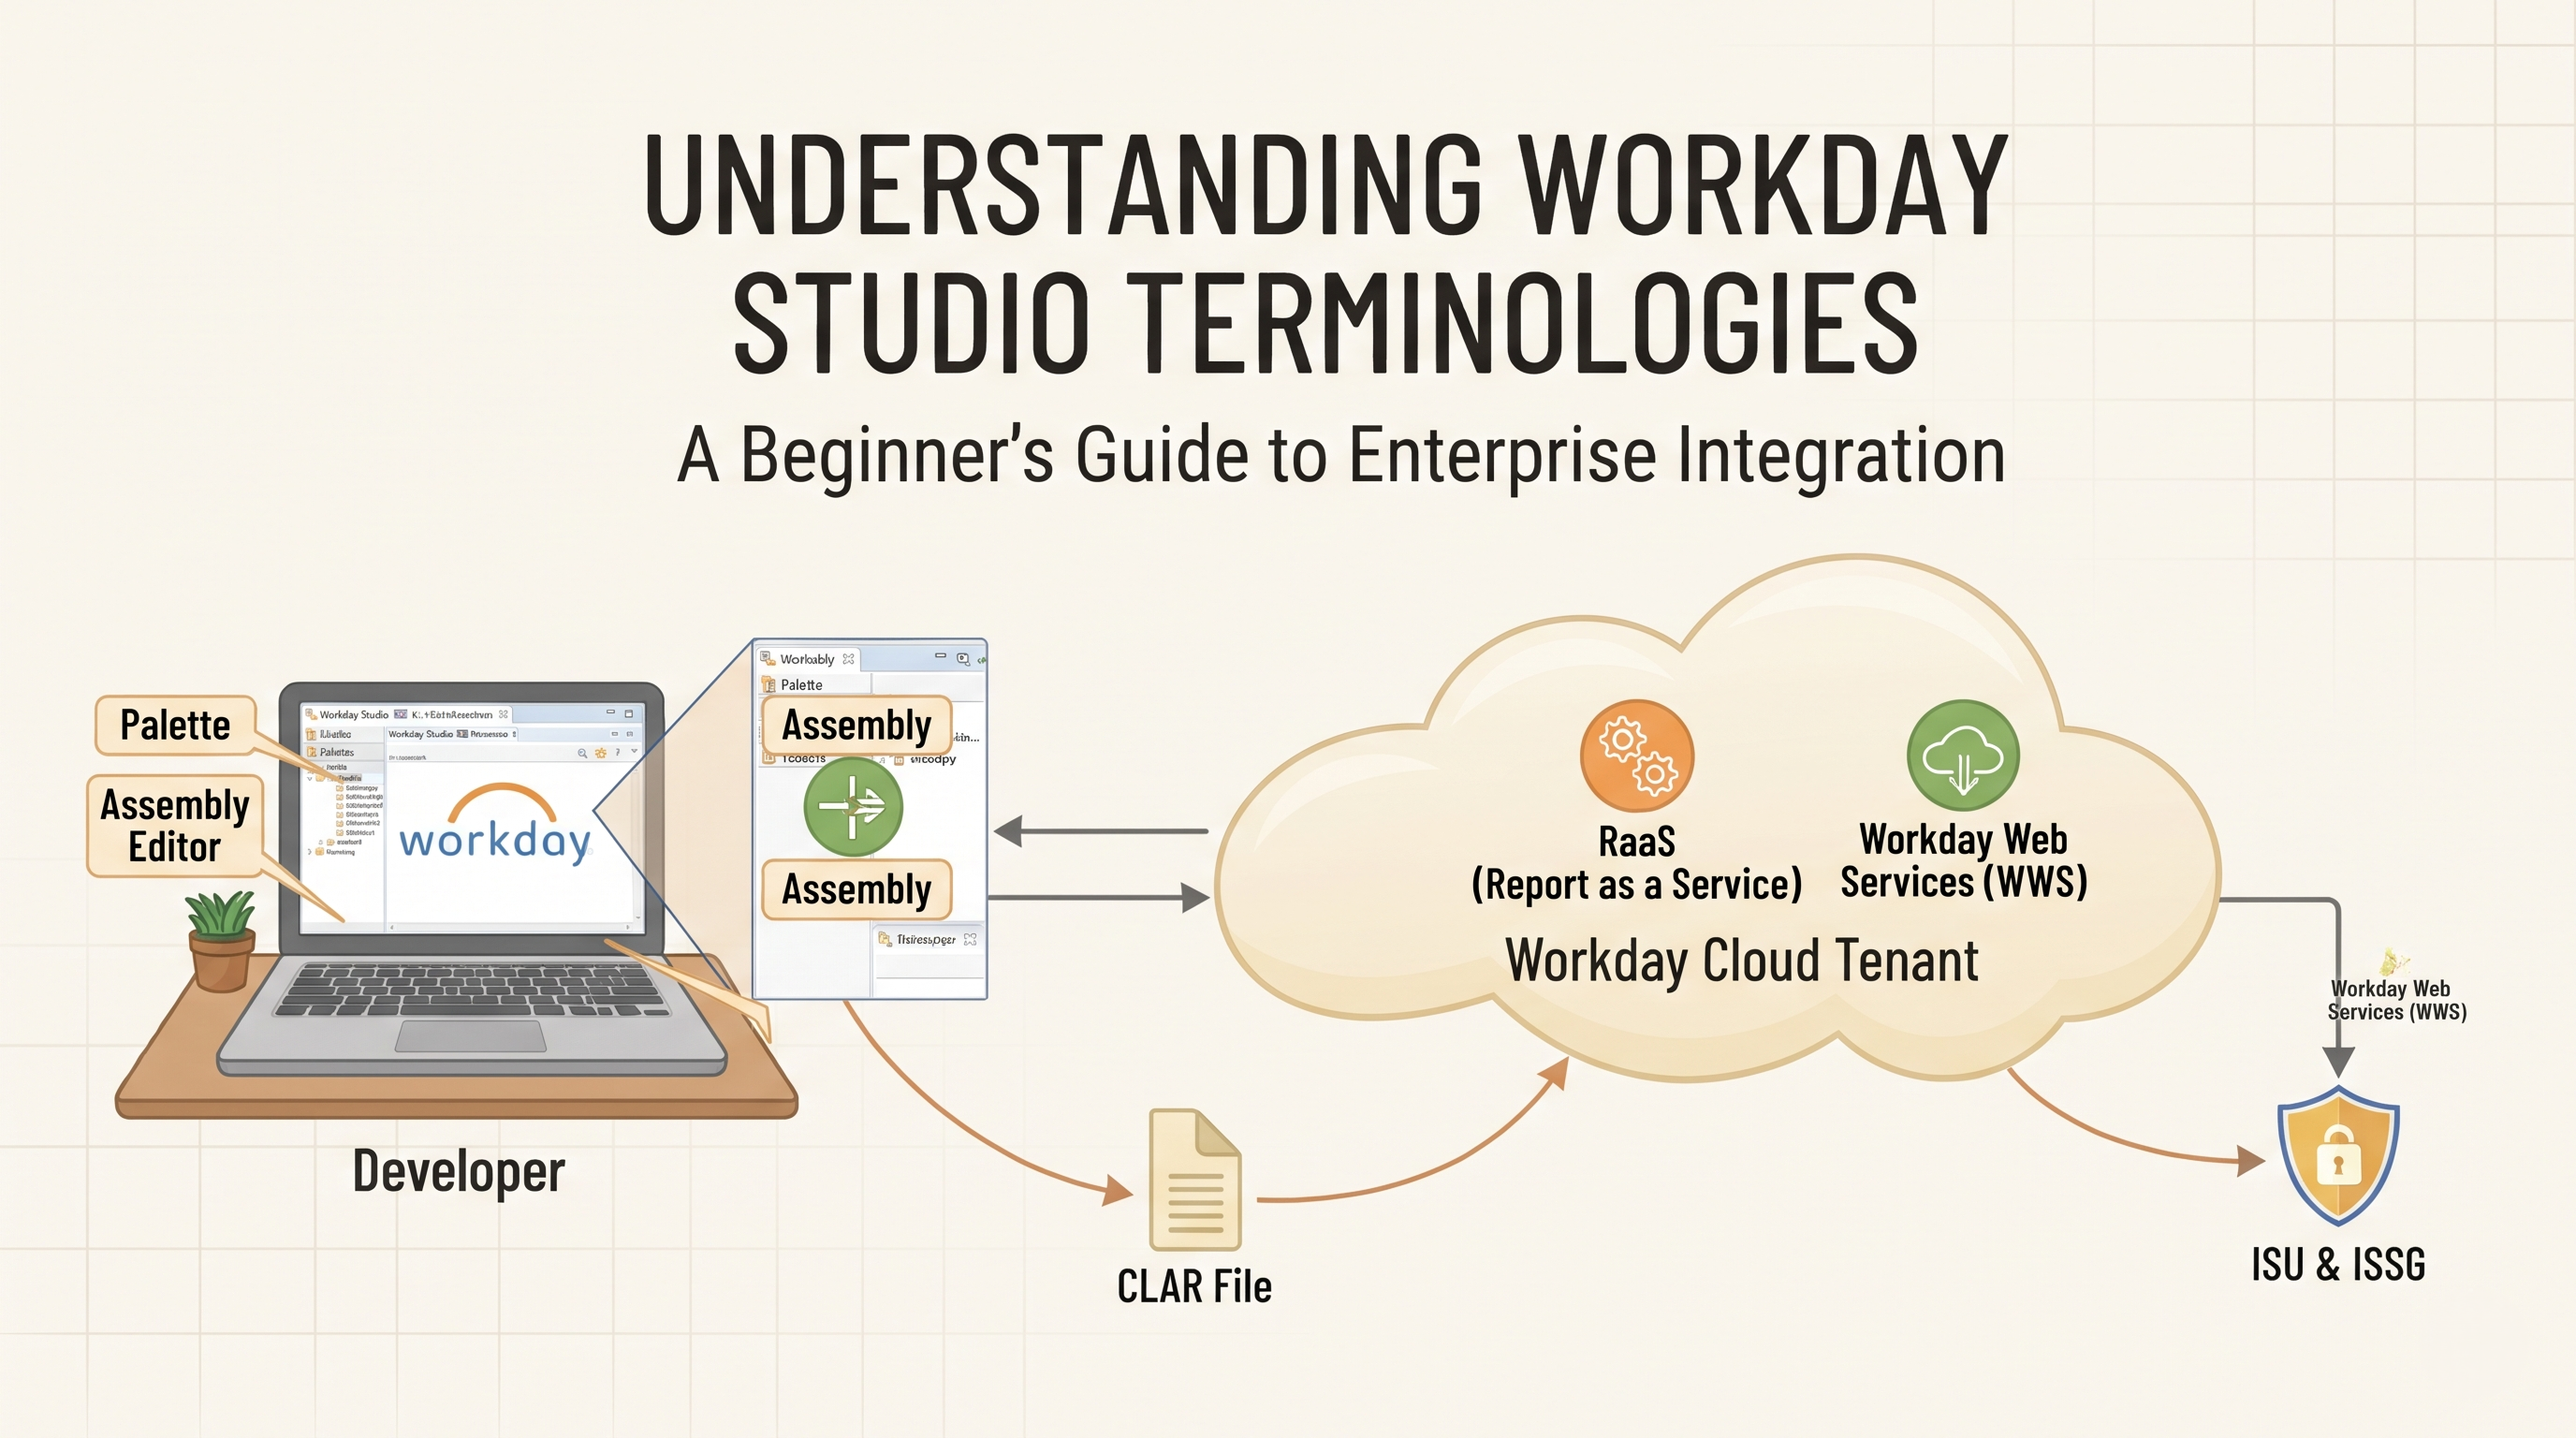
Being part of the world of enterprise integration will involve learning a new language, especially in case of using a very robust platform like Workday. There are some simple tools in the Workday environment, for instance, Enterprise Interface Builder (EIB) and Core Connectors that make use of configuration templates and point-and-click interface. However, there is Workday Studio, which is an Integrated Development Environment, specifically for eclipse. It has been designed for complicated multi-stage and voluminous integration tasks. The language used in Studio is very distinct.
These are the first big milestones to understand for any aspiring Workday integration consultant or technical analyst. Without a good understanding of what assemblies, mediation steps, message contexts, and CLAR files are, navigating the Studio canvas or troubleshooting integration events is a steep hill to climb. In addition to the complete studio workshop in workday studio tutorial, this makes it very simple for you to understand all the Workday Studio terminologies that are essential for every beginner to build enterprise-level integrations.
Fundamental architecture and workspace concepts
Before dragging and dropping components onto a canvas, a beginner needs to understand the structural environment in which Workday Studio operates. These terms establish the general framework for the integration project.
Workday Studio IDE
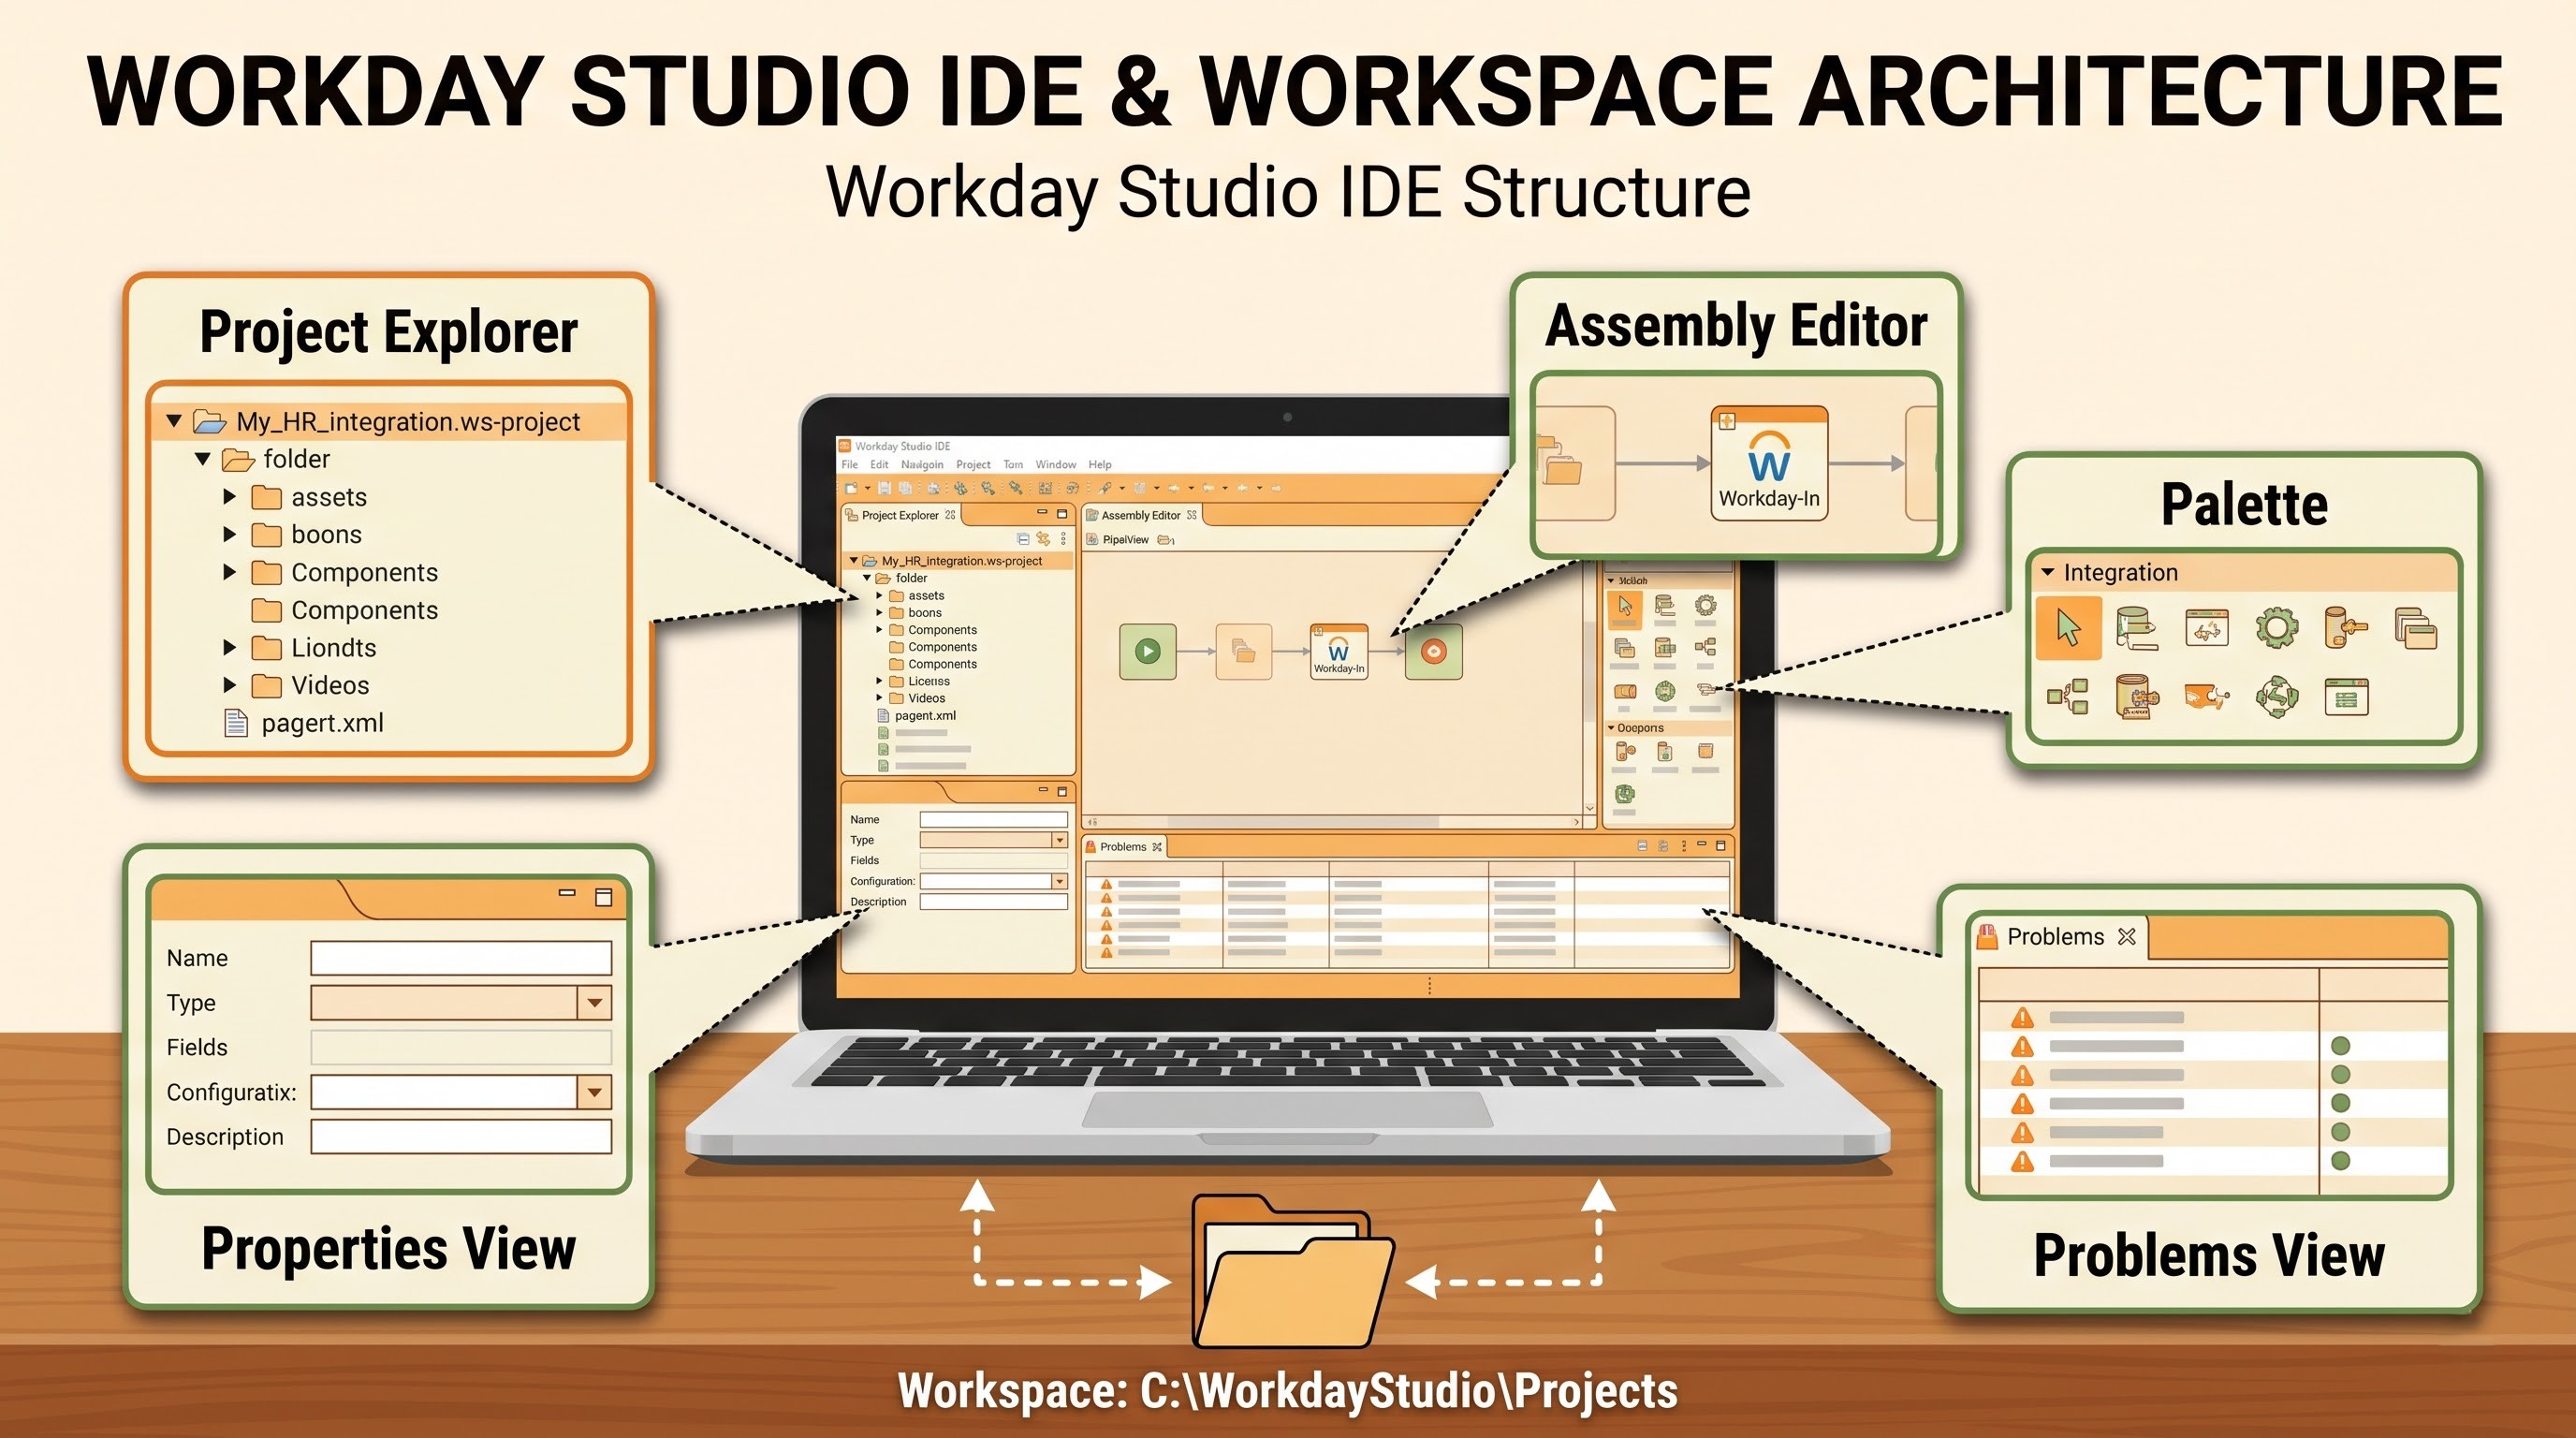
The Workday Studio Integrated Development Environment is a customised version of the Eclipse desktop application. Studio is a local application that sits on a developer’s workstation, whereas Workday’s tools are web based and sit entirely in your browser. It offers a visual drag and drop canvas and XML editors, debugging tools and direct connectivity to Workday tenants. Developers are able to use this environment to build integration logic locally, test it against sandbox tenants, and package it for deployment into the Workday cloud.
Assembly (B)
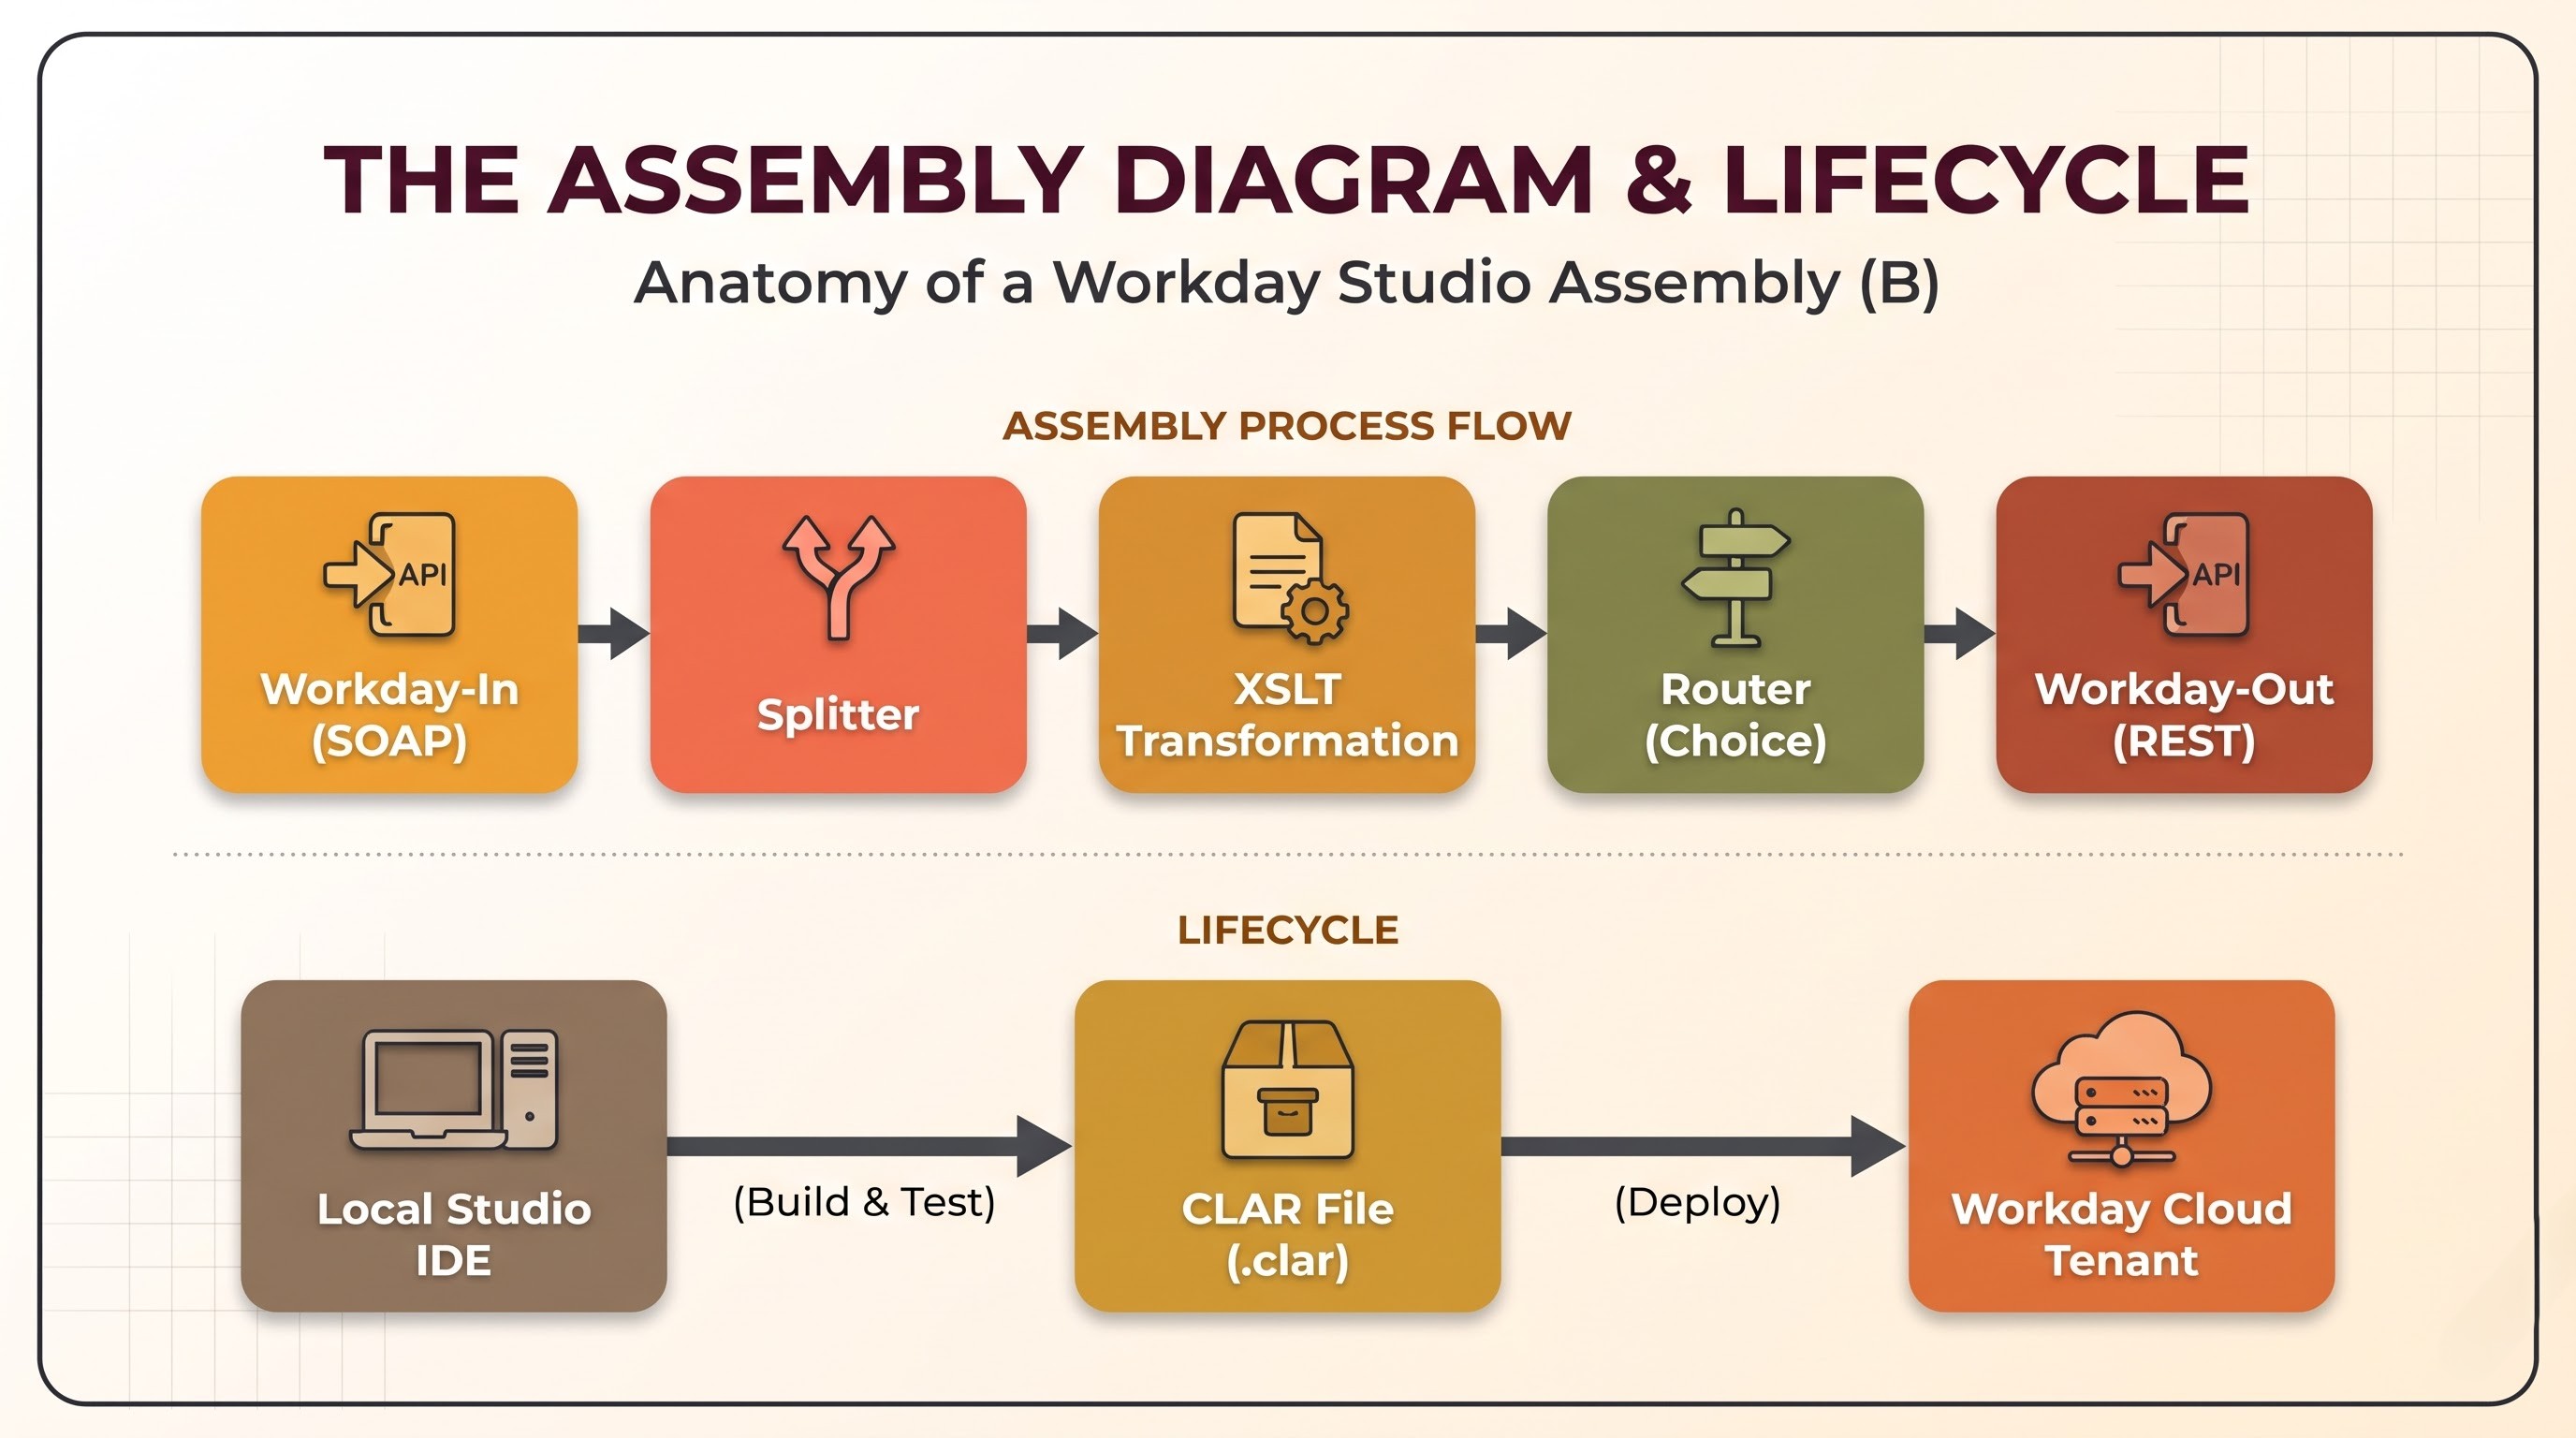
The Assembly is the visual blueprint and the architectural heart of your integration in Workday Studio. This is what you will see when you open the main canvas in Studio: the assembly diagram. It’s a chain of interconnected building blocks – called components or steps – that spells out how data gets into the integration, how it is processed or transformed, where it goes next, and what happens if something goes wrong. Consider an assembly as a flowchart, that actually runs code behind the scenes. Each Studio integration has one or more assemblies . Complex integrations often spread logic across multiple linked assemblies.
Projects and Workspace
A Workspace is a local folder on your computer where Workday Studio stores your settings, preferences and integration files (borrowed directly from Eclipse terminology). You organise your work in Projects in a workspace. Typically, each integration that you build will be contained in its own Studio project. A project consists of the assembly file, schemas, transformation stylesheets, test data and configuration metadata necessary to get that particular integration working as a stand-alone unit.
CLAR File (Cloud Archive)
Once you’ve built and tested an integration in your local Studio IDE, you can’t just leave it on your laptop – you need to upload it to the Workday cloud so business users can schedule and run it. To enable this Studio packages your entire project (which includes the assembly, xslt files, schemas and properties) into a single packaged deployment file with a .clar extension (short for Cloud Archive). You upload this CLAR file directly into a Workday tenant, which creates or updates the Integration System object within the cloud.
Tenant
A Tenant is an instance of Workday dedicated, isolated and secured for a specific organization. Enterprise customers don't build integrations in their live business environment. Rather, they operate across multiple tenants, such as Implementation tenants for initial builds, Sandbox tenants for testing and user acceptance and Production tenants for live payroll, HR and financial operations. Workday Studio picks up the web service definitions, tests cases, and deploys CLAR files into these tenants. For the novice who does not have an enterprise sandbox, joining workday studio online training will offer them the correct tenant environment to deploy the assemblies.
Data Flow & Message Handling
An integration, in its most basic form, is just a pipeline that moves and reshapes data from a source to a destination. Workday Studio processes data in discrete chunks. It’s important to understand how Workday Studio holds, tracks and routes that data.
Workday In, Workday Out
Every integration has a start and end point. These are controlled by transport components in Studio. Workday-In is the entry point to an integration assembly. It describes how the integration is triggered and how the pipeline receives initial data or launch parameters. Workday-Out, in contrast, is an outbound endpoint to push data out of the assembly, either back to Workday via web services, or to an external system using protocols such as SFTP, HTTP, or REST.
Transportation
A Transport is a special part of the assembly which handles communication across boundaries, moving messages into Studio, out of Studio, or between different internal parts. Examples of these transports include HTTP transports for invoking REST APIs, SFTP transports for reading and writing files on remote servers, and SOAP transports for interacting with Workday Web Services. Transports handles the actual delivery mechanism . Mediation steps alter the content of a message.
Message
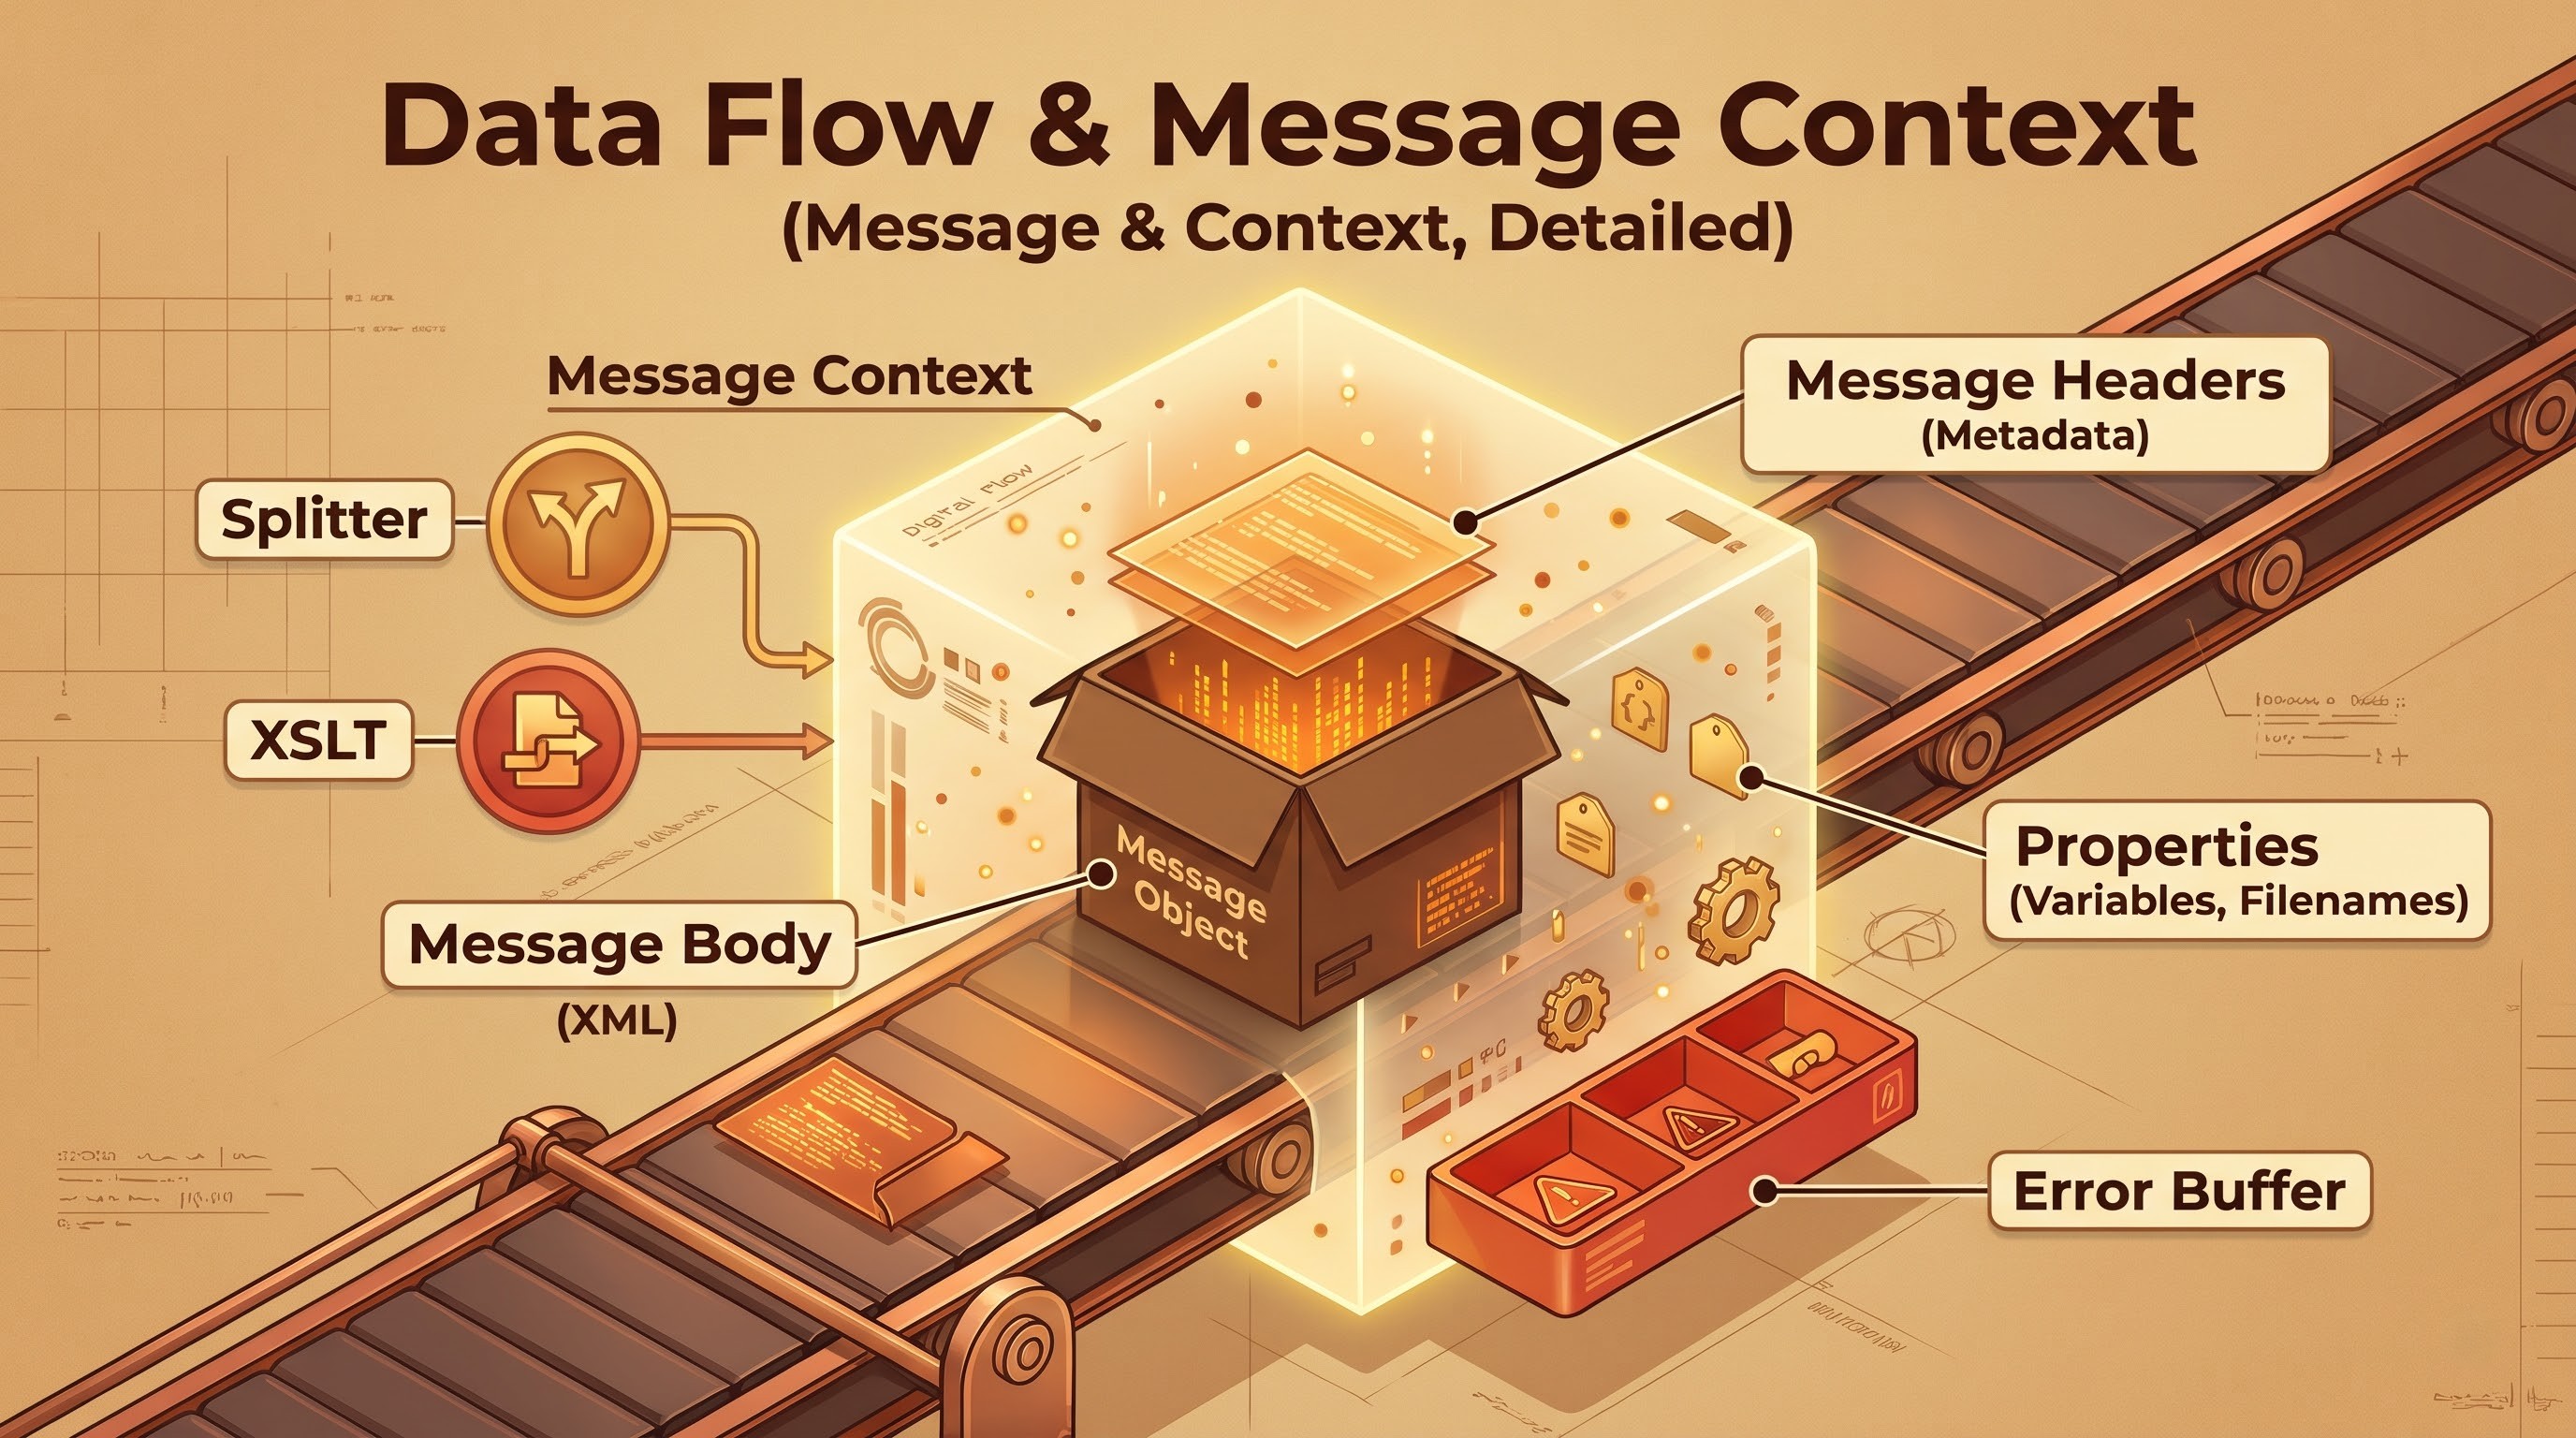
In Studio terminology, a Message is the basic unit of data that flows through your assembly at any given instant. A message is more than just raw text; it is an object that consists of two main parts: the message body (the actual payload, such as an XML document, a CSV format, or a JSON string) and message headers (metadata key-value pairs that contain routing instructions, filenames, timestamps, or status flags). As a message moves across the assembly canvas from left to right, various steps inspect, modify, or replace the body and headers of the message.
Context of the message
If the Message is the package on a conveyor belt, the Message Context is the whole factory floor around it. The Message Context is a memory buffer that exists for the lifetime of an integration run. It tracks the current active message, variables, properties, error conditions and historical snapshots of data from previous steps. Studio integrations often involve making multiple API calls and transforming data multiple times. Developers use the Message Context extensively to store a piece of data in step two and then read it back in step ten.
Properties and Variables
Developers use Properties and Variables to store temporary information in the Message Context. Properties are key-value pairs that are associated either with a specific message header or globally to the integration context. You might save a target filename or a record counter as a property for later components to read dynamically. Variables created by MVEL expressions or mediation steps have a similar purpose, allowing developers to store structured objects, lists or computed values in memory without overwriting the main message payload.
Routing, processing, and transformation components
When data arrives at an assembly via a Workday-In transport, it’s rarely in the exact format required by the destination system. Studio gives you a rich palette of components to slice, route, enrich and reshape messages.
Mediation Step
A Mediation Step is any component that is placed inside an assembly that inspects, modifies, routes or enriches a message without communicating with external transports. The mediation steps are the workhorses of Studio logic. You are performing a mediation step when you are evaluating a conditional rule, splitting a large XML document into individual worker records, logging a debug message, or transforming data formats.
Sync Mediation vs Async Mediation
On the Studio palette, beginners often find two special mediation containers: Sync Mediation and Async Mediation. It is important to know the difference between them for performance and error handling.
A Sync Mediation (Synchronous Mediation) processes a message, sequentially, on the same execution thread. The integration stops at that step and runs all sub-steps in the Sync Mediation container in strict order and waits for their completion before proceeding. Sync Mediations are a good match for linear logic where step two depends immediately on the output of step one since everything is sequential. Sync Mediations also allow centralised error trapping around a particular block of operations.
An Async Mediation (Asynchronous Mediation), in contrast, decouples message processing by putting messages on an internal queue to be processed independently. It is often used for things like logging messages, background processing, or high-throughput operations where you don’t need immediate sequential blocking. In practice, beginners tend to handle most of the core business logic using Sync Mediation, while Async Mediation is reserved for specialised queuing or decoupled sub-processes.
Aggregator & Splitter
Bulk data is a common occurrence in enterprise integrations – for example, one XML report containing ten thousand employee records. Processing all ten thousand records at once might exceed memory limits or break third party API rate limits. To this end Studio uses a Splitter. A Splitter will take one big, composite message and break it down into individual, smaller sub-messages—for example, splitting a massive worker feed into ten thousand individual worker messages so each employee can be processed, validated or sent to an API one by one.
The Aggregator does just the opposite. Once the individual messages have been processed or enriched separately , an Aggregator will take those scattered sub-messages and combine them back into a single unified message . This is often done right before writing a final consolidated output file to an SFTP server.
Router
Integrations don’t usually run in a straight line, they have to make decisions based on the data they see. A Router is something that branches conditionally. It evaluates rules on the incoming message and routes it to different execution paths. A Choice Router, for example, is equivalent to an if-else statement: if the employee's country is India, send the message to the regional payroll sub-assembly; if the country is the United States, send it to the domestic payroll path; otherwise, send it to an exception handler.
XSLT (Extensible Stylesheet Language Transformations)
Since Workday's native data format is heavily XML based, XSLT is arguably the most important transformation technology in a Studio developer's toolbox. XSLT is a declarative programming language. It is used for transforming XML documents to other formats (a completely different XML structure, a flat CSV, HTML, plain text, etc.). To accomplish this, developers add an XSLT step to the assembly in Studio and associate it with a stylesheet file that maps Workday fields to the exact layout required by a third-party vendor.
MVEL (MVFLEX Velocity Expression Language)
MVEL is used for light inline expressions in Studio properties and mediation steps, XSLT is used for heavy structural transformations of XML documents. MVEL is an expression language for Java based environments that allows developers to read message headers, manipulate strings, perform basic math, evaluate boolean conditions in routers, and construct file names or API endpoints dynamically without writing full Java classes.
Integration Touchpoints and Workday Ecosystem Terms
A Workday Studio integration is not a separate entity. It constantly interacts with core Workday functional configurations, reports and security frameworks. You should understand how Studio connects the IDE and the Workday tenant.
Workday Web Service (WWS)
Workday Web Services are public SOAP-based APIs that Workday exposes to allow external tools and integrations to read or write data in a Workday tenant. Workday has dedicated web service operations for just about every functional area in Human Capital Management, Payroll, Financial Management, Recruiting and Benefits. In Studio, developers perform operations (e.g., getting worker details, submitting time-off requests, or changing employee contact information) by using the Web Service Tester and SOAP components.
RaaS (Report as a Service)
Workday Web Services are great for structured transactional updates, but getting complex, filtered data sets directly via standard APIs can result in dozens of individual calls. Functional consultants create Custom Reports in Workday that simplify data extraction and expose them as a web service, which is called Report-as-a-Service (RaaS). The RaaS report can be accessed from a dedicated URL and is provided in XML, JSON, or CSV format. Developers will often fire a RaaS URL at the start of an assembly in Studio to bring a custom, pre-filtered feed of employees, positions or financial transactions directly into the integration pipeline.
Launch Parameters
An administrator running or scheduling a Studio integration in a Workday tenant will often need to supply the integration with the scope of data to process, such as a specific pay period, a target company code, or a flag indicating whether it should run in test mode. Launch Parameters are input fields, defined by the Studio assembly, that appear on the launch screen in Workday and can be configured by the user. When the integration kicks off, Workday sends any values the user entered into the Message Context so that the assembly logic can adjust its behaviour based on that context.
Integration Attributes and Maps
Hardcoding values such as server URLs, SFTP directories, or vendor account codes directly into a Studio assembly is not a good practice as it would require editing and recompiling the CLAR file if the integration is moved from a Sandbox tenant to a Production tenant. Developers instead define Integration Attributes and Integration Maps.
Integration Attributes are configurable text, numeric or boolean settings exposed on the Integration System within the Workday tenant that enable administrators to update endpoints or credentials directly in the UI without having to modify Studio code. Integration Maps are lookup tables managed in the tenant that map Workday values to external vendor codes for example, the internal location code for New Delhi in Workday mapped to a vendor specific branch identifier.
ISU (Integration System User) ISSG (Integration System Security Group)
Security is enforced on all Workday tenants and integrations cannot bypass domain permissions. An Integration System User (ISU) is a dedicated non-human user account created to run integrations. It ensures that automated processes do not use an individual employee’s login credentials. That ISU is then assigned to an Integration System Security Group (ISSG) that provides the specific read or write permissions required for the web services, reports, and business objects that the Studio assembly interacts with.
Error Handling, Monitoring and Debugging
Even the best designed integrations run into bad data, expired passwords, or network timeouts. The first thing that any beginner learns is that building the happy path is only half the job. What separates a fragile script from a production-ready enterprise integration is catching and reporting failures gracefully.
Exception Handling and Error Pathways
Workday Studio allows you to configure each mediation step and assembly with its own error paths, which appear as red connector lines on the canvas. If a step fails, e.g. due to an invalid XML payload or rejection of a web service request, the execution seamlessly moves to the red error line instead of abruptly terminating the whole process. Developers hook logging and notification components into these error pathways so they can capture the exact reason for failure, track which employee record caused the issue, and allow the rest of the batch to continue processing cleanly.
Integration message
If a Studio integration executes in the cloud, business users and support analysts can follow its progress in the Workday user interface instead of watching the developer’s local Studio console. The Put Integration Message component is a Workday step that you use inside an assembly to write structured status updates, warnings or critical error messages directly into the Workday Integration Event log. With careful use of the Put Integration Message, developers are able to ensure that if a record fails validation, an HR administrator can see the exact Employee ID and error description right inside Workday without needing technical support to dig through raw server logs.
Parts Delivery & Pickup
Integrations often create output files (e.g. payroll remittance files, vendor benefit enrolments) that must be securely stored or picked up by downstream processes. The Deliver component attaches the generated file directly to the completed Integration Event in Workday, making it available for download by authorised users and subject to Workday’s document retention policies. In contrast, the Retrieve component allows a Studio assembly to retrieve files attached to an integration event, or uploaded by a user at launch time.
Breakpoints and Studio Debugger
Developers test and debug their logic locally using the Studio Debugger before packaging a CLAR file for cloud deployment. A developer can set Breakpoints on specific steps in the assembly canvas, run the integration in debug mode, and pause execution mid-stream to inspect the exact contents of the Message body, verify header properties, test MVEL expressions in real time, and step through the assembly one component at a time to find logic bugs.
Putting the Vocabulary Together
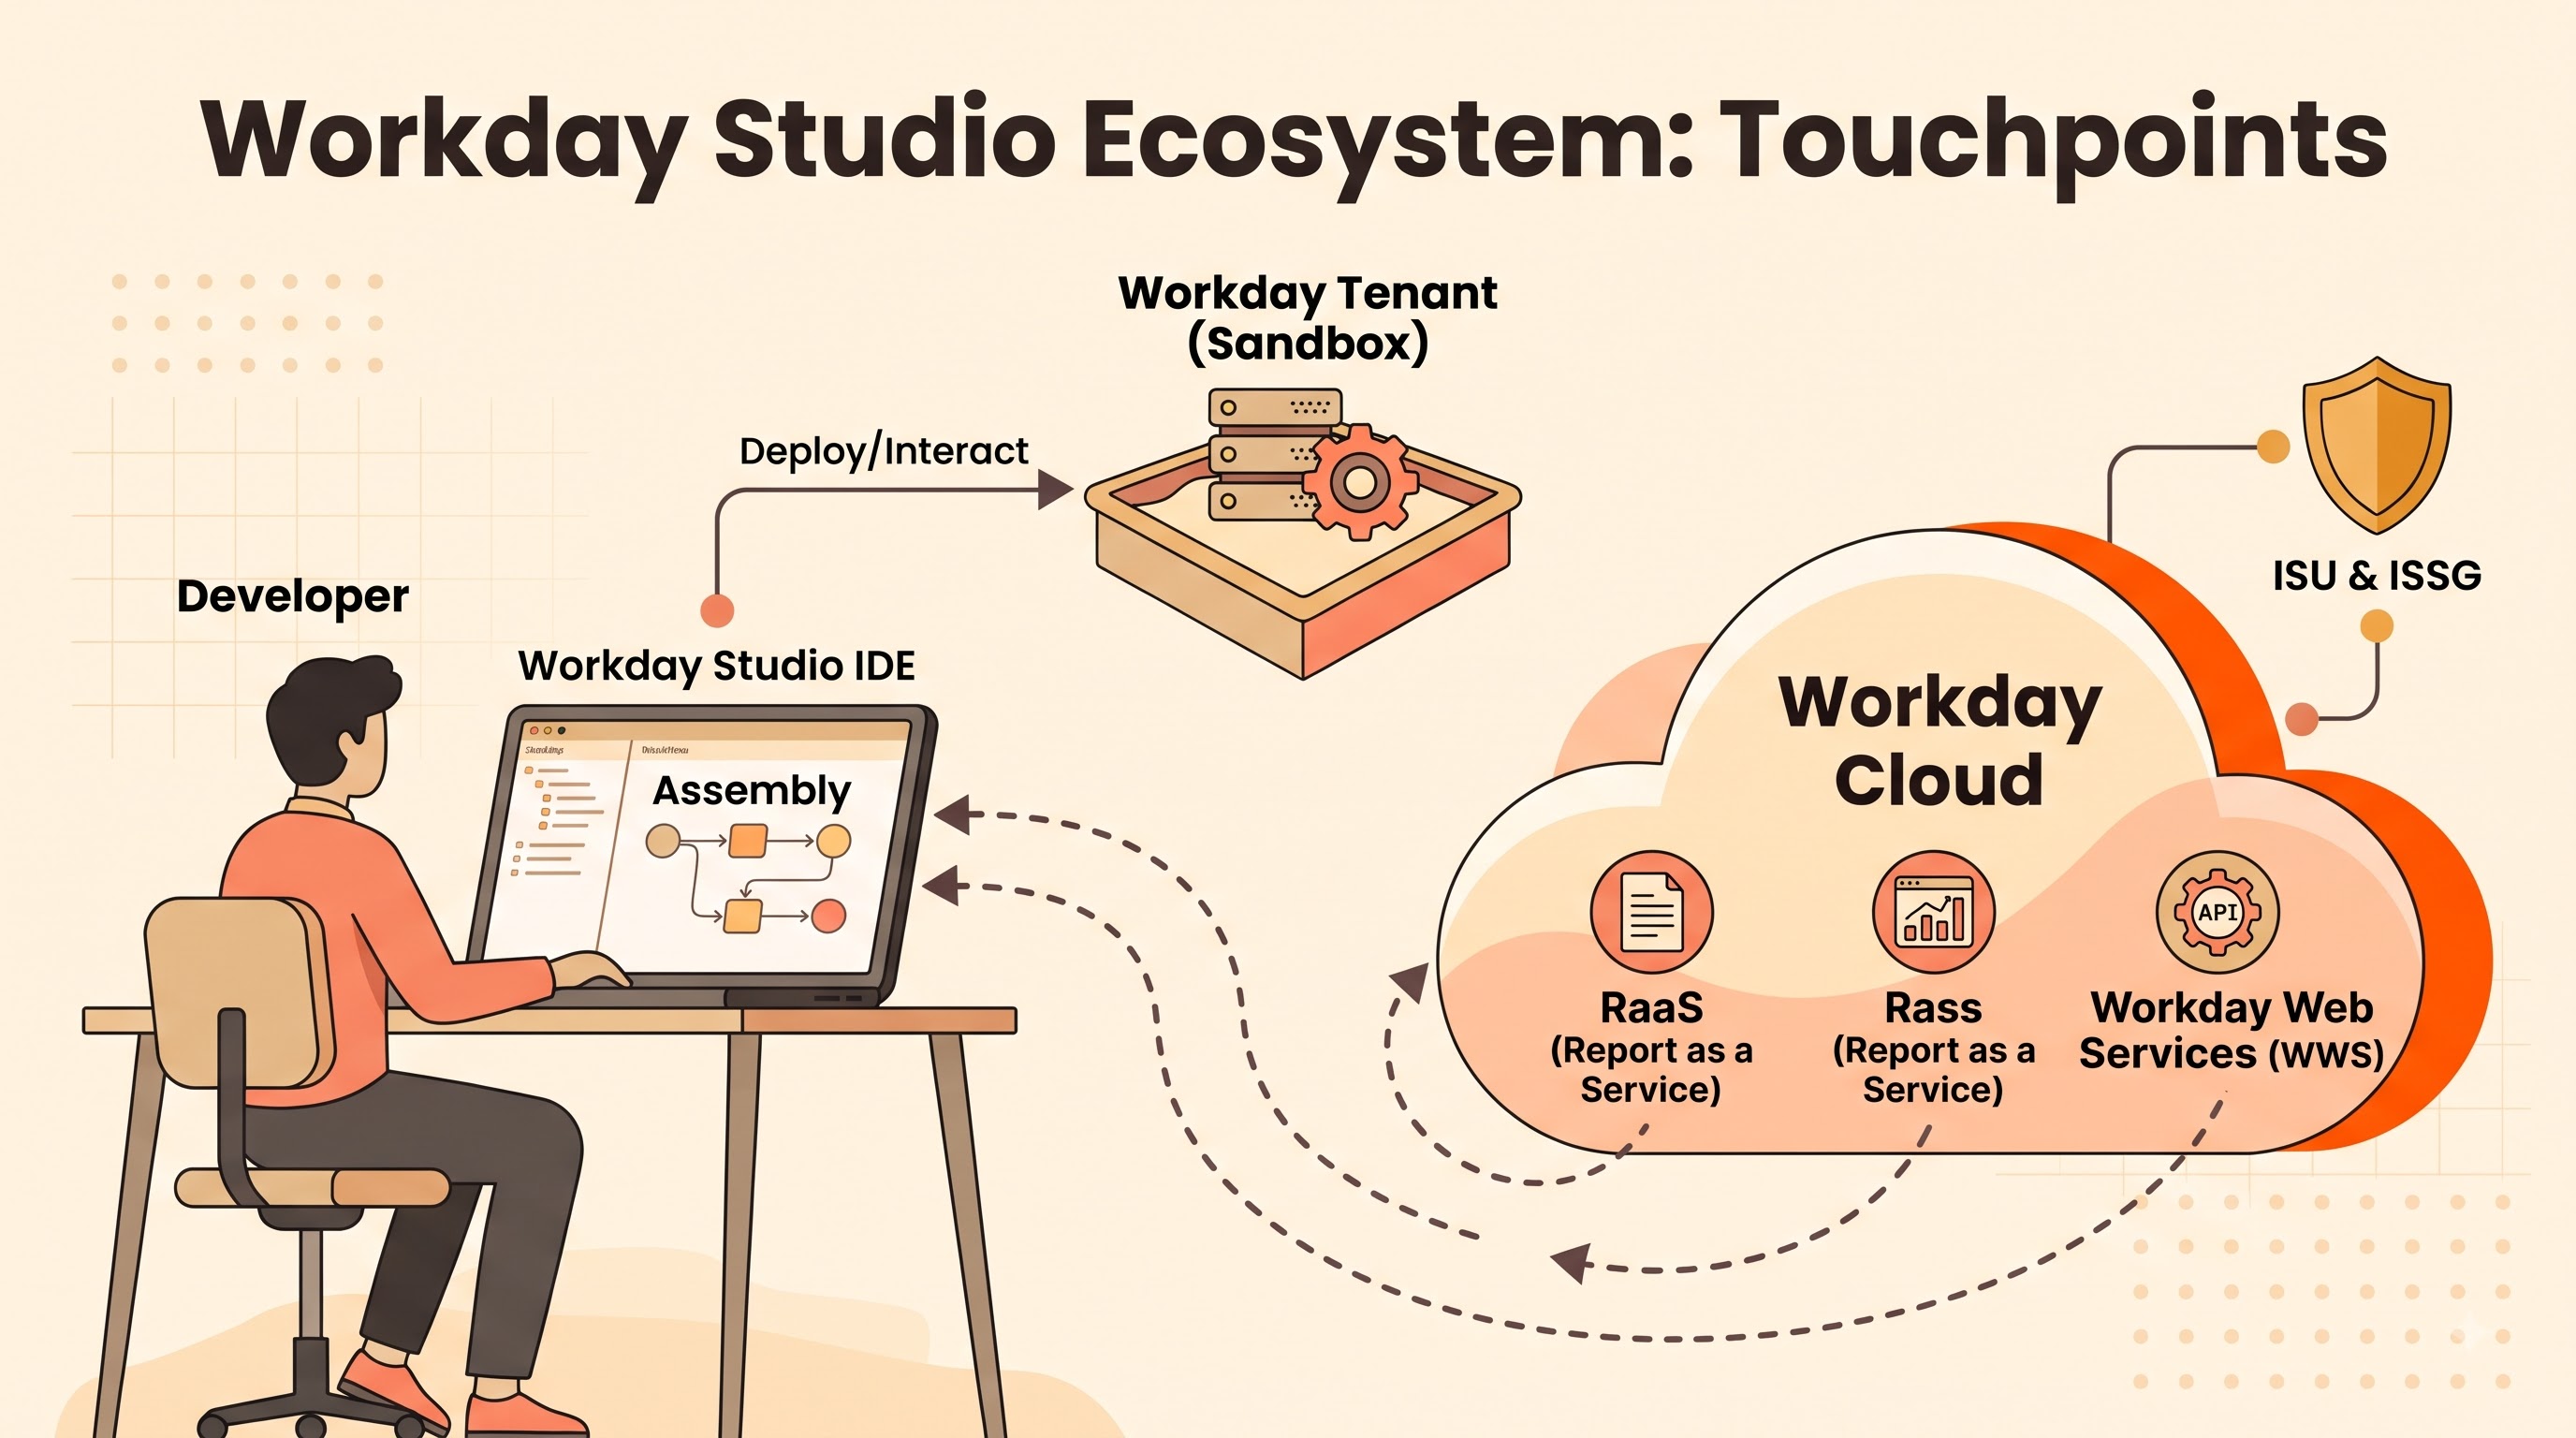
Now step back and see how all these terminologies are interrelated and the architecture of Workday Studio makes perfect sense. A developer launches the Workday Studio IDE on their workstation and creates a Project in their Workspace and an Assembly on the visual canvas. That assembly authenticates to a Tenant with an ISU controlled by an ISSG. Reads configurable Launch Parameters and Integration Attributes. Pulls data via a RaaS report or Workday Web Services through a Workday-In Transport.
Sync Mediations orchestrate the workflow as the Message travels through the Message Context, using a Splitter to break up individual records, a Router that uses MVEL expressions to apply conditional logic, and XSLT stylesheets to convert the XML payload to the vendor’s schema. Red Exception Handling pathways catch unexpected error and log actionable diagnostics through Put Integration Message. Successful outputs are packaged through Deliver or sent out externally through Workday-Out transport. Once validated in the Studio Debugger, the complete solution is then compiled into a CLAR File and deployed to the cloud.
Once you have learned this common language, Workday Studio is less of a scary wall of technical icons and more of an orderly, predictable engineering toolkit. As you start creating your assemblies yourself, this essential information will help you gain an understanding of any integrations that exist, allow you to communicate effectively with your team members, and design solutions that work and scale well for your business – all without forgetting a solid foundation for your workday studio certification.