
Learn MuleSDK to Build, Test, and Deploy Custom MuleSoft Connectors
Last updated on Aug 11, 2026

MuleSoft has a wide array of off-the-shelf connectors available through Anypoint Exchange, including those for major cloud services, databases, enterprise resource planning platforms, and software-as-a-service applications. Nevertheless, most modern enterprise IT infrastructures have custom internal systems, legacy protocols, industry endpoints, and proprietary backend architectures that are not supported out of the box.
Using standard HTTP Requestors and simple Web Service consumers to connect with those systems will often mean repeating logic, duplicating code, and having disparate authentication processes that lead to inconsistency in error handling.
Learning how to solve this integration gap issue is a module that should be considered as part of every comprehensive MuleSoft training courses. With the use of a custom connector developed via Mule SDK, there is no more need for this. It will help you package the low-level integration logic in a reusable module which can be used for authentication standardization and security policy implementation among others.
This paper presents a detailed description of the way of creating, testing, governing, and deploying an enterprise-ready custom connector on the Mule 4 platform.
Architectural Foundation of Mule SDK
In terms of architecture, the Mule SDK has replaced the previous DevKit architecture that was used in Mule 3.x in a brand new manner suitable for Mule 4.x. The primary benefit provided by this new architecture is that it uses the standard Java annotations allowing us to communicate with the core Mule runtime and makes large XML metadata wrapper files obsolete. Using an object-oriented approach is the key architectural point because we are able to map the Java classes to the visual components created in Anypoint Studio. Therefore, understanding the architectural components becomes important for someone who wishes to join the best rated mulesoft developer course online.
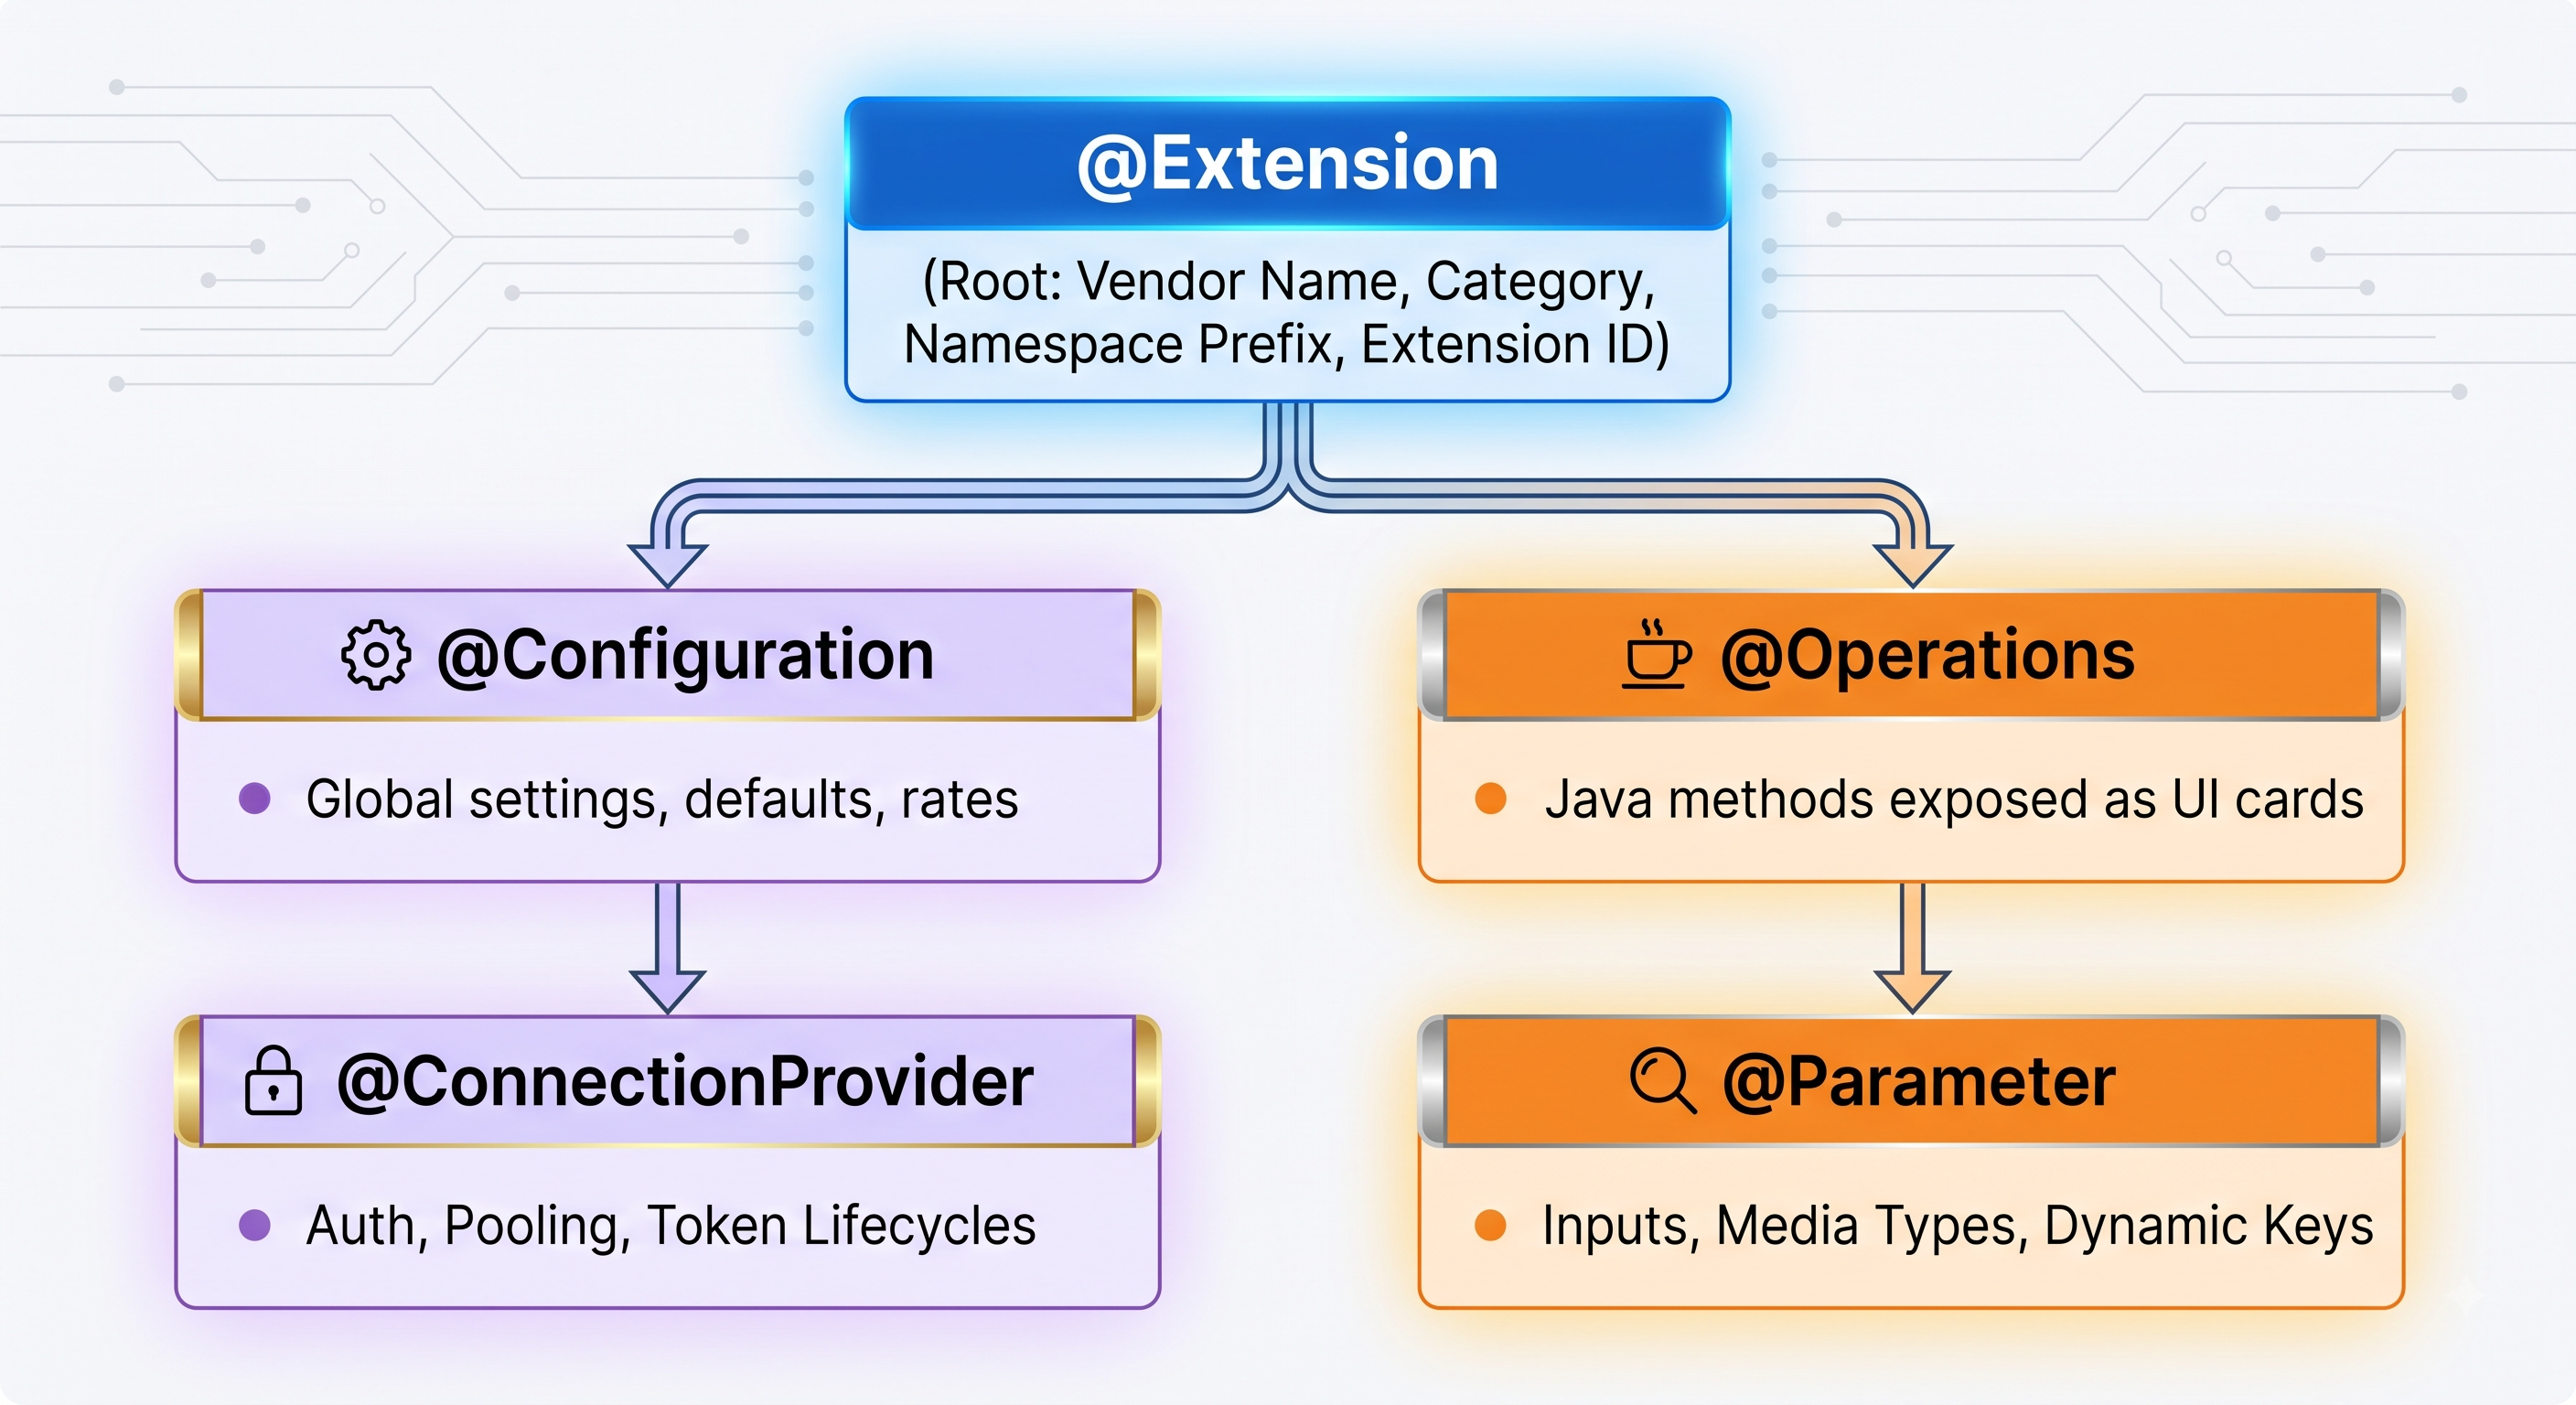
Main Architectural Components
Extension Definition: It is the main entrance of the project. It declares global metadata such as vendor name, extension name and ID, description, and XML namespace prefix. Besides this, it registers all the configurations related to the extension, connection providers, and operational containers.
Configuration refers to the major structural containers that consist of a combination of settings that are used for a number of operations. Thanks to the configuration it is possible to store all global parameters such as the address of the target domain, the default timeout for connections, the proxies defined, and the connection providers selected.
Connections refer to the items that stand for working communal interaction with differing systems. It includes several components, for example, the connection status, contractor’s tokens, communication sockets, and others that allow one to issue the commands to the necessary system.
Operations cover the basic mechanisms which open for different ‘Mule’ application travels. Operations can be formally described as separate operations like writing the record, getting some data, etc. They get specific relevant parameters from creating the journey, find the working connection that should be used and perform the required operation.
Sources are special functioning parts that provide the possibility to transfer some signals in the system. They allow custom systems to have the possibility to do the operation and transfer signals.
Configuration for environment and tools
Constructing a stable Mule SDK customized connector necessitates correct establishment of the area of work, that includes all the toolchains, programs, and working stations correspondingly with Mule SDK.
Software tools required:
Java Development Kit (JDK 8, 11, or 17): Newest versions of Mule 4 based systems (beginning from Mule 4.6 LTS) can work with JDK 8, 11, or 17. It is crucial to give the right pointers to the relevant installation of JDK in the operating system’s environment.
Apache Maven: The most used build automation tool in MuleSoft projects. It performs the function of managing dependencies, running compiling programs, dealing with tests, and building the connector.
Anypoint Studio (7.x version or higher): The development platform for creating, launching, and debugging the applications developed with Mule.
Anypoint Platform access: Admin rights or Developer rights to Anypoint Exchange van be used for expected enterprise employment and usage of the created connector.
Making the Project Workspace
Custom connectors use the common directory structure that conforms to the framework for building extensions in Mule. However, instead of doing every action step by step, the developers who are trained by MuleSoft developer training are taught to use the Maven Extension Archetype.
The Maven generator command initializes the project with everything needed like standard Java source folders, test resources, and a POM configuration file with all required plugins and SDK dependencies. While creating the project you specify some required coordinates:
The Group ID, which is often mapped to your organization’s domain or Anypoint Platform Organization ID.
The Artifact ID, which is your project’s name associated with the connector.
The Version, which shows that the initial release is marked with a semantic versioning.
The Package name allows organizing your source code in Java packages.
Deep Dive: Creating a Custom Connector
For more understanding of how we can build our connector, consider that a company would want to create a special connection for its internal legacy system CoreSystem. There are special demands on it, including the requirement of a special header for an API key, payload format, and strict connectivity monitoring.
Step 1: Creating Connection Management
The initial step in developing the custom connector is identifying how the connector gains authentication and communicates with the targeted system. This means that you need to create a new Connection class and its own Connection Provider class.
Connection Object
The Connection class represents an already instantiated session where all necessary parameters for communicating with the external system are included, i.e. base URLs, API keys, and connection timeouts.
In this class, you also develop functions that will make actual network calls, check the state of the session, and clean up the resources of the client when it is turned off.
Connection Provider
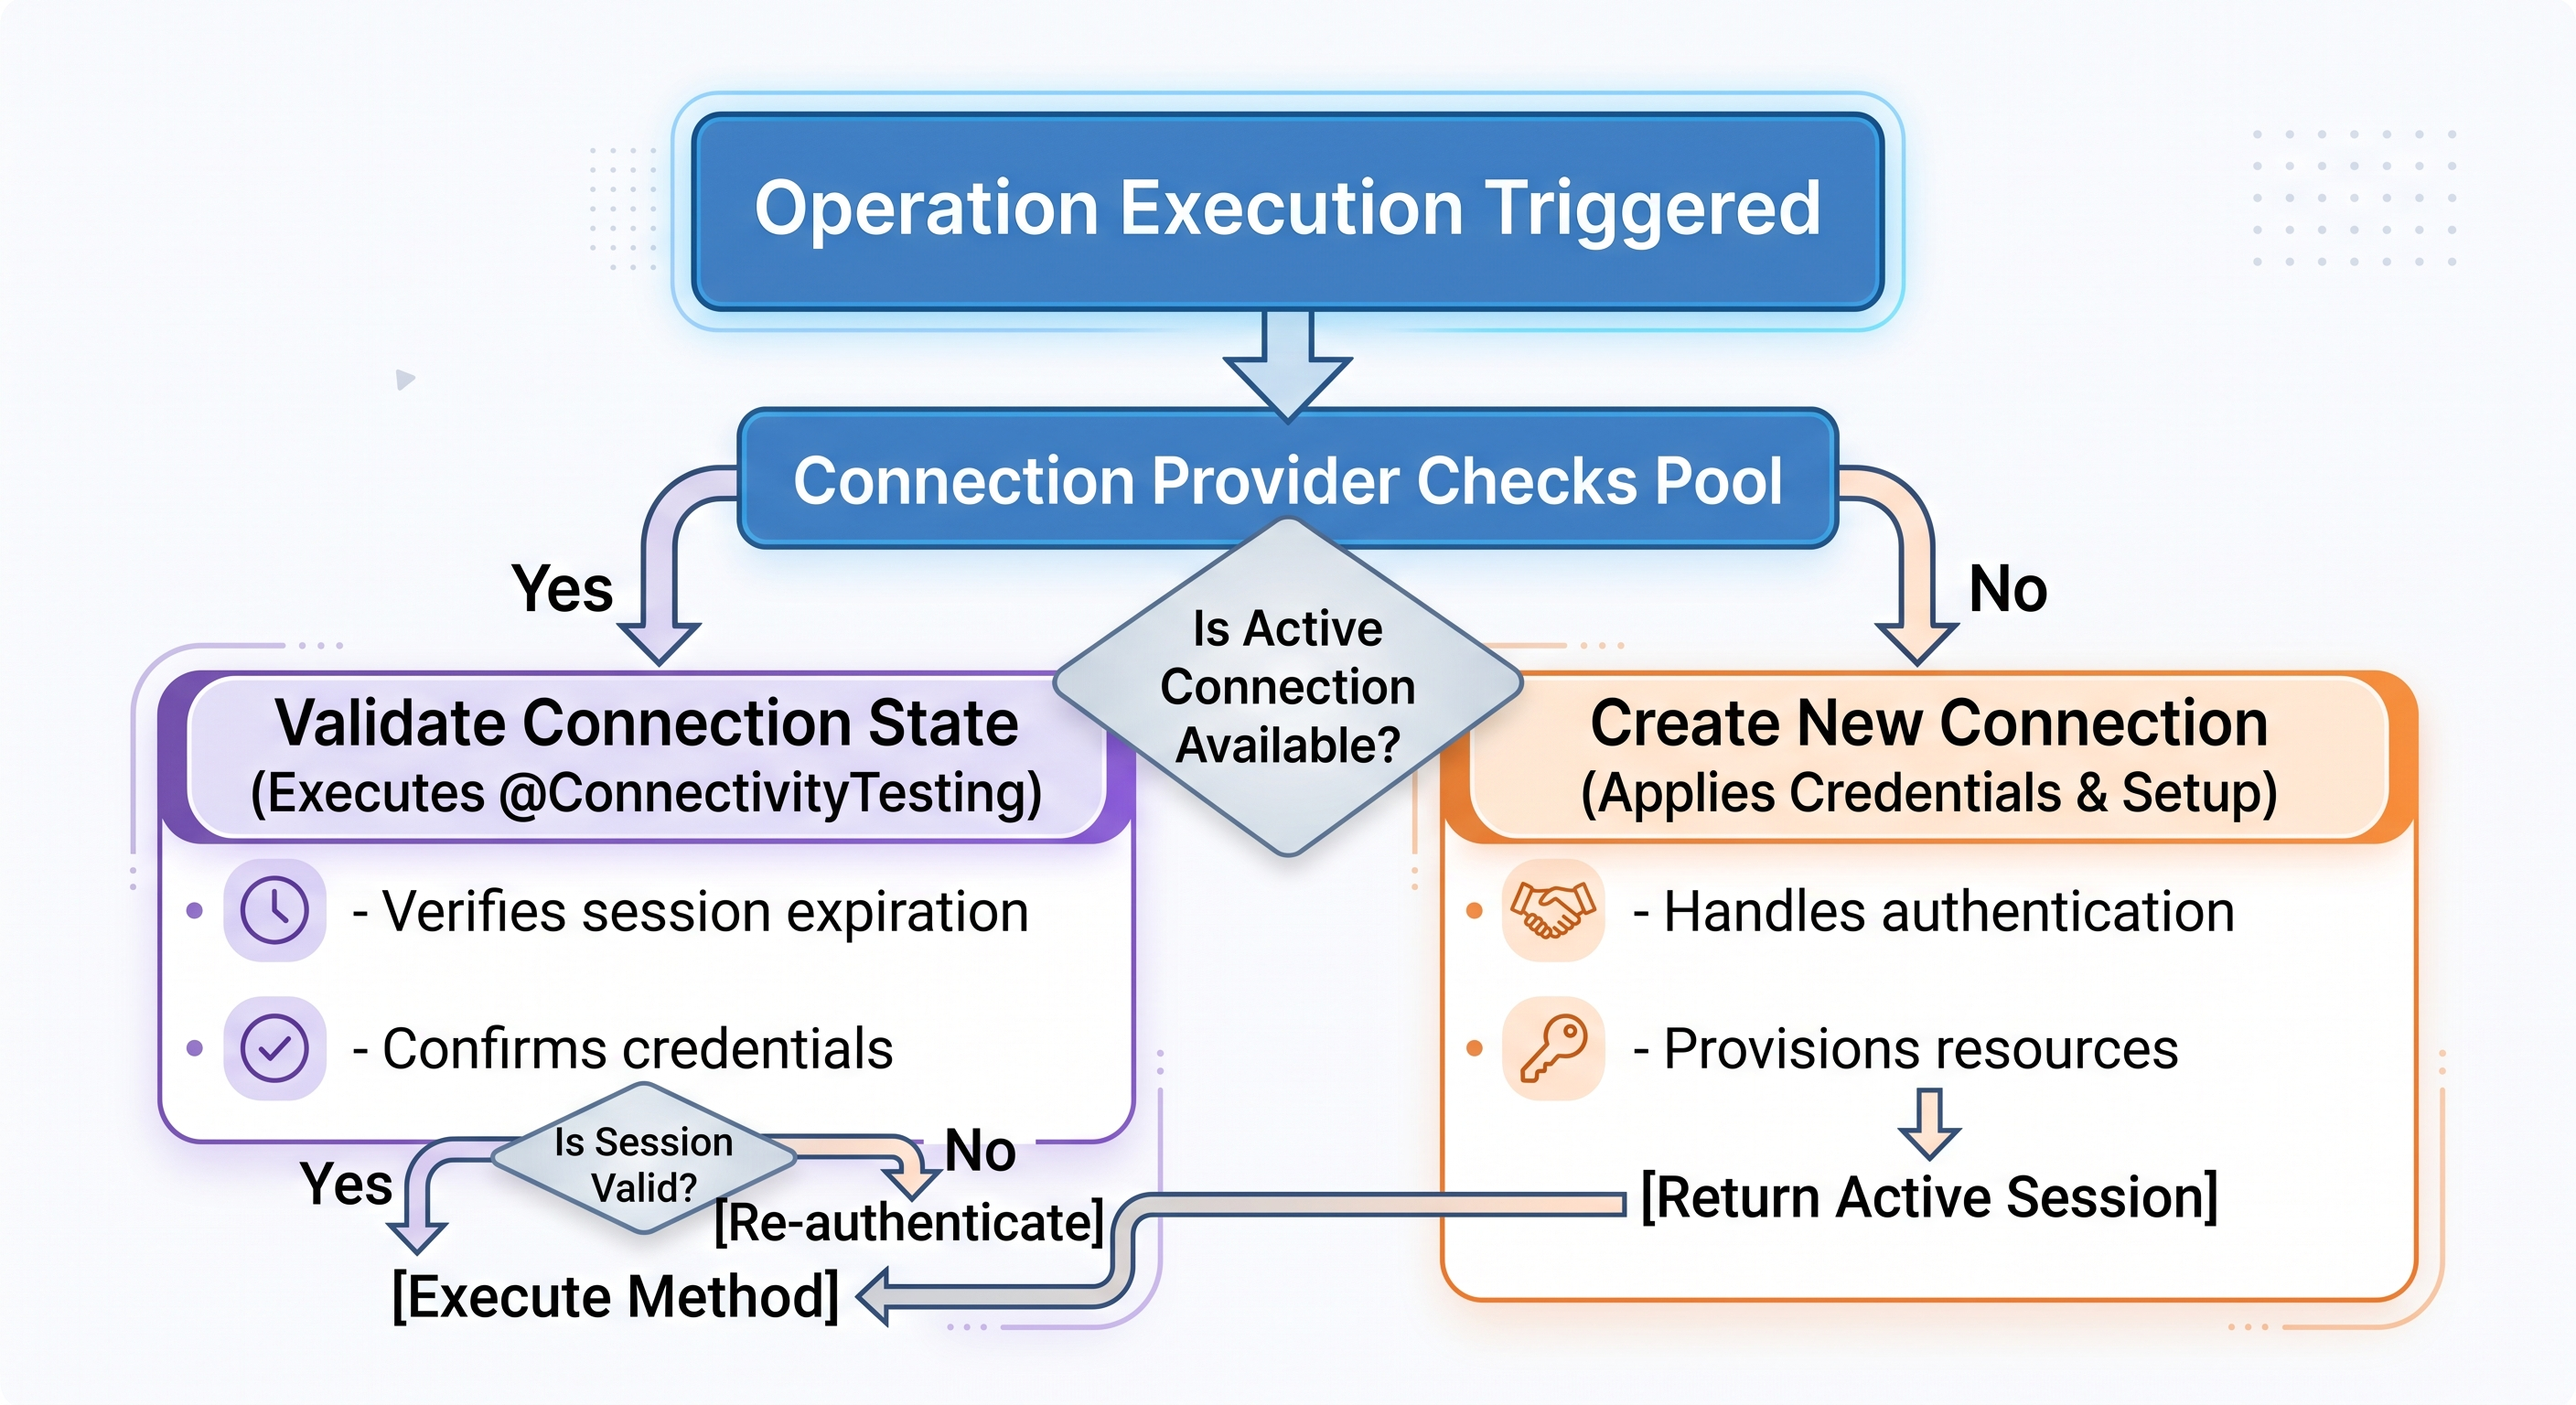
Connection Provider is a class that serves to create the Connection objects, as well as to keep track of them, and is marked with the Connection Provider annotation to identify which fields need to be provided for authorization.
Provider performs some core lifecycle obligations:
Parameter Declaration: Specifies entity parameter symbols and provides the information on endpoints and security keys. It also includes input data which is in the form of password information. Input fields having sensitive data are categorized as password display parameters.
Session Initialization: Implements connection functions that are responsible for gathering parameter information from the user, creating the Connection object and performing a basic set of authenticating actions.
Connection Validity: Implies the application of the logic that is executed by the Mule code periodically or before executing operations. This ensures the proper identification of non-actual, expired or interrupted sessions before any data processing.
Disconnection Cleaning: Describes how all resources are released after the termination of the application when it closes network channels, destroys security tokens and frees memory.
Step 2: Configuring Global Settings
The second step of the process is to configure global settings. Once connection management has been defined, the Configuration class is created. This class serves as a logical link between the connection providers and operations.
The Configuration class is annotated with the Configuration annotation. It is used to define the configuration parameters that are shared by all instances of the connector. For instance, if there are several methods of authentication (Basic, OAuth2, Static API keys), the Configuration class defines them as available connection providers.
Furthermore, you can also create global operational defaults, such as maximum retries allowed, response time limits, etc.
Step 3: Execution of Business Logic and Operations
Operations form the main functional aspect of the connector. When a developer selects your connector from the Anypoint Studio palette, they are encoding an operation.
The operations are defined through creating the Operations class, which consists of public Java methods with appropriate SDK annotations.
Major Factors of Operation Design
Parameters Exposure: Arguments of the method are input fields that flow developers utilize. Through parameters' annotation, the custom display name, explanation, default values, and obligatory input conditions may be stated.
Connection Injection: The Connection object, which is used in the method of the operation, is being injected with a validated Connection object, managed by the Connection Provider.
Media Type Definition: The Annotation provides an option to define media types for outputs such as JSON, XML, or text. The processing of media types specification helps in proper handling of data streams in the Mule runtime environment.
Execution Logic: Inside the method, standard Java logic processes input values, makes calls on Connection objects, and processes the answer of the target system.
Step 4: Filling of Central Extension
In the fourth and final stage of code construction is to declare the Extension class. It connects the various components that were built in the prior stages as one entity.
As the class includes the Extension annotation, the class defines:
Title and Metadata: States the human-comprehensible title to be used in Anypoint Studio and Anypoint Exchange together with information about the vendor and the description.
XML Namespace prefix: Specifies a prefix used in the XML file when the connector configuration is done in Mule application XML files.
Component Registration: The Configuration classes, the Connection Provider classes, and the Operations classes are declared in such a way as to ensure that they are compiled into a single catalogue by the SDK engine.
4. Validation and Local Integration Testing
Before implementing a custom connector into the corporate infrastructure, it is necessary to validate its functional characteristics, parameter revealing, error management, and execution locally.
1. Build and install a file to Local Repository:
Use Maven’s clean installation and building command on the project directory of the custom connector. The build process will compile Java code, run unit tests, build plugin information and build fat JAR and install in the local Maven repository of your system.
2. Configuration for dependencies of test project:
Create a test project in Anypoint Studio. Edit the configuration file of that project and add a dependency which refers to the installed custom connector. Ensure the values of Group ID, Artifact ID, Version are configured and classifiers are defined as “Mule plugin”.
3. Create Test flows and check the Integration of Palettes:
Check if your personal connector appears on the Anypoint Studio palette automatically. Drag the operations onto the design canvas, define the universal connection information by using the test endpoints, pass the required parameters and execute the application in debugging mode.
4. Execute the operation and monitor it:
Send requests from the applications. Verify if the parameters correctly get passed into your Java method, if the network connection is established and confirmed, if the output payload correctly gets sent to the DataWeave solution and if there is enough reaction to errors.
5. The Deployment, Governance, and Distribution of the Enterprise
When local testing verifies your stability findings, install the custom connector on an appropriate central site. The hands-on experience gained through the deployment of an enterprise prepares students for their MuleSoft certification training.
Publishing in Anypoint Exchange
Anypoint Exchange provides a centralized platform for assets utilized by MuleSoft environments. Publishing custom connectors to the private exchange area of the organization enables instant access to them for the authorized users.
Update Project Metadata: Ensure that your project configuration file has the correct Anypoint Platform Organization ID in the Group ID field.
Credentials settings: Create Maven user configuration files Create credentials/tokens for Anypoint Platform to publish your asset.
Connector plugin deployment: Your application can be run from the command line in the context of your project environment. The Maven plugin can deploy the compiled jar, documentation and metadata of your connector to your own Anypoint Exchange.
6. Connector SDK design and governance principles – advanced
Creating an SDK-based connector may seem rather easy, but you have to utilize advanced principles of design to make it production and enterprise-ready.
1. Exceptionality Management
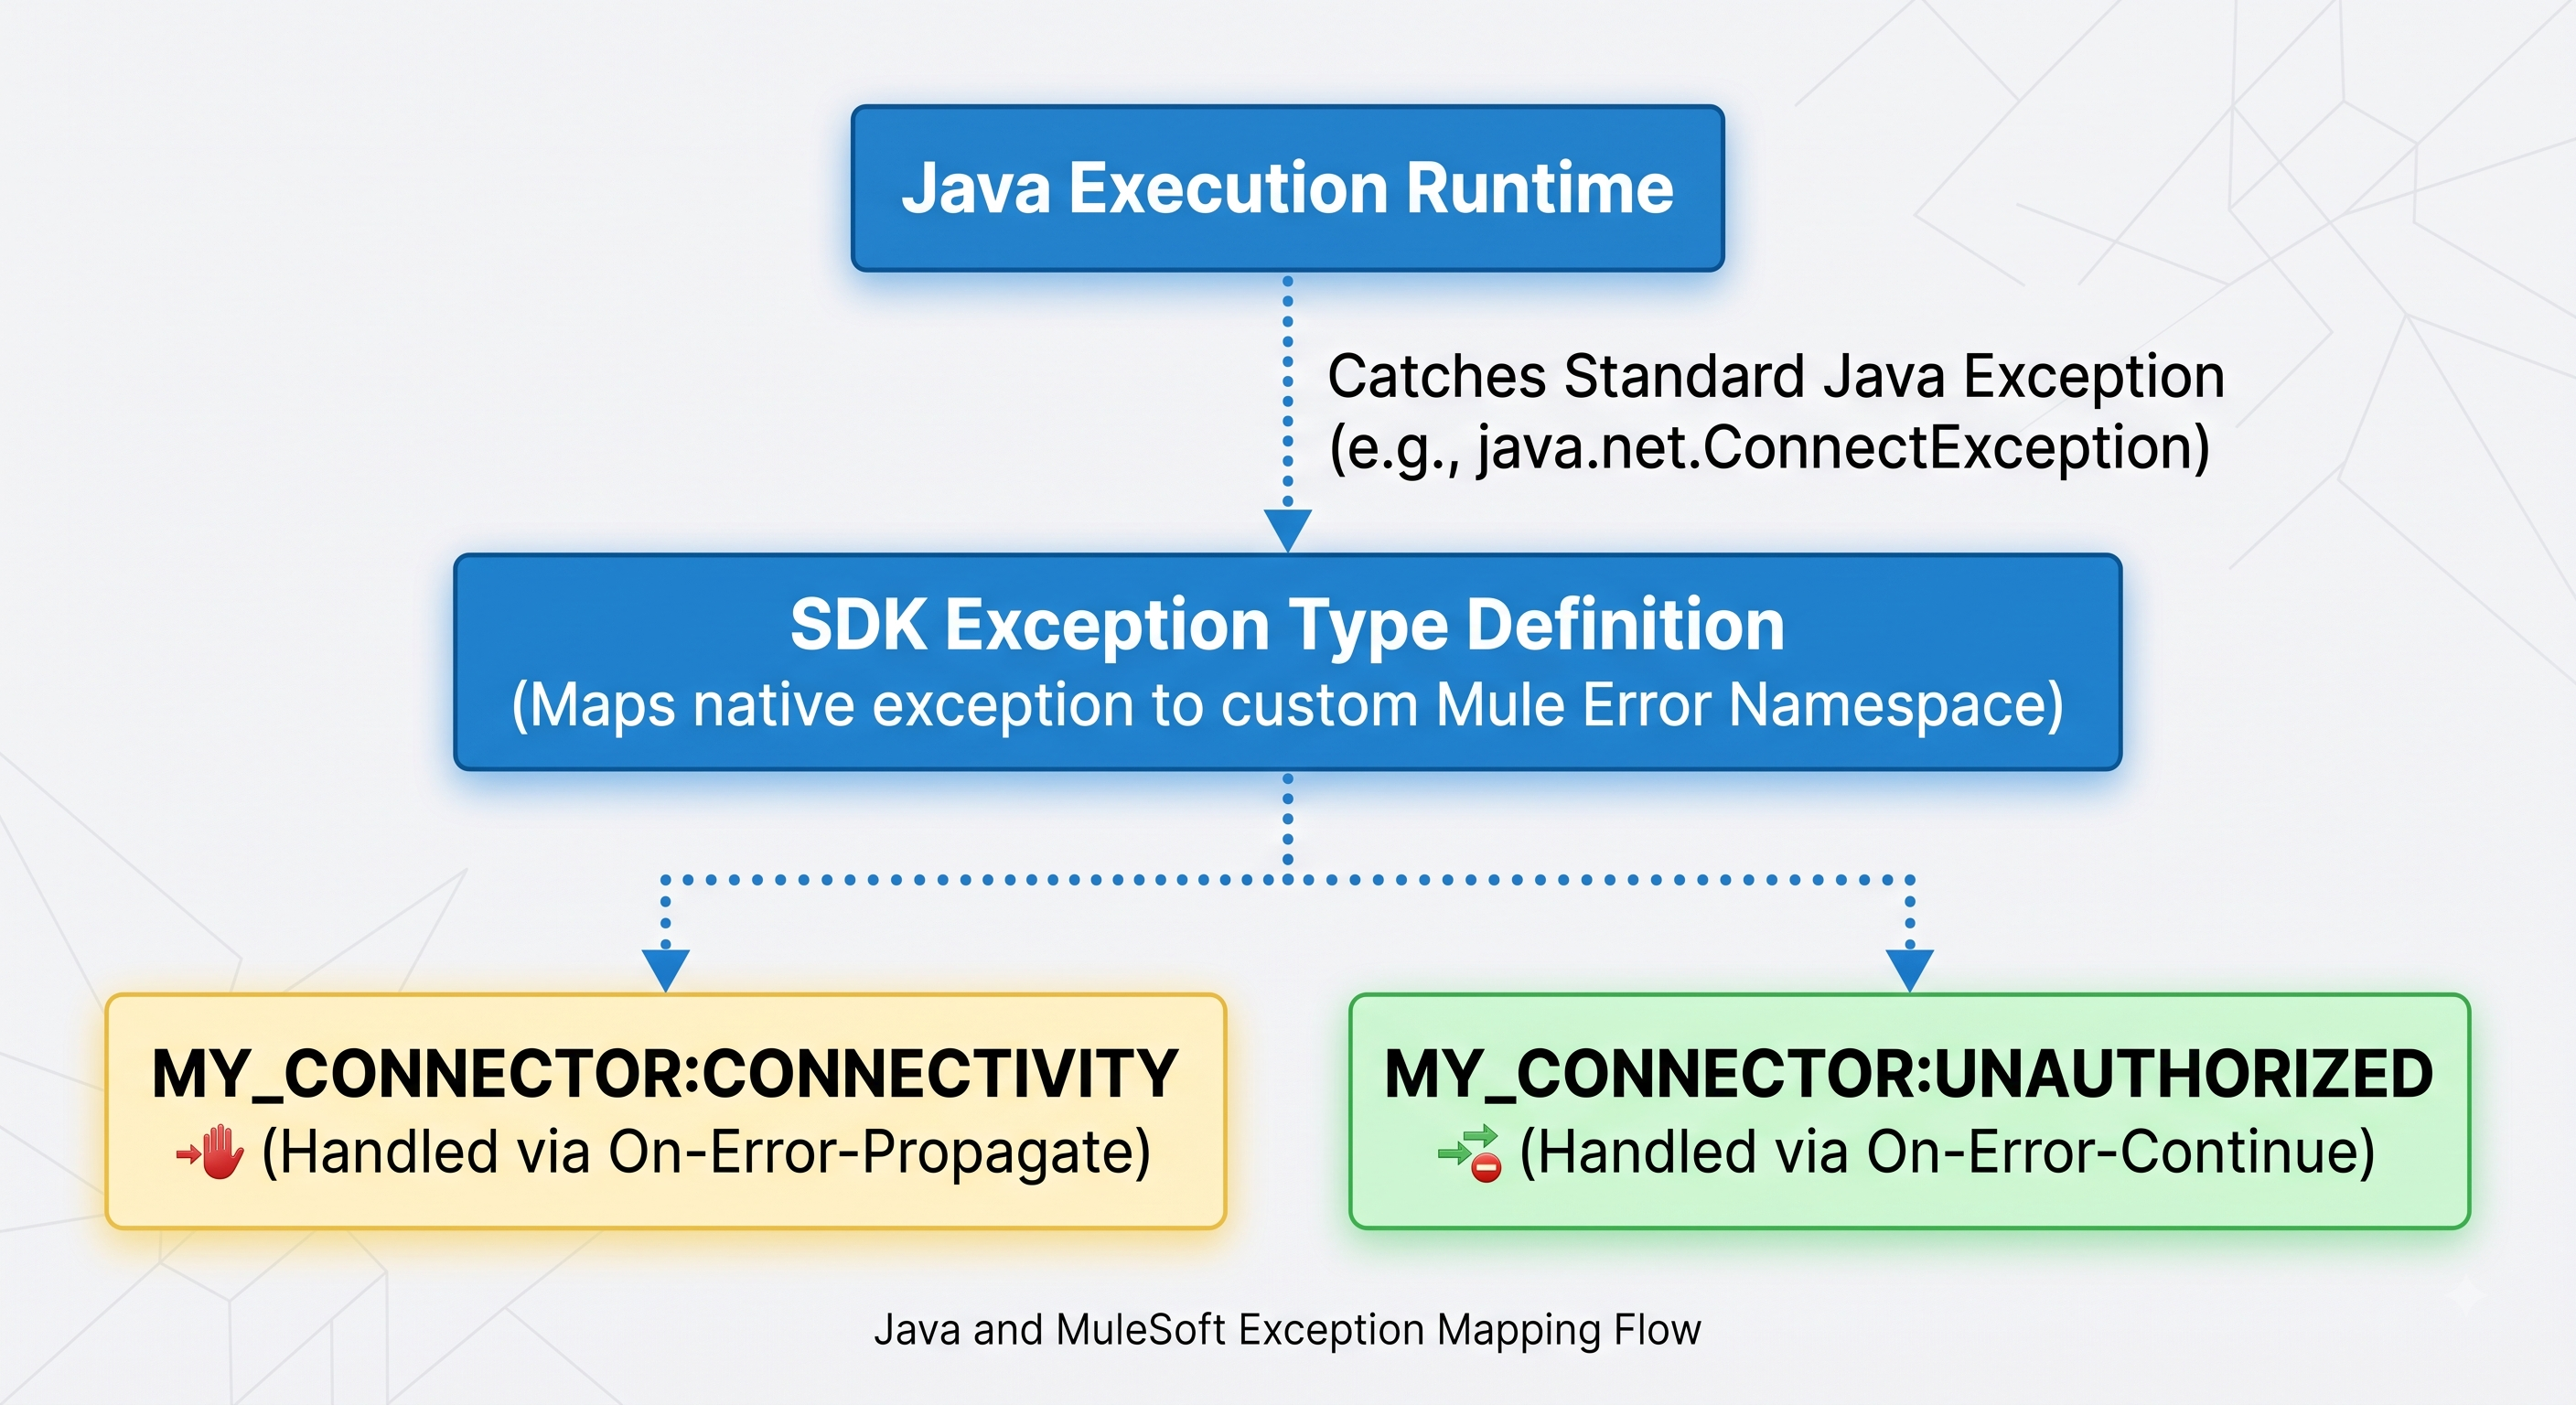
The default Java exceptions shouldn't come into the Mule application flow. Whenever the external APIs would fail, there are timeouts, or invalid credentials provided, the custom connectors would catch it and generate the proper type of exception.
Mule SDK enables a developer to create different types of exceptions based on their respective namespace. By annotating the operations with the different custom exception types, the developers of the implementation would catch specific exceptions like connection failure, resource search failure, and authentication failure with the help of standard components like Mule On-Error-Continue and On-Error-Propagate.
2. Security and Data Protection Safeguards
Compliance in the area of security is crucial while dealing with sensitive enterprise information.
Credential Masking: It is essential to always add well-defined annotations to sensitive parameters e.g. customer secrets, API tokens, passwords and private keys to prevent the secret data from being displayed in plain text inside Studio UI forms, XML configurations and execution logs generated by the system.
Secure Token Handling: It is necessary to store state authorization and session tokens safely in memory. Also, automated checks for the token refresh need to be carried out by means of the Connection Providers so that long-running integrations are not to be stopped because of expired session tokens.
3. Asynchronous / High-Performance Execution
For connectors that process huge amounts of parallel transactions, synchronous execution is a cause of memory pressure and thread pool starvation in the Mule runtime server.
The Mule SDK includes support for asynchronous processing models. Operations can either return completion futures or use asynchronous callback structures, letting the runtime engine release processing threads while waiting for long-running external I/O tasks to complete. This is a non-blocking approach, which dramatically improves general throughput and efficiency of resources.
4. Dynamic Data / Schema Resolution
In enterprise environments, such target platforms may include custom user fields or dynamically modified data structures. Conventional static Java return types are unable to account for these types of customized schemas.
The Mule SDK offers advanced metadata resolution interfaces. By implementing dynamic metadata resolvers, the connector may ask the target system at design-time in Anypoint Studio to find out the current dynamic schema and show precise field definitions to developers. This allows DataWeave drag-and-drop mappers to instantly show real-time field structures that greatly reduces interface development time.
Mastering Metadata: Static or Dynamic DataSense
DataSense is one of the most crucial features of the MuleSoft platform, which allows DataWeave to analyze both the input and output payload structures during the design stage. After the developer links a custom connector to a component of Transform Message, DataSense fills the visual mapping tree with valid fields, data types, and hierarchical structures.
The developer of a custom connector would have to apply two different approaches to metadata discovery: static and dynamic.
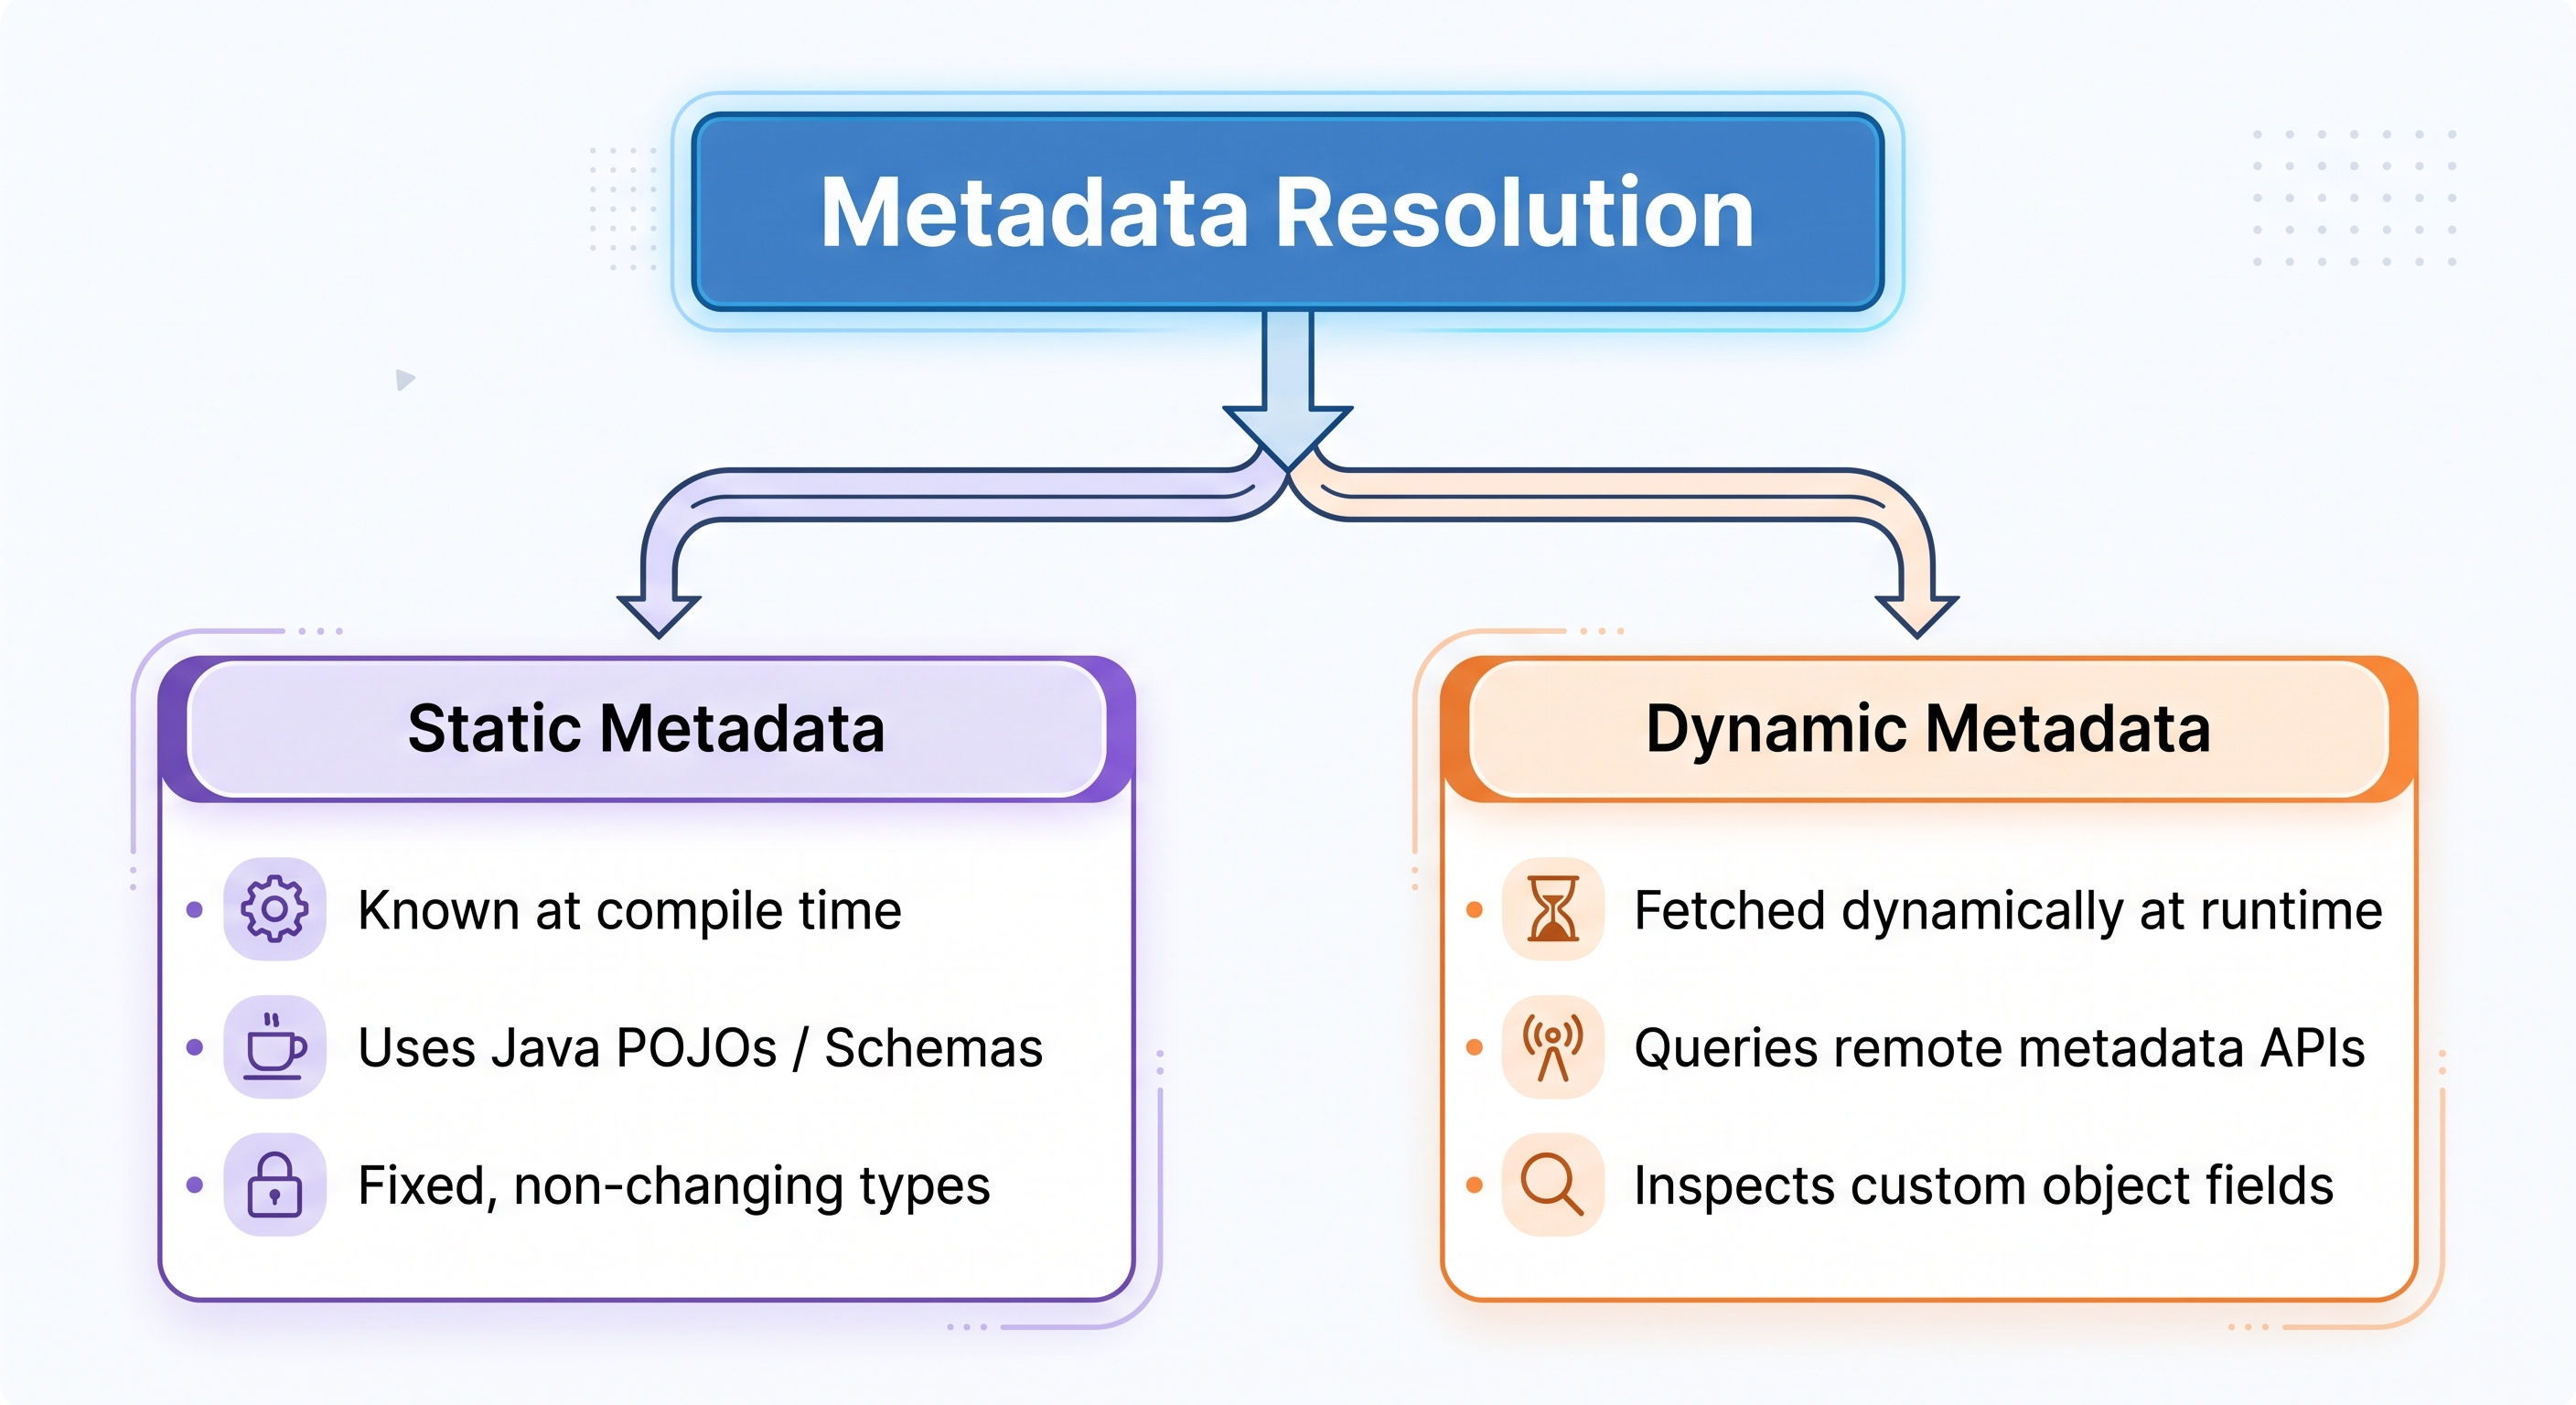
Static Metadata Resolution
Static metadata applies when output structures are determined at runtime. It is appropriate for static REST APIs, standard JSON messages, or native Java Plain Old Java Objects (POJOs) announced in your connector model.
Java Type Introspection: When a method returns a typed Java-class (for example, public CustomerRecord getCustomer()), the Mule SDK automatically carries out the introspection of getter methods and fields in the CustomerRecord class. Therefore, the Anypoint Studio displays all properties (strings, integers, nested objects) straight in the DataWeave palette without needing any additional code.
Static Schema Files: If your connector works with static XML or JSON schemas, you can pass the .xsd or .json schemas to your project resources folder. Thus, the annotations within the action inform the DataSense that these files should be loaded to be the structure of the received information.
Dynamic Metadata Resolution
Dynamic metadata is utilized in situations when the target platform permits end-users to create external entities, custom attributes, or dynamic database schemas (like Salesforce custom objects, SAP IDocs, and dynamic SQL queries).
To enable the dynamic DataSense, the Mule SDK features the following specific resolver interfaces:
Category Resolver: It makes logical groups of the metadata keys (for instance, “Tables,” “Custom Objects,” and “Events”).
Type Keys Resolver: It operates on the target platform during the design time, requests the number of available entities (for example, retrieves all database table names), and provides a dropdown list in Anypoint Studio UI.
Type Resolver (InputTypeResolver & OutputTypeResolver): When a user picks up the entity from a dropdown list, the Type Resolver makes a network call through the current connection and retrieves a certain schema for that entity. It creates a MetadataType object (information about the fields, data types, nullability, and primary keys), which is immediately moved to Anypoint Studio.
The adoption of the dynamic metadata resolvers changes the generic API wrapper to a context-aware enterprise connector resulting in dramatic decreases in mapping errors for developers.
Below are the best practices when creating custom connectors
For a successful adoption and future use, it is advisable to compare your custom connector with the following production readiness principles:
Operational Usability
It is important to assure that all parameters, operations, and settings known to the user have a readable name and go with a tooltip that helps in visual design in Anypoint Studio.
Make XML tag prefixes short, clear and unique so that no namespace conflicts happen.
It is wise to provide default values for optional fields like timeouts, retry limits, and batch sizes.
Code Quality and Maintainability
It is good practice to organize connection logics, API request formatting, and response parsing in separate helper classes instead of creating a huge operation providing all tools in one implementation.
Be sure to have unit tests and integration tests that are carried out before publishing.
Platform Compliance
Ensure the project POM is constructed only on the commonly supported versions of the Mule SDK compile dependencies.
All active connections, background polling threads, and open sockets should be properly closed in the disconnect life cycle methods to help prevent memory leaks during application redeployments.
Thus by the adoption of the Mule SDK for packaging complex system-specific integration patterns into custom connectors, the organization can simplify software development process, implement strict policies regarding the information security, streamline mechanisms for error handling, and ensure extensive reuse of software within the enterprise.