
Mastering Catalog Builder: A ServiceNow Admin Course Guide
Last updated on Jul 31, 2026

In modern service management practices like IT Service Management (ITSM) and Enterprise Service Management (ESM), the Service Catalog serves as the foremost online click-and-buy site for any organization. It allows the employees to use a single point-multipurpose self-service portal that can be used for the procurement of anything from equipment replacement or database access to complicated synchronous off-boarding processes among several departments. The intake process of requests is made less tedious with the help of the service catalog which makes sure that the requests ultimately reach the right destination.
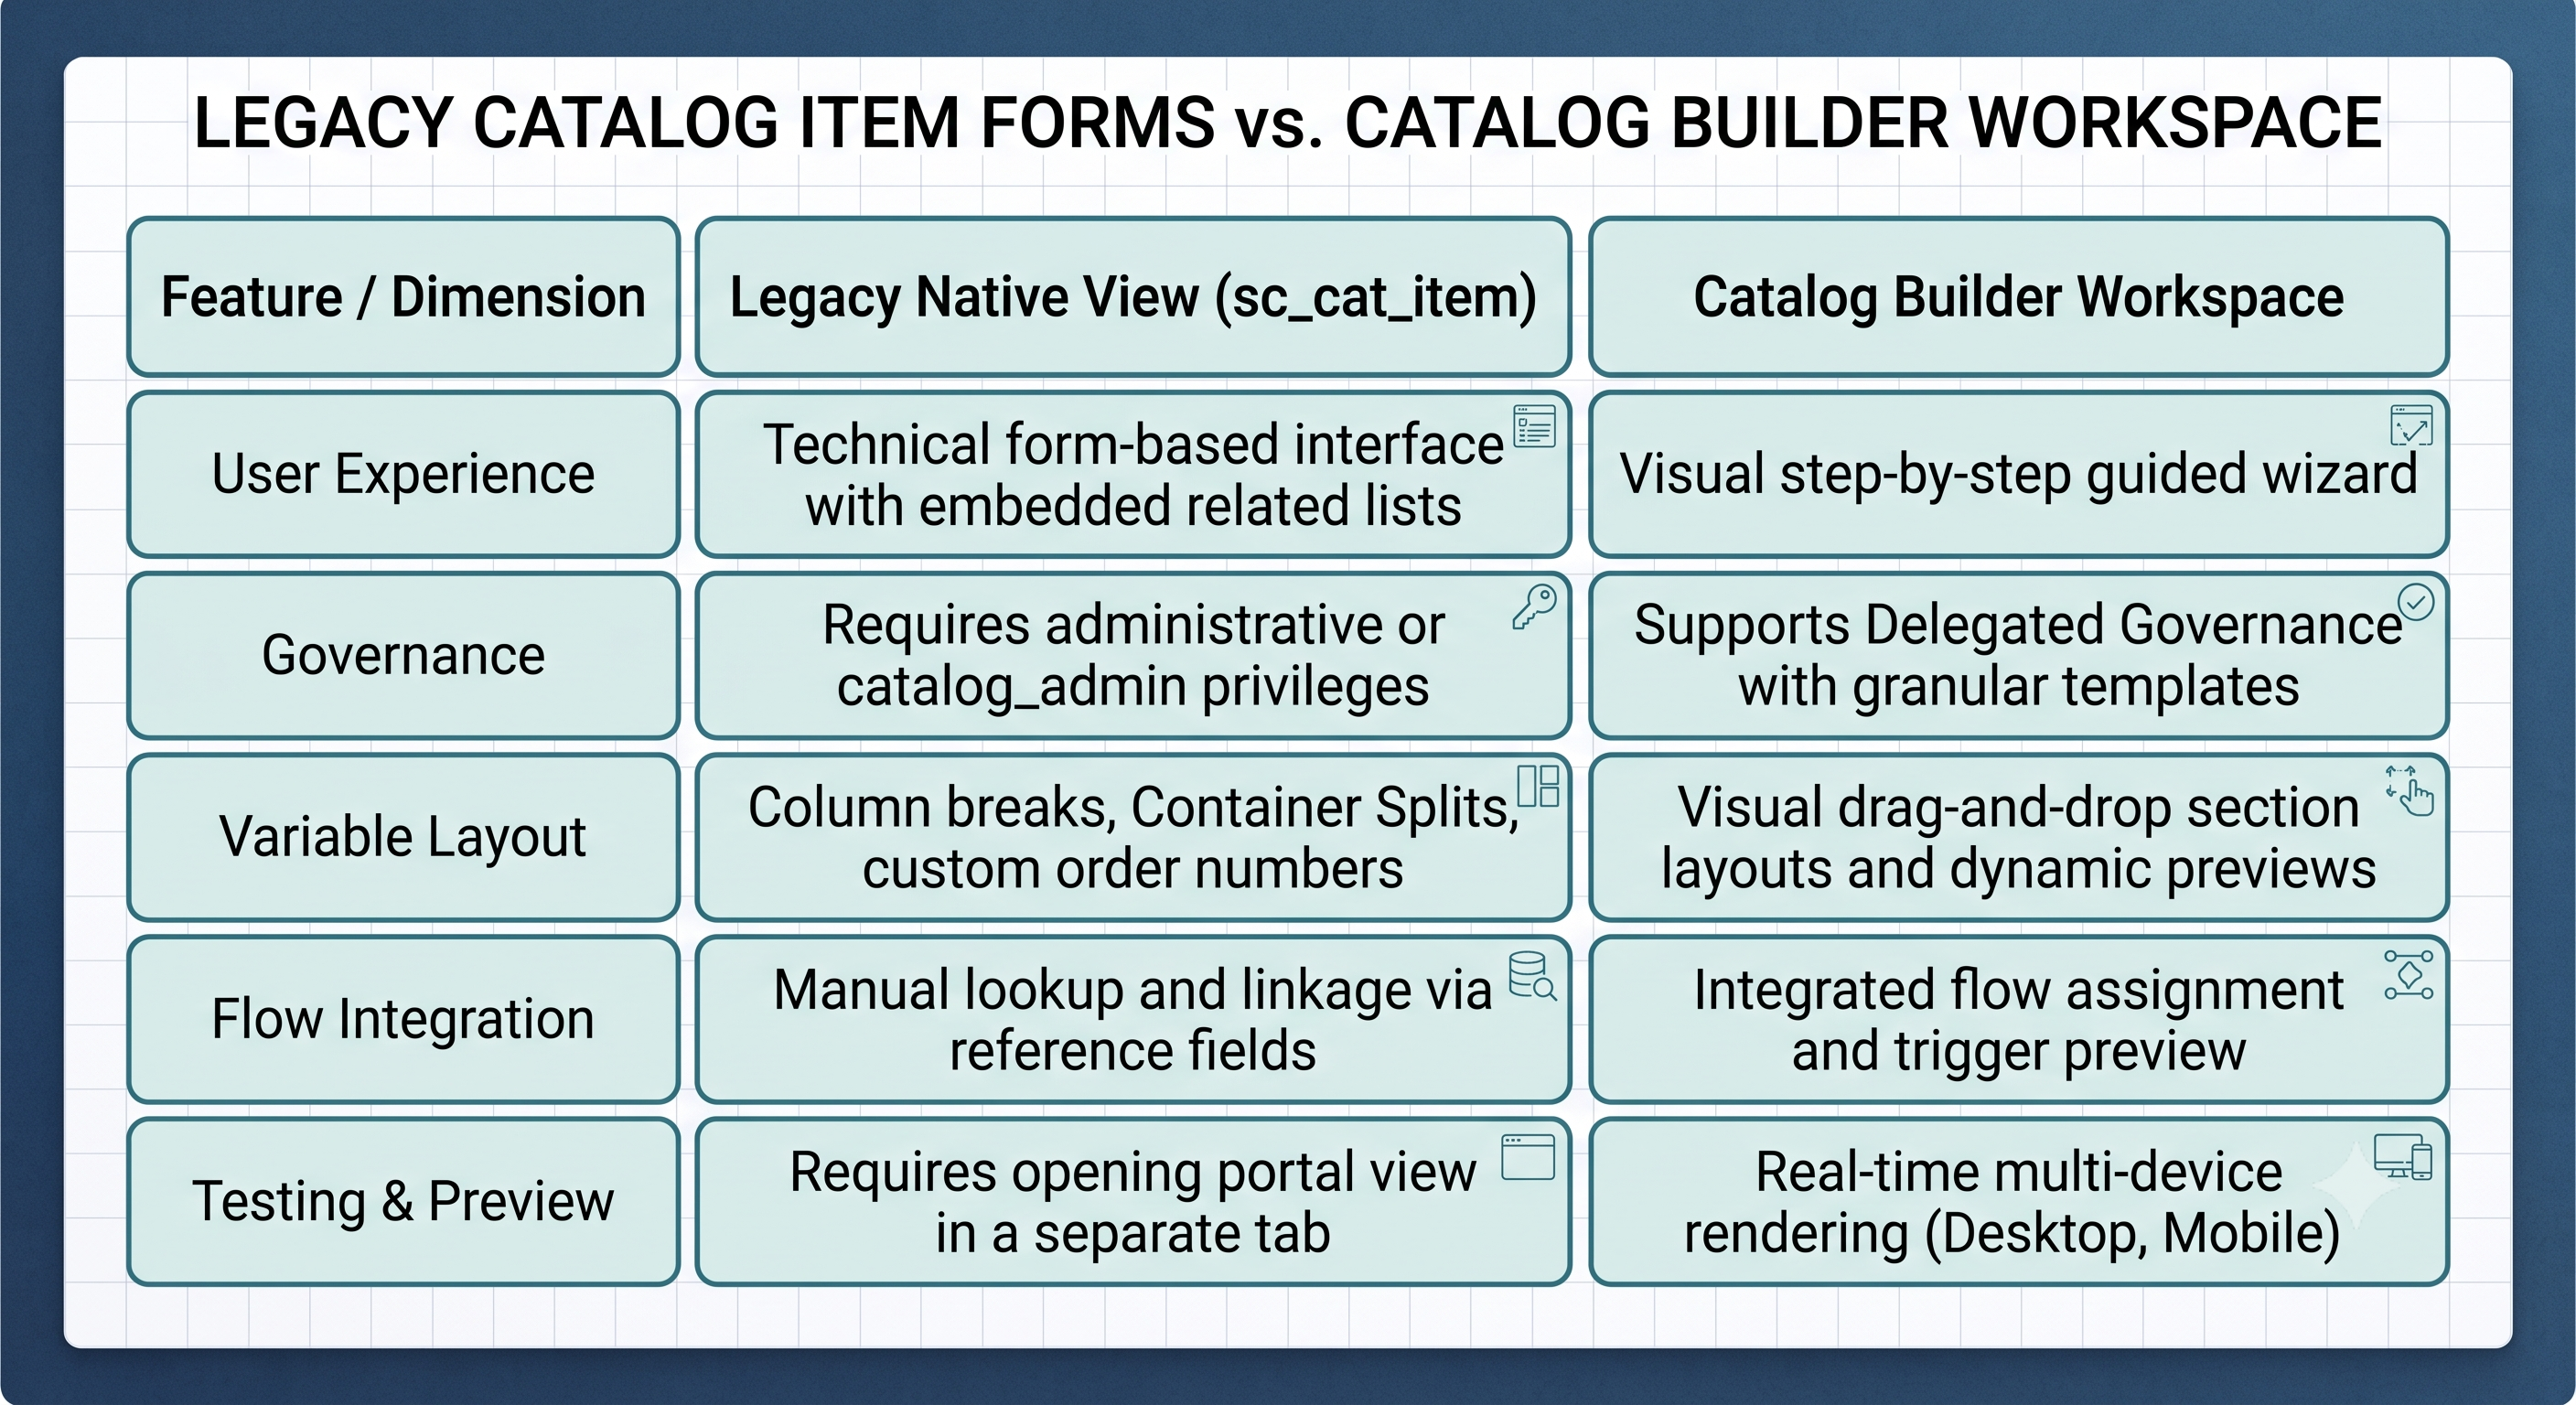
The task of creating and managing catalogs was laborious in the past. Since the people performing this role had to deal with numerous old-style forms, write custom scripts for the client and arrange complex back-end processes all over different tables simultaneously, the work involved a lot more time and effort than actual work.
With the introduction of Catalog Builder, this situation radically changes. It allows the employees creating the catalog to have a big picture plan of how the process of creating a catalog from A to Z should look like. It permits the person carrying out the process of catalog creation to use already.
In this guideline, a practical and easy way to make a Service Catalog Item ready for production with Catalog Builder is explained. In addition, one will learn the basic principles of creating order forms, using reusable and modular variables/sets, dynamic form rules, and automated order processing using the Flow Designer.
Master ServiceNow Administration through Practical Training
Want to create custom catalog items, configure Flow Designer workflows, and learn about platform governance? Join a structured serviceNow admin course to quickly get practical experience. You can choose a ServiceNow Administration course that is specifically aimed at people who wish to gain knowledge for the certification or the ServiceNow Administration course modules that will help them learn various aspects of the system.
What you will find in Core Section:
1. Form Structure: Learning how to perform navigation through the Request Data Hierarchy (REQ -> RITM -> SCTASK) and get essential info.
2. . Variables / Variable Sets: Understanding how to calculate clear questions and insert re-useable field sets (e.g. shipping details) within catalog items.
3. Dynamic Logic: Understanding how to control the display of fields, enforce mandatory inputs and validation of user input using Catalog UI policies and Client Scripts.
4. Automated Fulfillment: How to send forms to Flow Designer and have automatic approval by managers, assign tasks to specialists, and notify users when the task has been done.
Catalog Structure and Basic Concepts of Catalog Builder
Before creating any catalog items, understand how ServiceNow tracks information about the service request.
The Structure of Request Data (REQ vs. RITM vs. SCTASK)
When orders arrive via the Service Portal or Now Mobile, a three-level
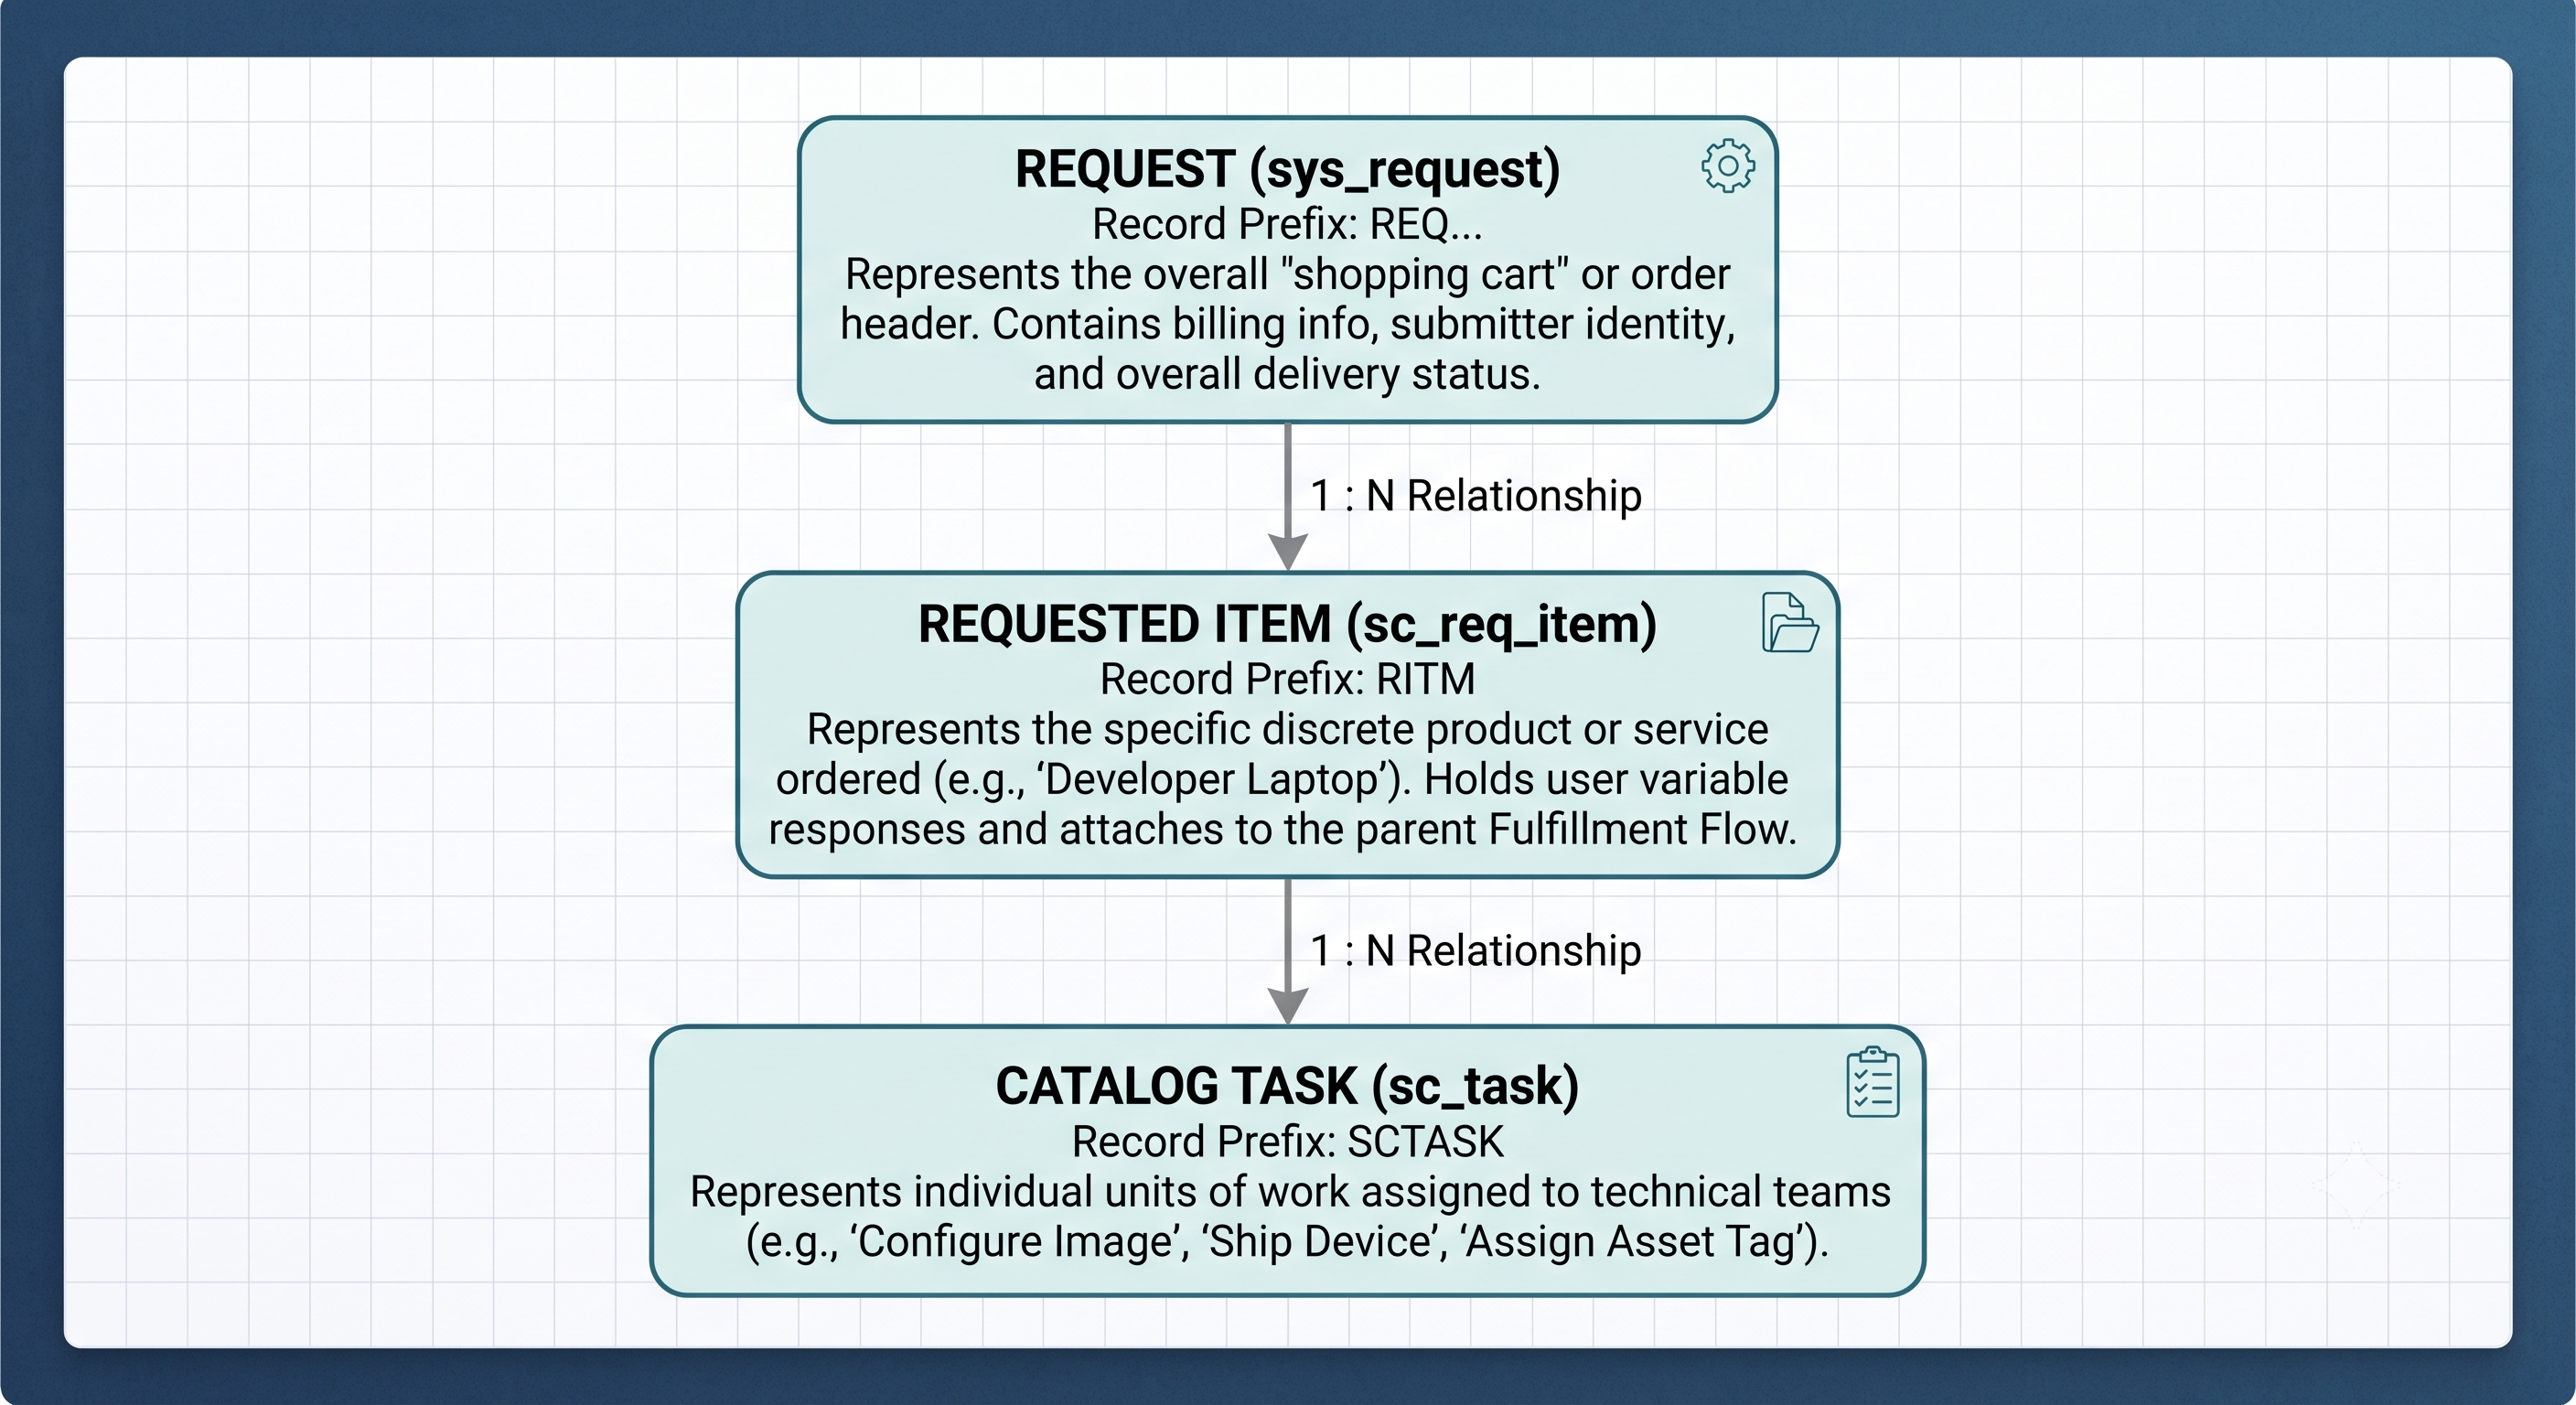
Req (sys_request): Refers to the top-level parent entity (record) for the shopping cart checkout. A single req may contain more than one item.
Requested Item (sc_req_item): Refers to the individual catalog item that the user acquired through the order. The variables that are defined on the catalog item are accounted for on the req_item record.
Catalog Task (sc_task): Refers to the specific operational tasks that are generated through the fulfillment flow.
Planning and Designing a Catalog Item
Directly jumping into building without proper planning results in making disorganized user forms, ineffective data collection and unsuccessful fulfilment processes. It is wise to observe this design approach prior to starting making an item:
Checklist before Building
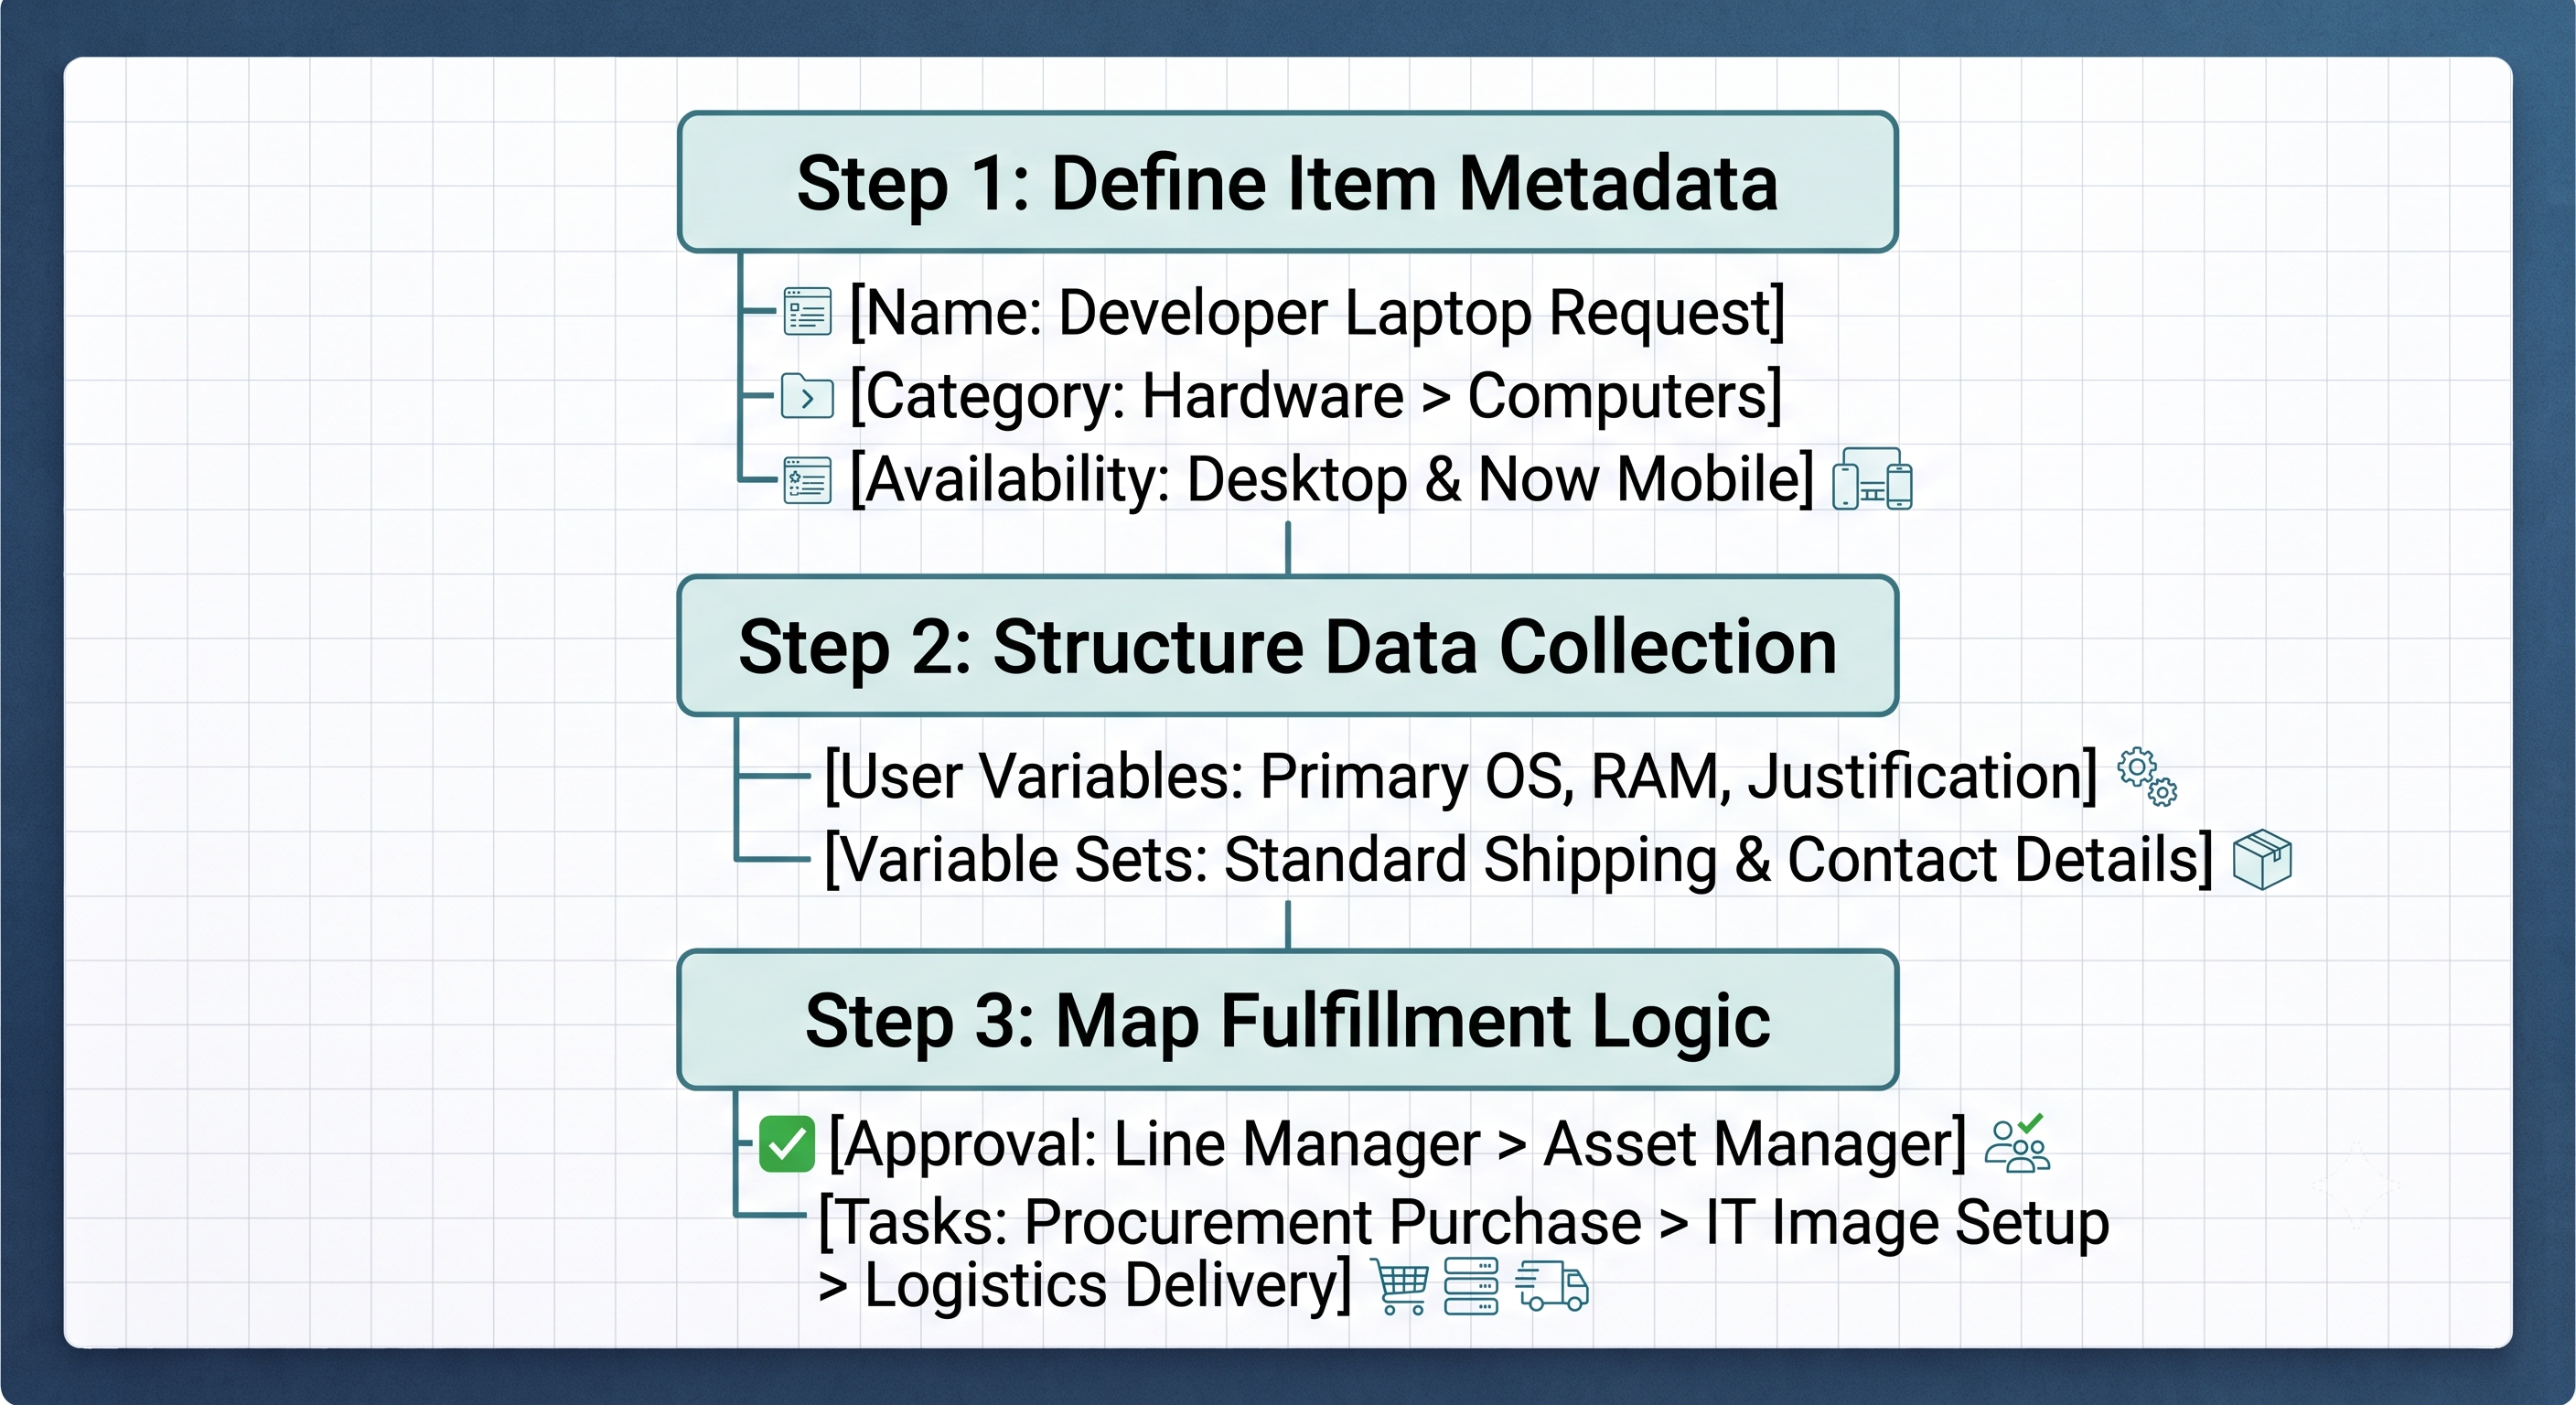
Name of the item and its description: Is the title easy-to-understand and searchable?
Cataloging and Categorization: Where will this item belong in the portal structure?
Target Audience (User Qualification): Who is eligible to request this item? Who can’t do it?
Input and Parameters: What information do I need to provide? Which parameters are auto-populating?
Execution Architecture: Does this item need manager or financial approvals? How many operational tasks will be needed?
Instructional Manual for the Creation of the Catalog Item
In order to show all possibilities of Catalog Builder, we will implement a catalog item “Developer Laptop Request”.
Step 1: open Catalog Builder
Go to Service Catalog > Catalog Builder or open it through Application Shell.
Click Add New Item.
Pick a Template (e.g., Standard Hardware Template) or opt for Starting from Scratch.
Step 2: Identify the base information and the location
Tabs: Related Information and Place: Base information set up
Title: Request for a development laptop
Description (short): Acquisition of a powerful computer for programming.
Description (long): Describe in detail the standard specifications, qualifications, and delivery SLA time.
Catalog Service: Catalog
Type: Hardware -> Laptop
Owner: Who is the owner of the life cycle of the catalog item
Catalog Service: Catalog
Kind: Hardware > Laptop
Owner: Specify the person who owns the lifecycle of the catalog item.
Icon & Image: Provide a clear, good-resolution thumb image for the Service Portal grid view.
Step 3: Formulating Queries (Variables)
Queries in Catalog Builder correspond with platform Variables (item_option_new). The choice of a variable type allows for achieving data cleansing and removing wrong inputs from users.
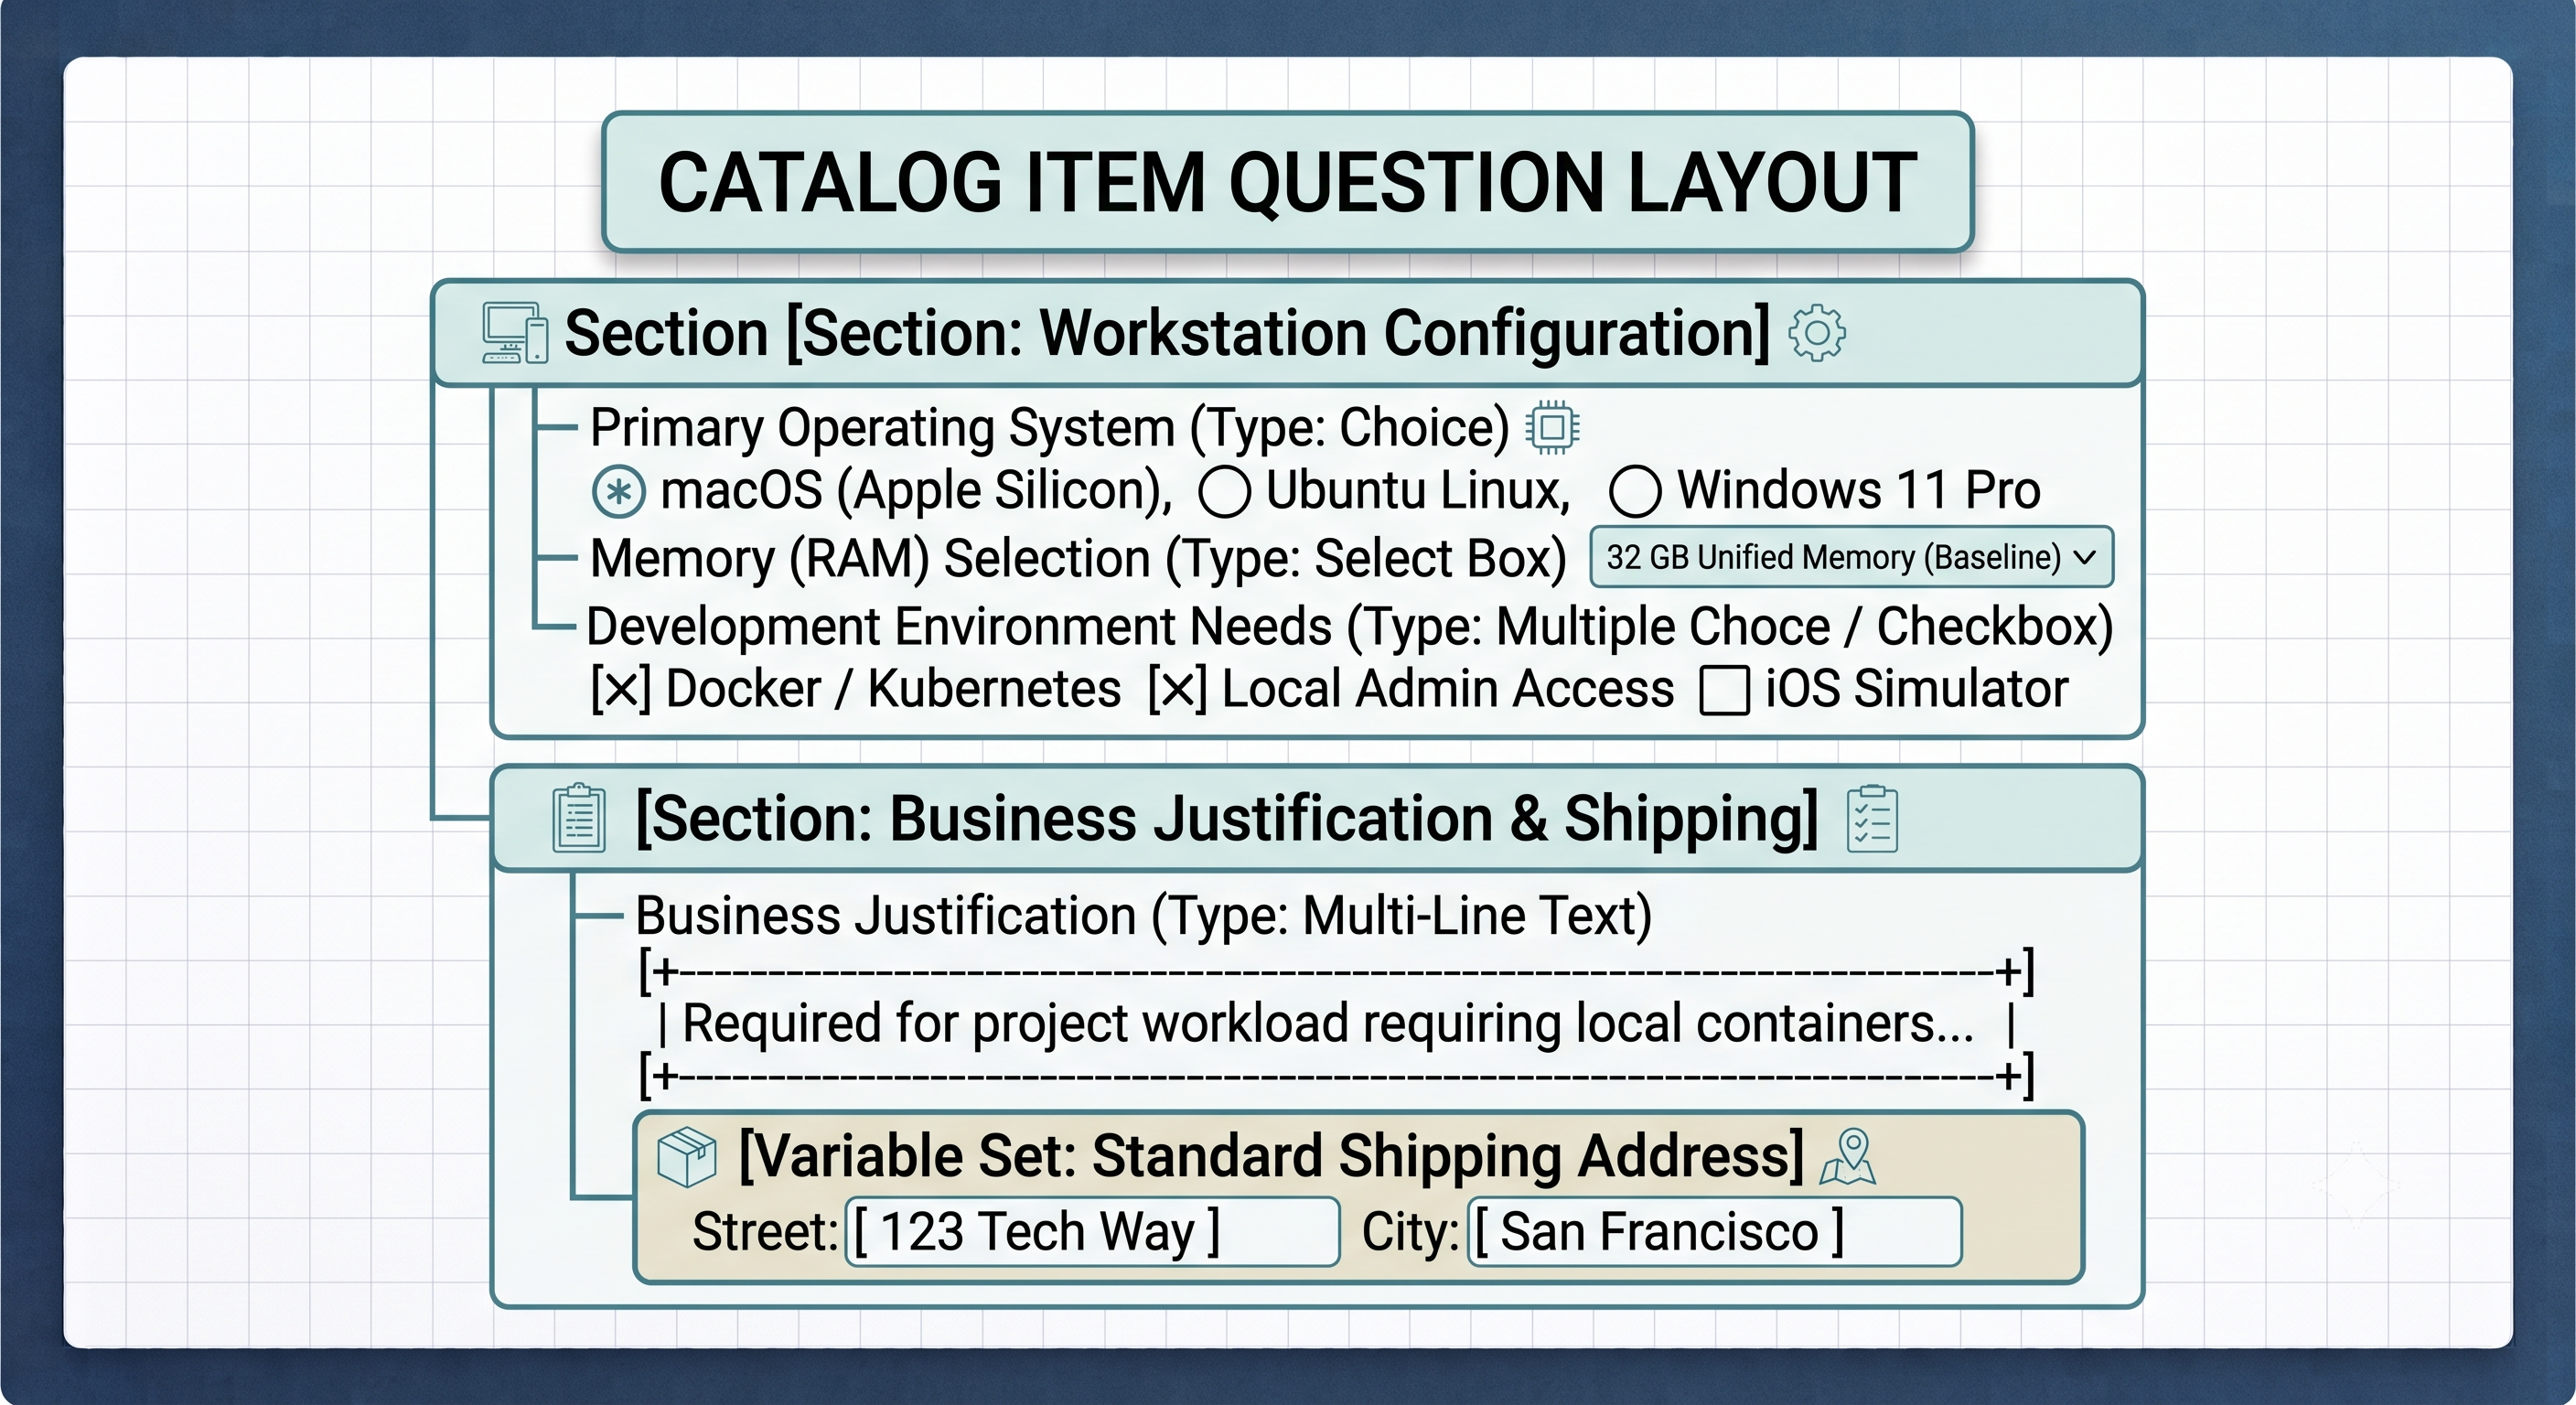
ServiceNow offers a range of variable types to ensure proper data collection in Service Catalog. As far as querying existing enterprise data is concerned, the use of the Reference variable type will make things easier, as one will be able to query tables directly and get all required information like cmn_cost_center and sys_user. If you don't need anything complicated, the Select Box / Choice variable type gives a chance to select an option from a fixed number of choices such as choosing your operating system. The Lookup Select Box variable works dynamically with existing tables to provide current data based on queries asked, for example listing available software licenses for a particular department.
For free-form input and scheduling tasks, the Multi-Line Text variable is a good option to implement, because it allows considerable storage space for complete business explanation or complex needs. In situations when timing matters Date / Date-Time variable is very important to be able to set definite time limits for example in terms of delivery date or provisional access cancellation. Elements like Container Start / End do not perform any operations with information but they just allow merging the questions into workable sections.
The procedure of adding questions:
1. Within the Questions tab, press New Question.
2. Chosen type of question: Multiple choice.
3. Question's label: Main operating system.
4. Name: primary_opening_system (this name is set automatically).
5. It is mandatory: Set the toggle button to True.
6. Multiple options:
Label: macOS (Apple silicon) | Value: macos
Label: Windows 11 professional enterprise | Value: windows
Label: Ubuntu Linux LTS | Value: ubuntu
Reusability of variable sets
Variable set (item_option_new_set) is a group of variables which is reusable and modular that may be connected to several catalog items at the same time.
Use of variable sets:
Standardization: All hardware orders contain shipping details, cost centers and telephone numbers in the same way.
One-point maintenance: If one of the variables is changed in one of the variable sets, hundreds of related catalog items will be altered.
Better forms: It allows to use the ready logic and create the identical forms with several columns within the catalog management system.
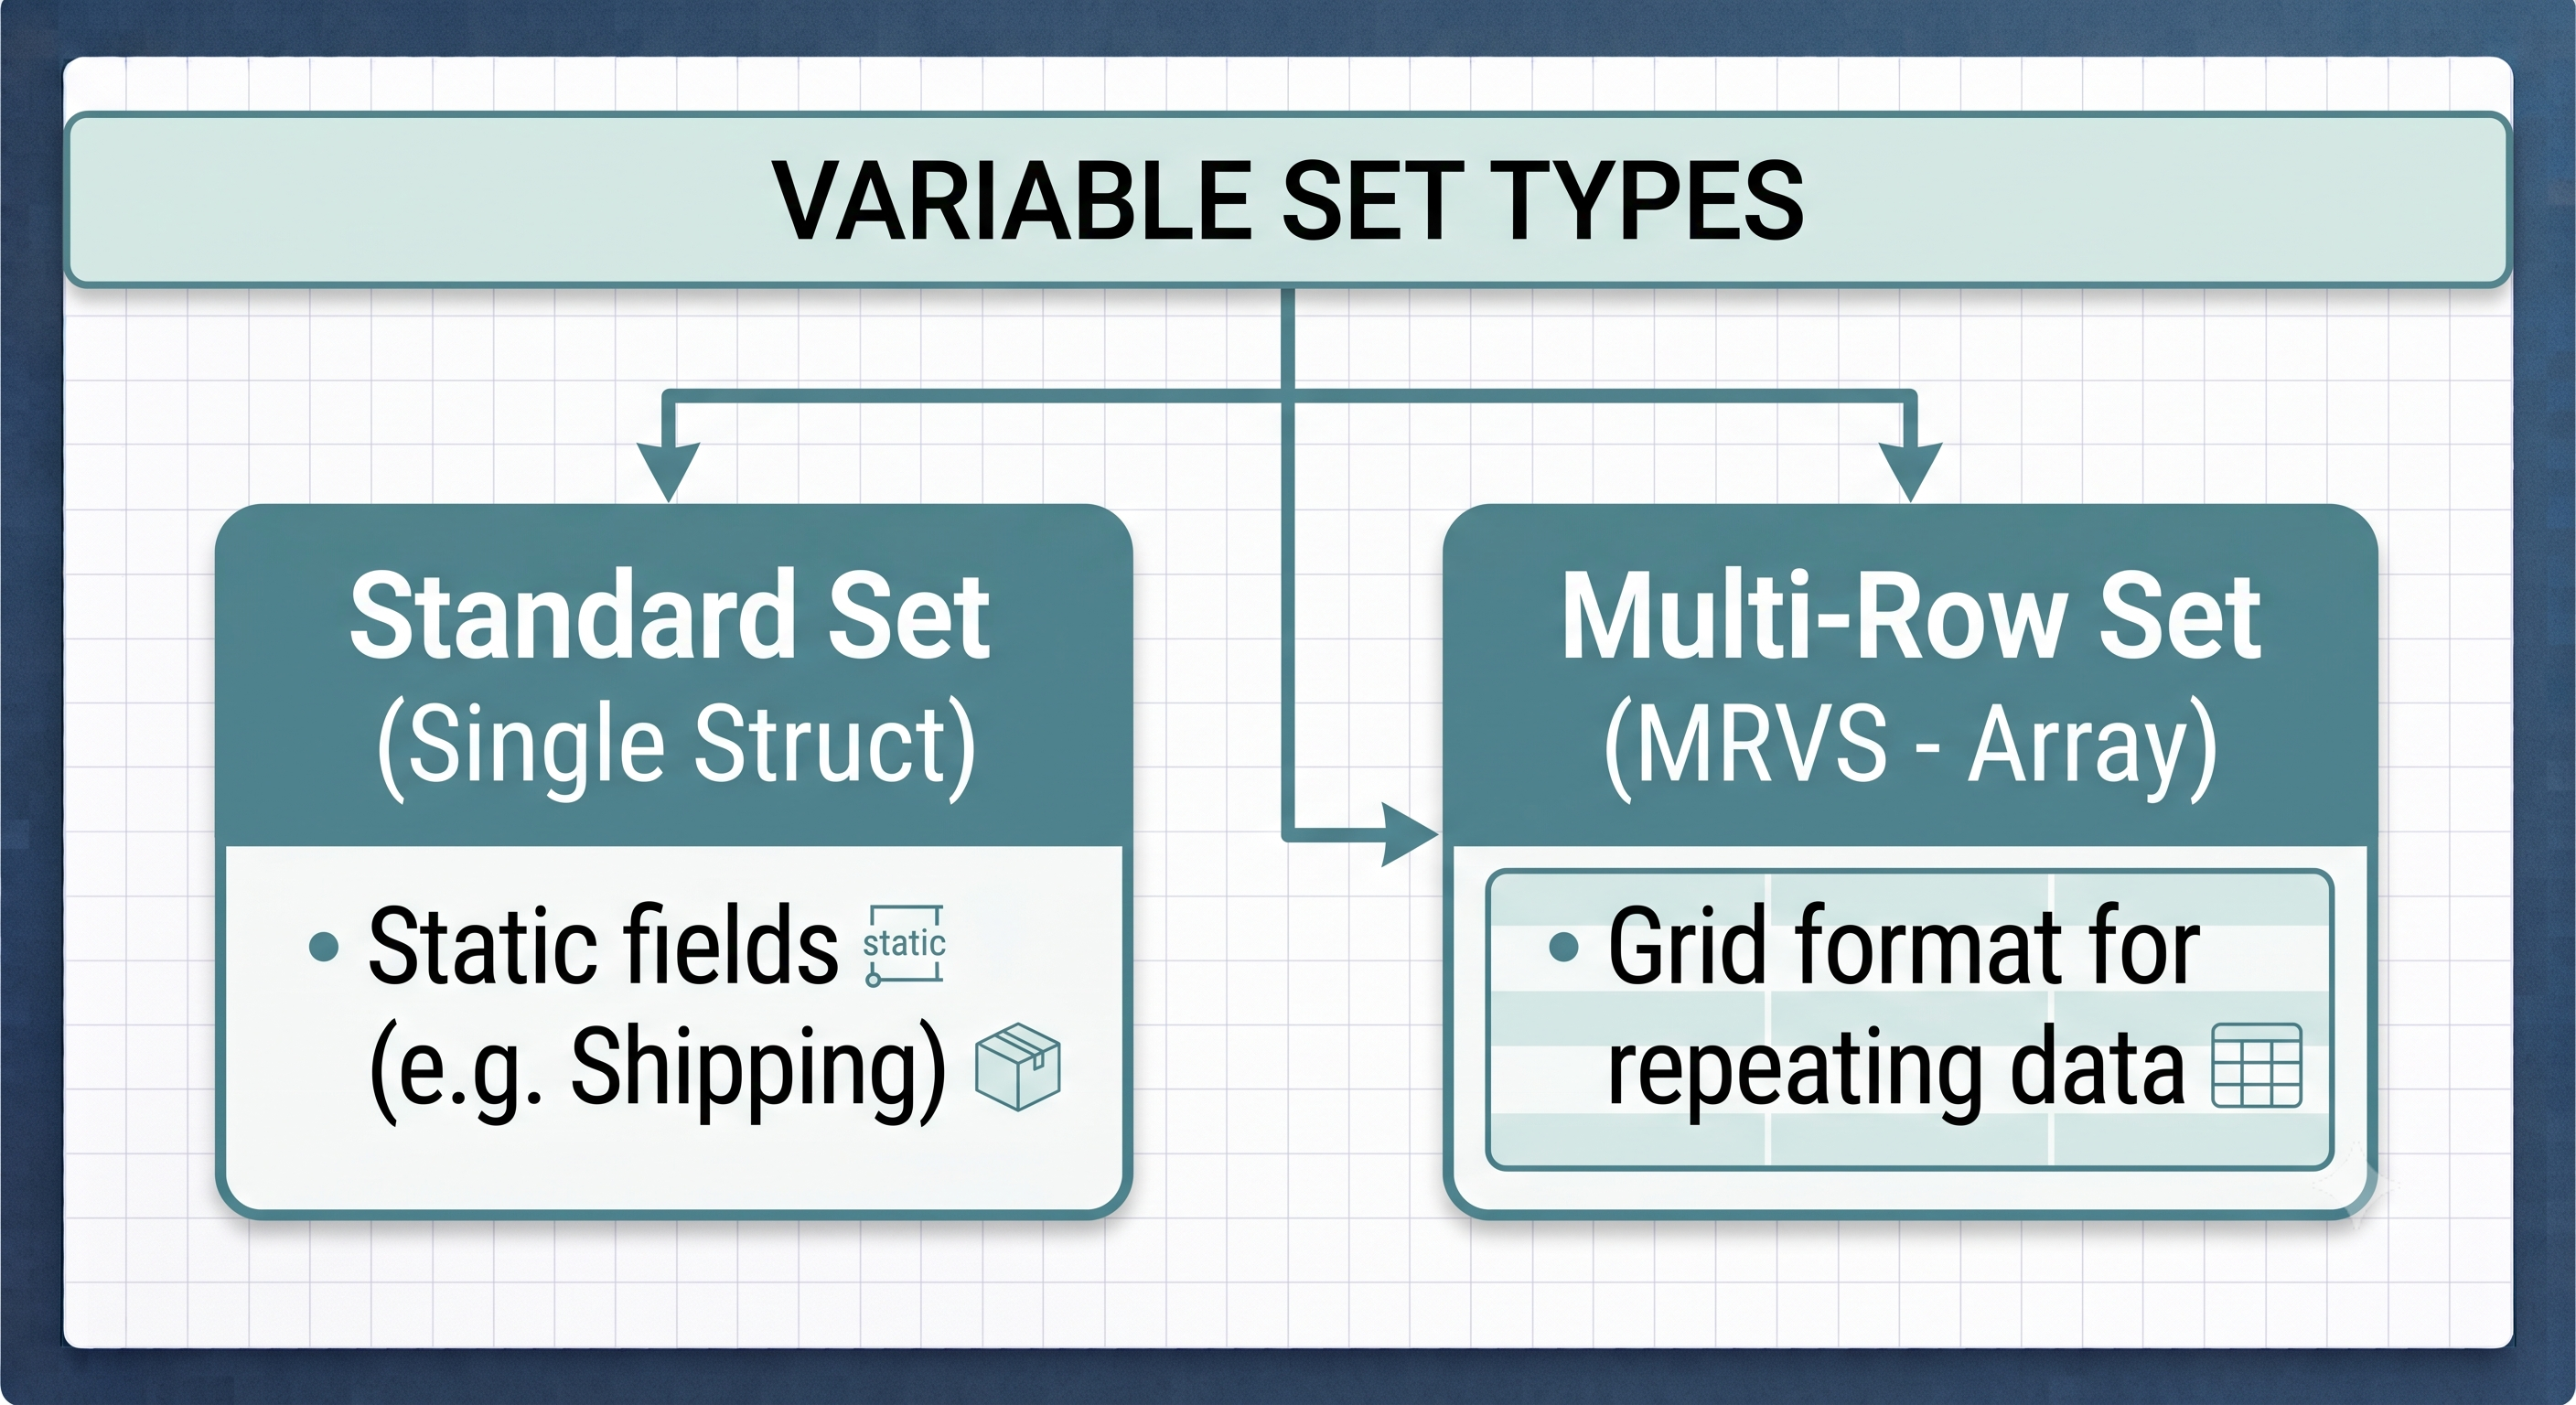
Standard Variable Set: This renders a definite group of fields on the form layout (for instance, the shipping address block).
Multi-Row Variable Set (MRVS): This renders a table/grid that is interactive, enabling users to add, change, or delete multiple rows of structured data (for example, adding many access IDs or accessories for several employees in one request).
Attaching the Variable Set in Catalog Builder
In the Questions tab, click on the drop-down next to New Question and choose the option Add Variable Set.
Search for the stipulated standard shipping address variable set.
Click Add. Subsequently, the questions will embed into your item preview instantly.
Tip for Managers of Different Platforms: In order to create Catalog Templates and Delegated Governance, a deep understanding of the ServiceNow security models and environment permission is needed when creating these. Should you want to level up your group knowledge or be able to do this alone, check our dedicated ServiceNow admin training program. It consists of everything you need to know about becoming a ServiceNow administrator starting from the basic installation to Gradient Governance.
Dynamic Form Logic: Catalog UI Policies and Client Scripts
Static forms are the cause of wrong submissions. You need a dynamic behavior: hiding fields and making the fields obligatory depending on the selection or assuring the fulfillment of restrictions.
Catalog UI Policies (No-Coding Dynamic Rules)
Catalog UI Policies run rules client-side without any coding.
Example Scenario:
Upon selecting Ubuntu Linux LTS as an Operating System, the user will see a compulsory field asking for the required version of the Linux Kernel.
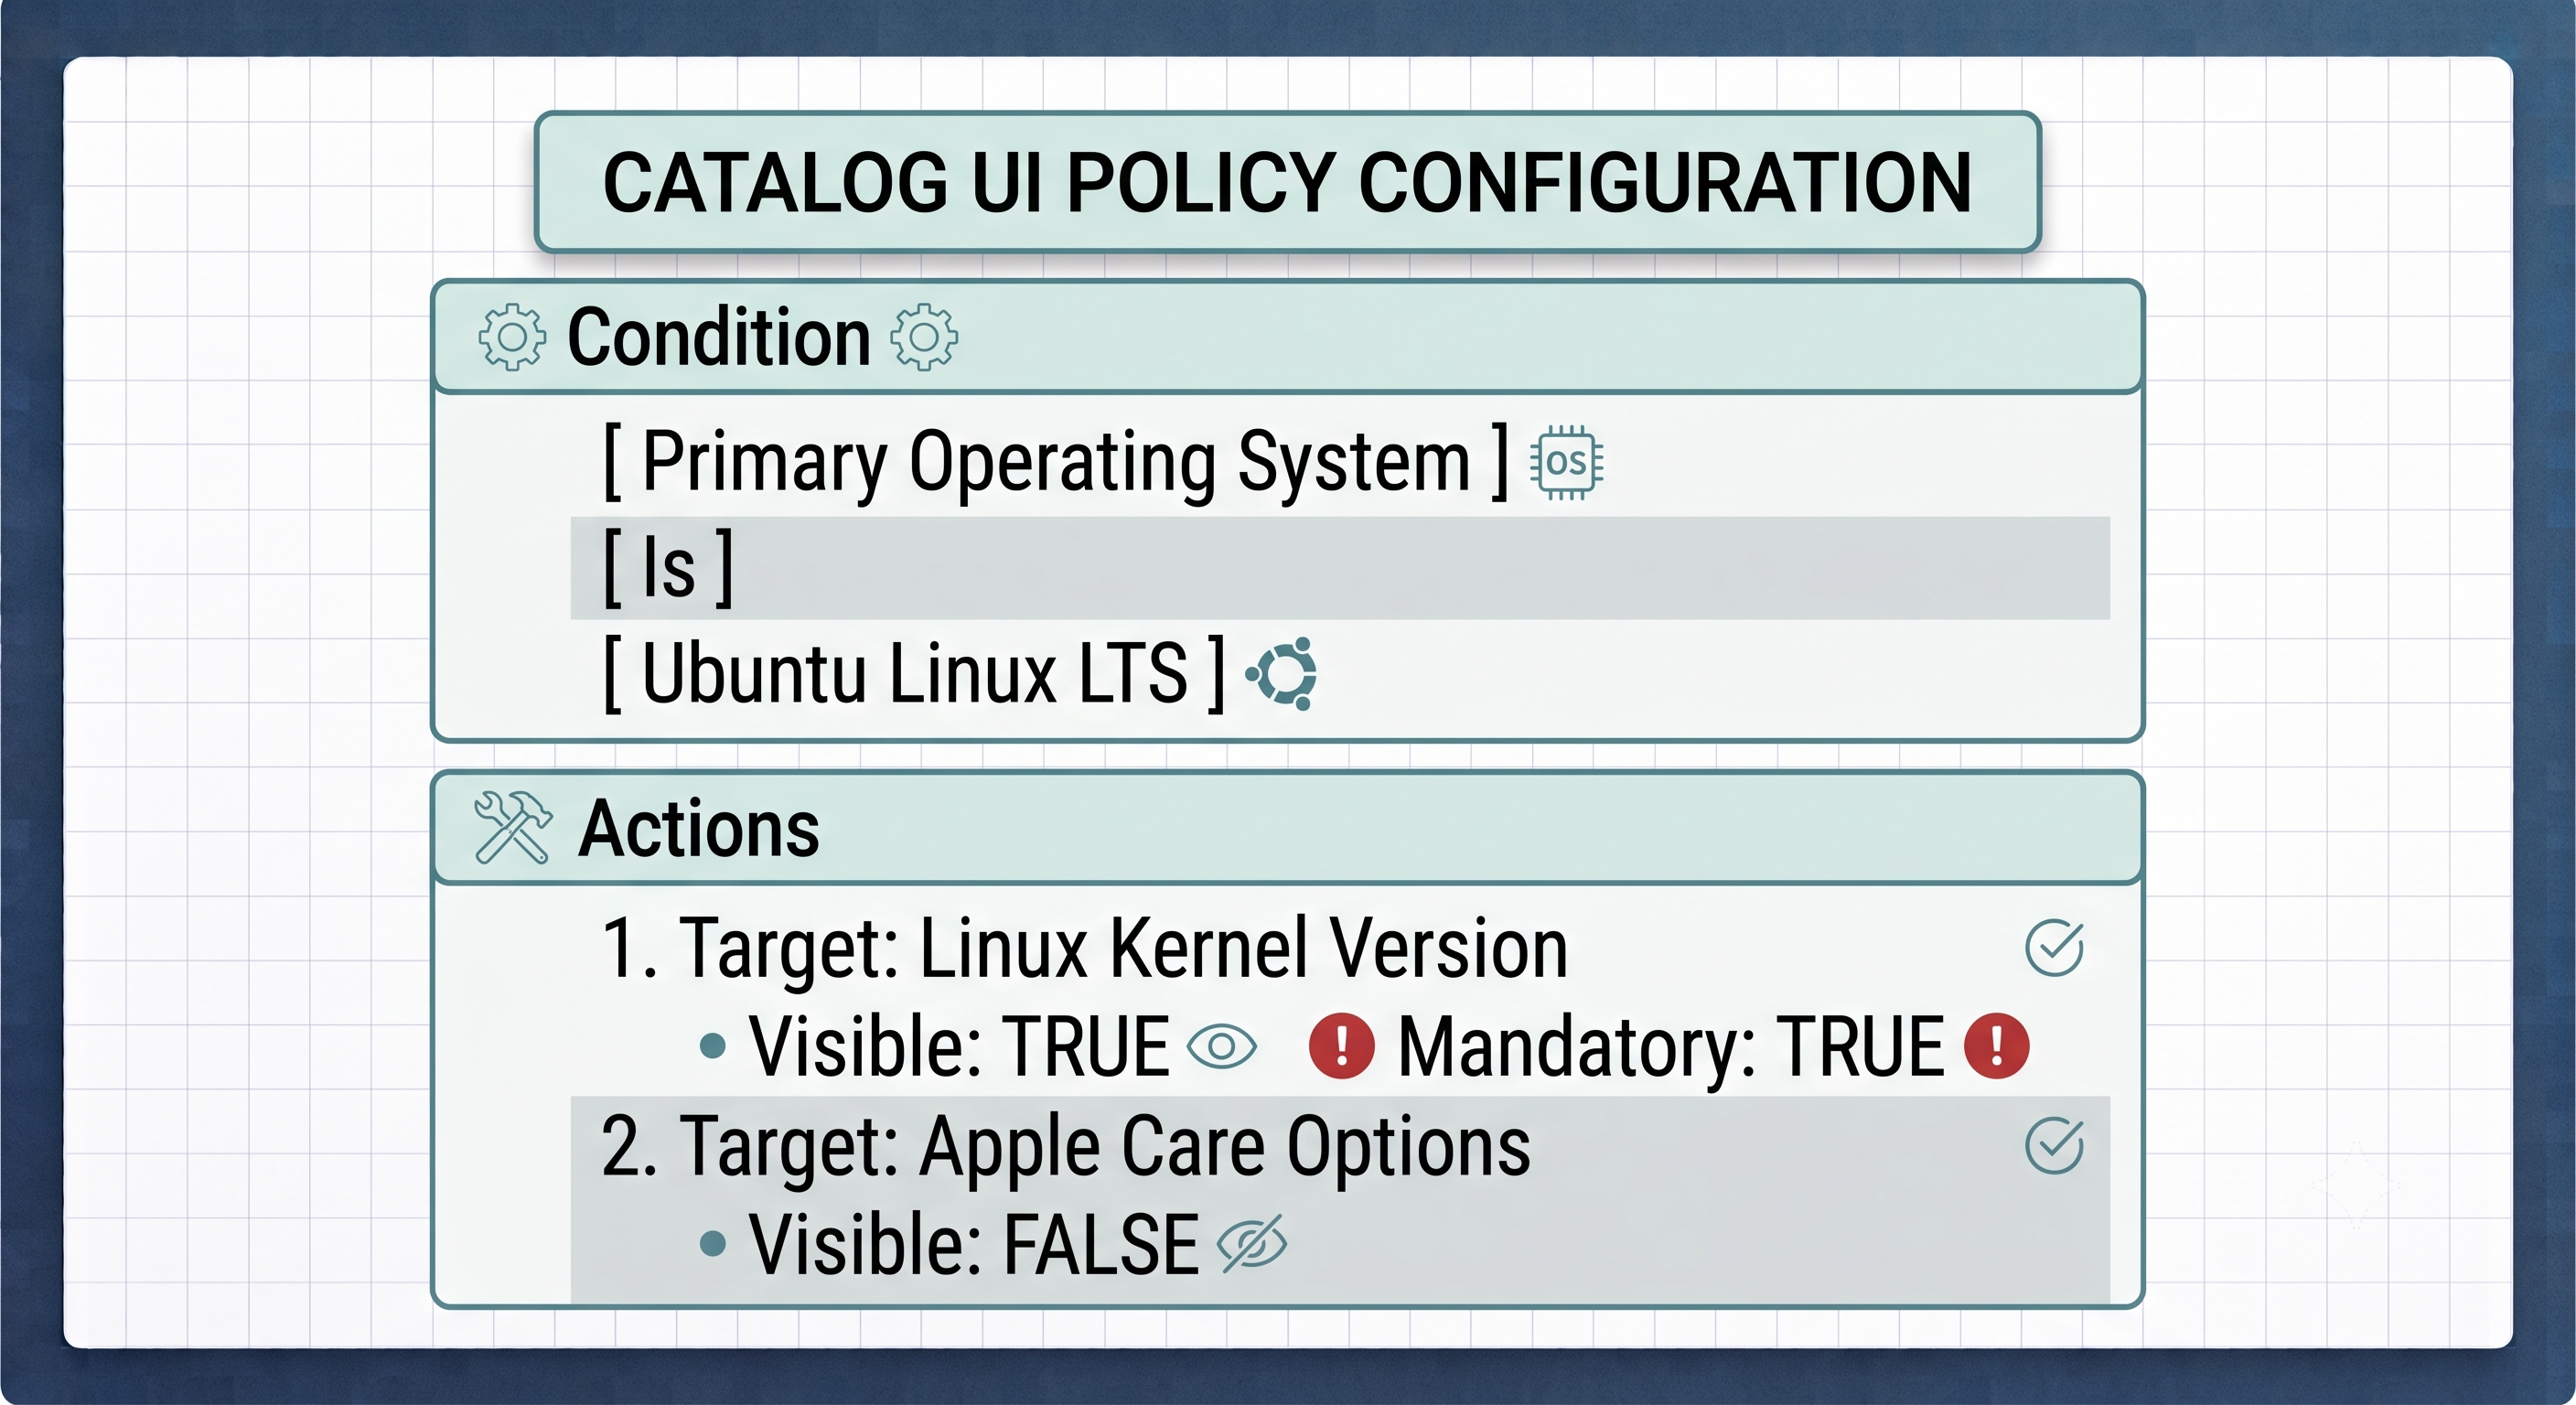
Setting up UI Policies among the Catalog Builder options:
Go to the Dynamic Behavior section in the Catalog Builder menu.
Press on the Add Rule button.
Setting Conditions: Primary Operating System Should be Ubuntu Linux LTS.
Actions to follow:Write Linux Kernel version.
Select is mandatory and visible options for Linux Kernel version.
Finally, save the rule. Now that rule is created in Catalog Builder.
In use of Catalog Client Scripts and Catalog UI Policies
Most dynamic forms will have their demands fulfilled with the help of the UI Policies however some complex check will require Catalog Client Scripts.
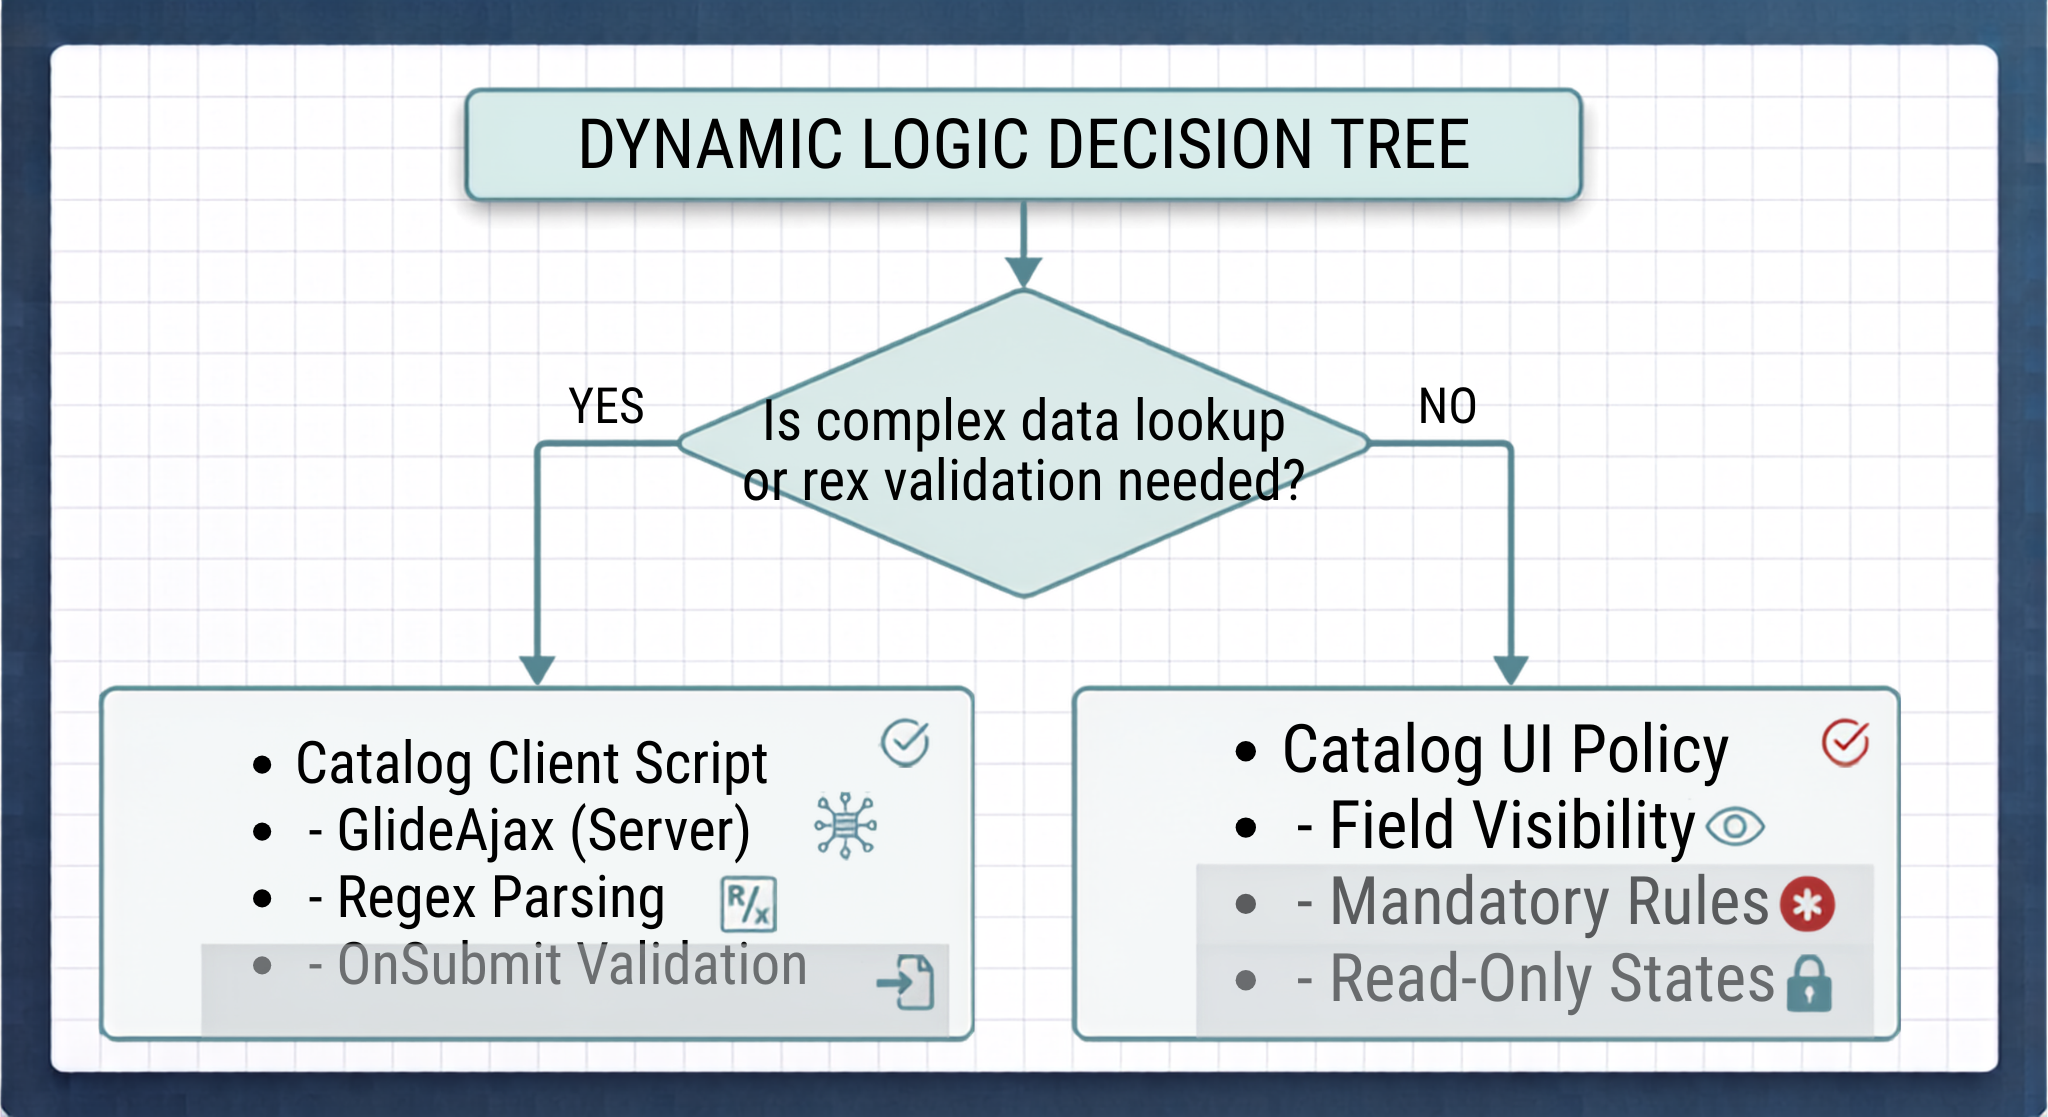
Utilize UI policies in the catalog for: displaying/hiding queries, turning mandatory aspects on and off, and making fields non-editable dependent on the user’s answer on the form.
Utilize scripts in the catalog to perform: validation upon submission (for example, checking phone numbers with regular expressions), and make calls to the server (via GlideAjax) for user information based on the manager selected.
Automation Enabling: Flow Designer Integration
A catalog item depends on the fulfillment engine since modern ServiceNow deployments employ Flow Designer in place of the previous workflow editor engines.
Designing the Laptop Request Fulfillment Flow
The fulfillment flow for the Developer Laptop Request should be capable of handling multi-level approvals, conditional points, tasks, and notification points.
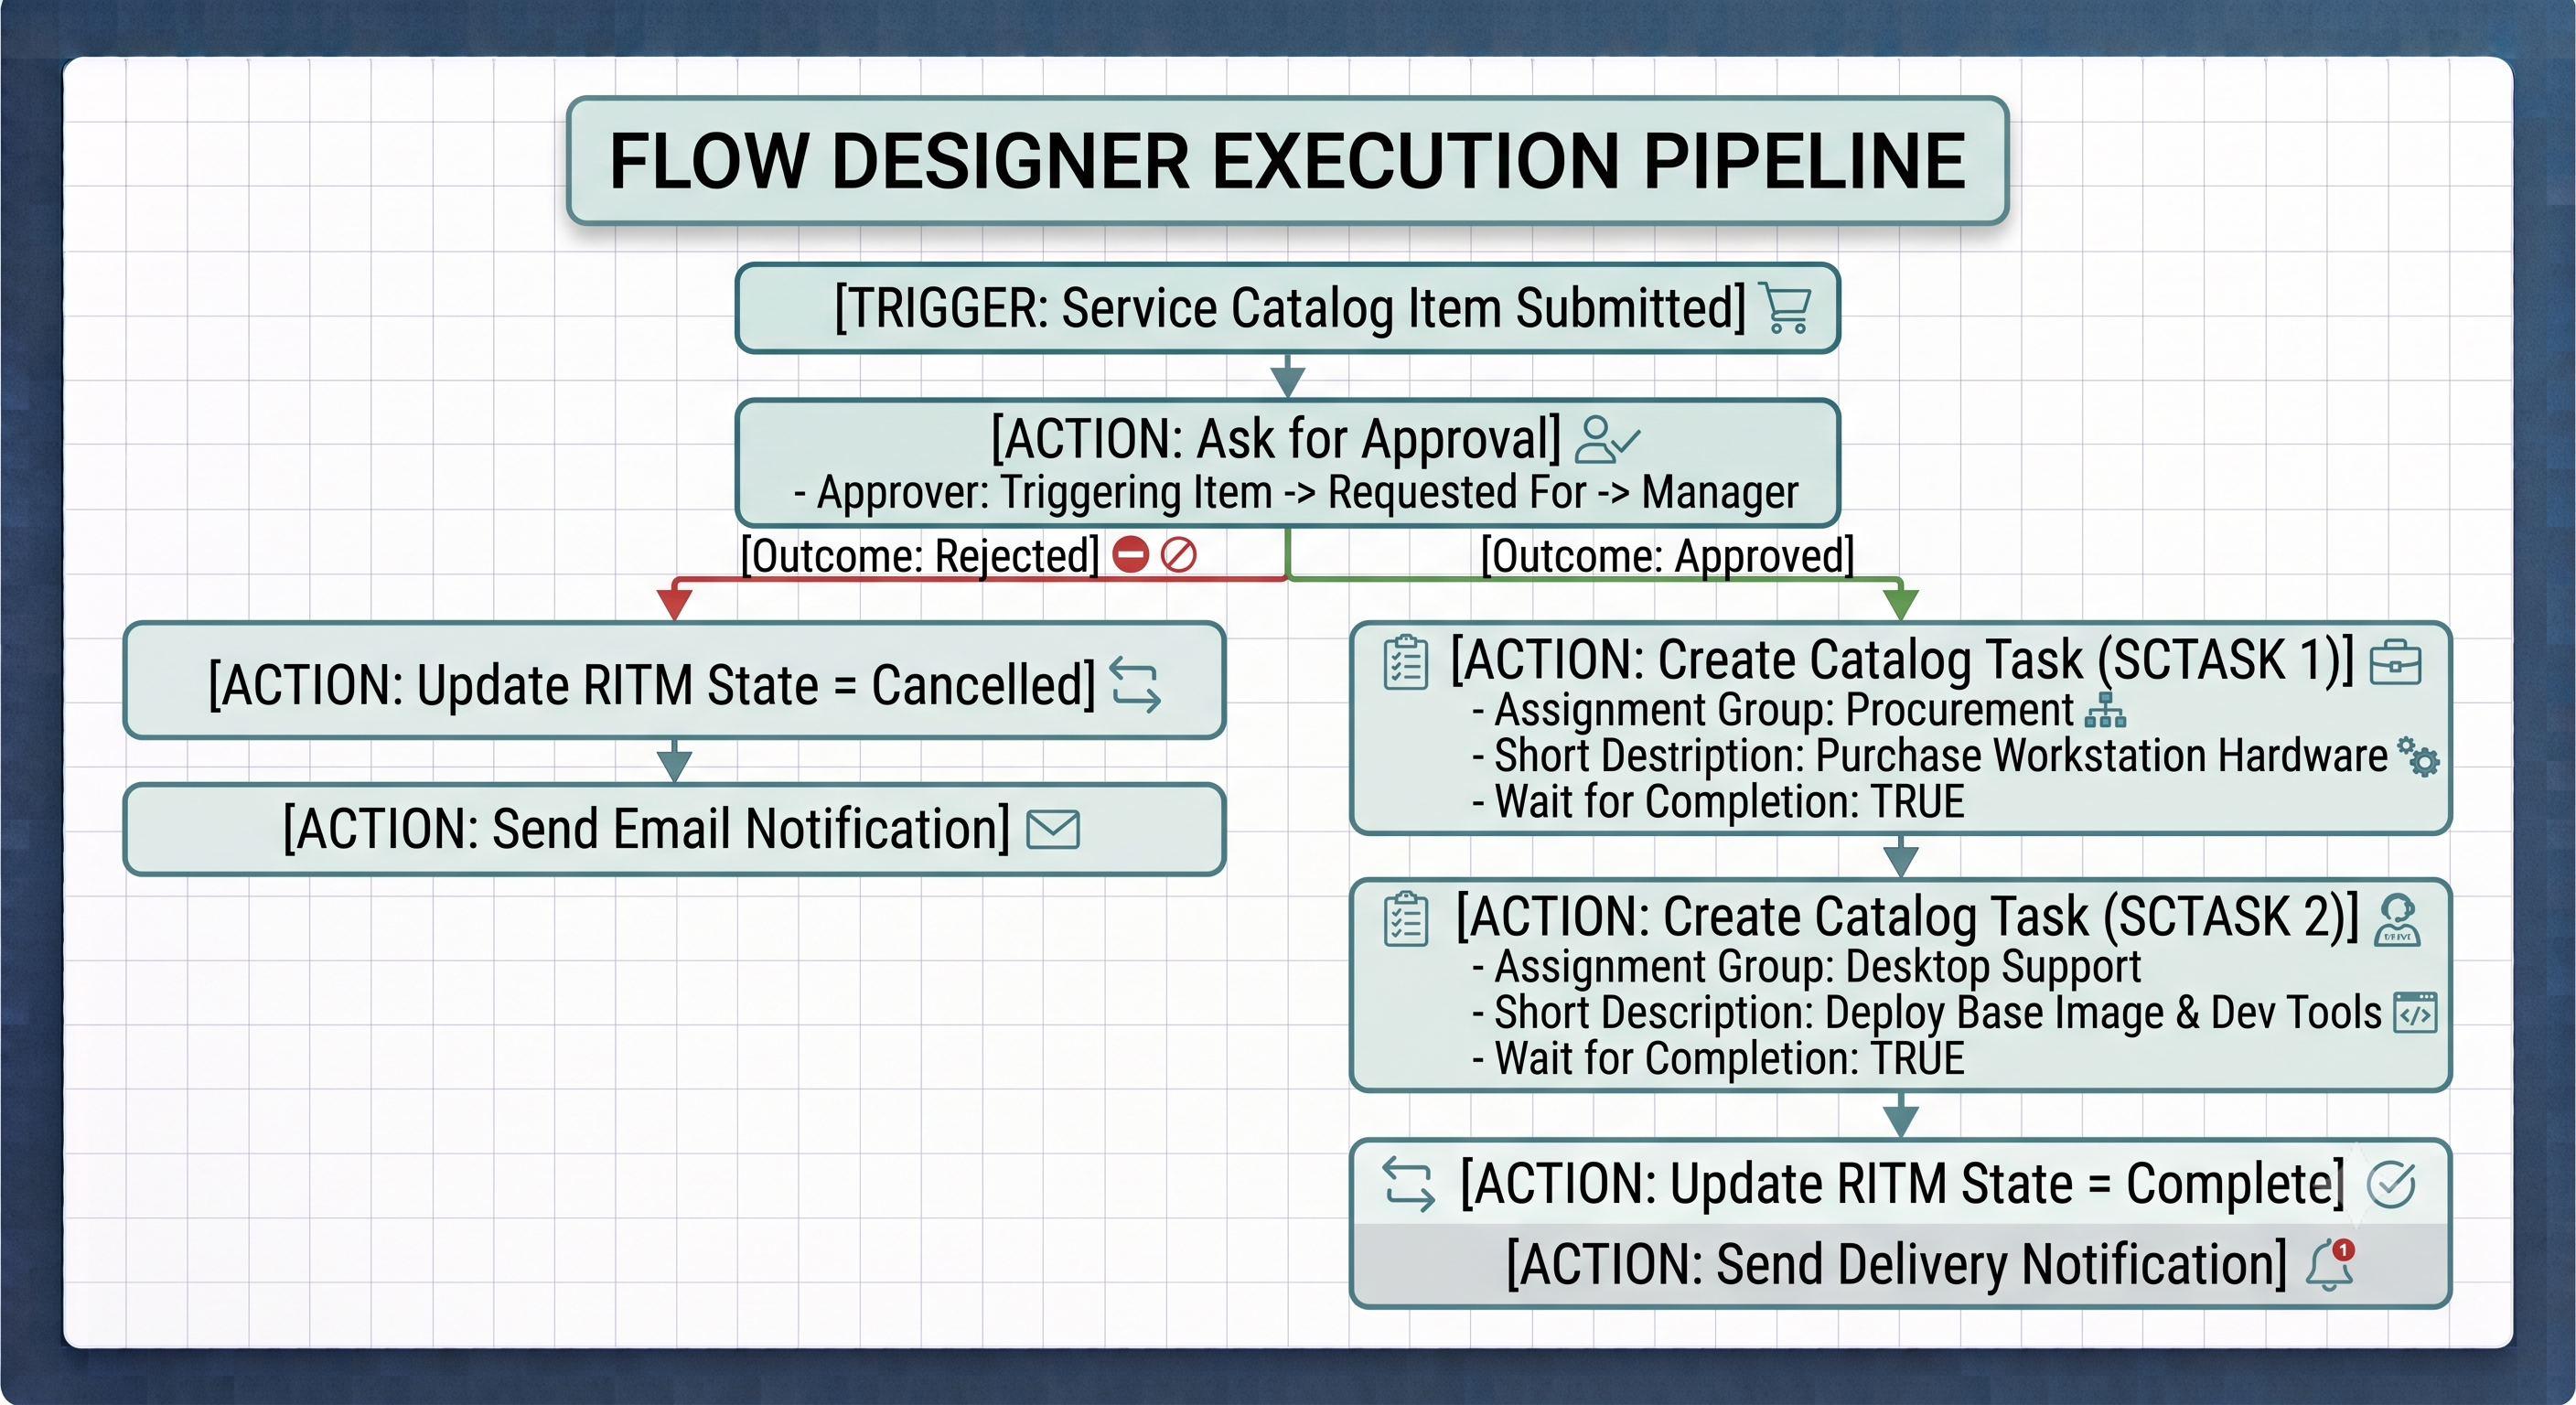
Step-by-Step Creation of Flow in Flow Designer
Open Flow Designer in the new tab.
Click New > Flow.
Name: Catalog - Developer Laptop Delivery.
Action: Click on Service Catalogue.
4.1. Get Catalogue Variables
Add the Get Catalogue Variables action to your workflow to make use of the inputs in the next steps:
Item Submitted Drag Requested Item [sc_req_item] from the Trigger Data Pane
Catalogue Item: Developer Laptop Request – Select one.
Variables selected: Keep Primary Operating System, Memory Selection, Business Justification in the right column
Step 4.2 Include manager approval
Add Action: Request for Approval.
Record: Requested Item Drag Record.
Approval Rules: Approve if the Manager of Requests For approves.
If approval_state is True then
If Rejected Set RITM state to Closed Cancelled, log worknotes and end flow.
4.3 Incorporate Fulfillment Activities
Create Cataloguing Task (sc_task) Add First Action.
Reference: sc_req_item The Requested Item.
Get Workstation - Operating System: [Main OS] Brief:
Assignment Group: Procurement Group .
Confirm Wait for Completion = True (flow stops until fulfilment engineer tasks are complete).
Initiate Other Action: Build Catalogue Task (sc_task)
Short Description: OS Image Install & Development Tools.
IT Desktop Assistance – Group to Do Assignment.
Wait Until Complete = Yes.
4.4 Complete Requested Item
Add Action: Document Changes.
Set sc_req_item State = Completed Closed.
Integrating the Flow in Catalog Construction
Revert Back to your Configuration of Item in Catalog Builder.
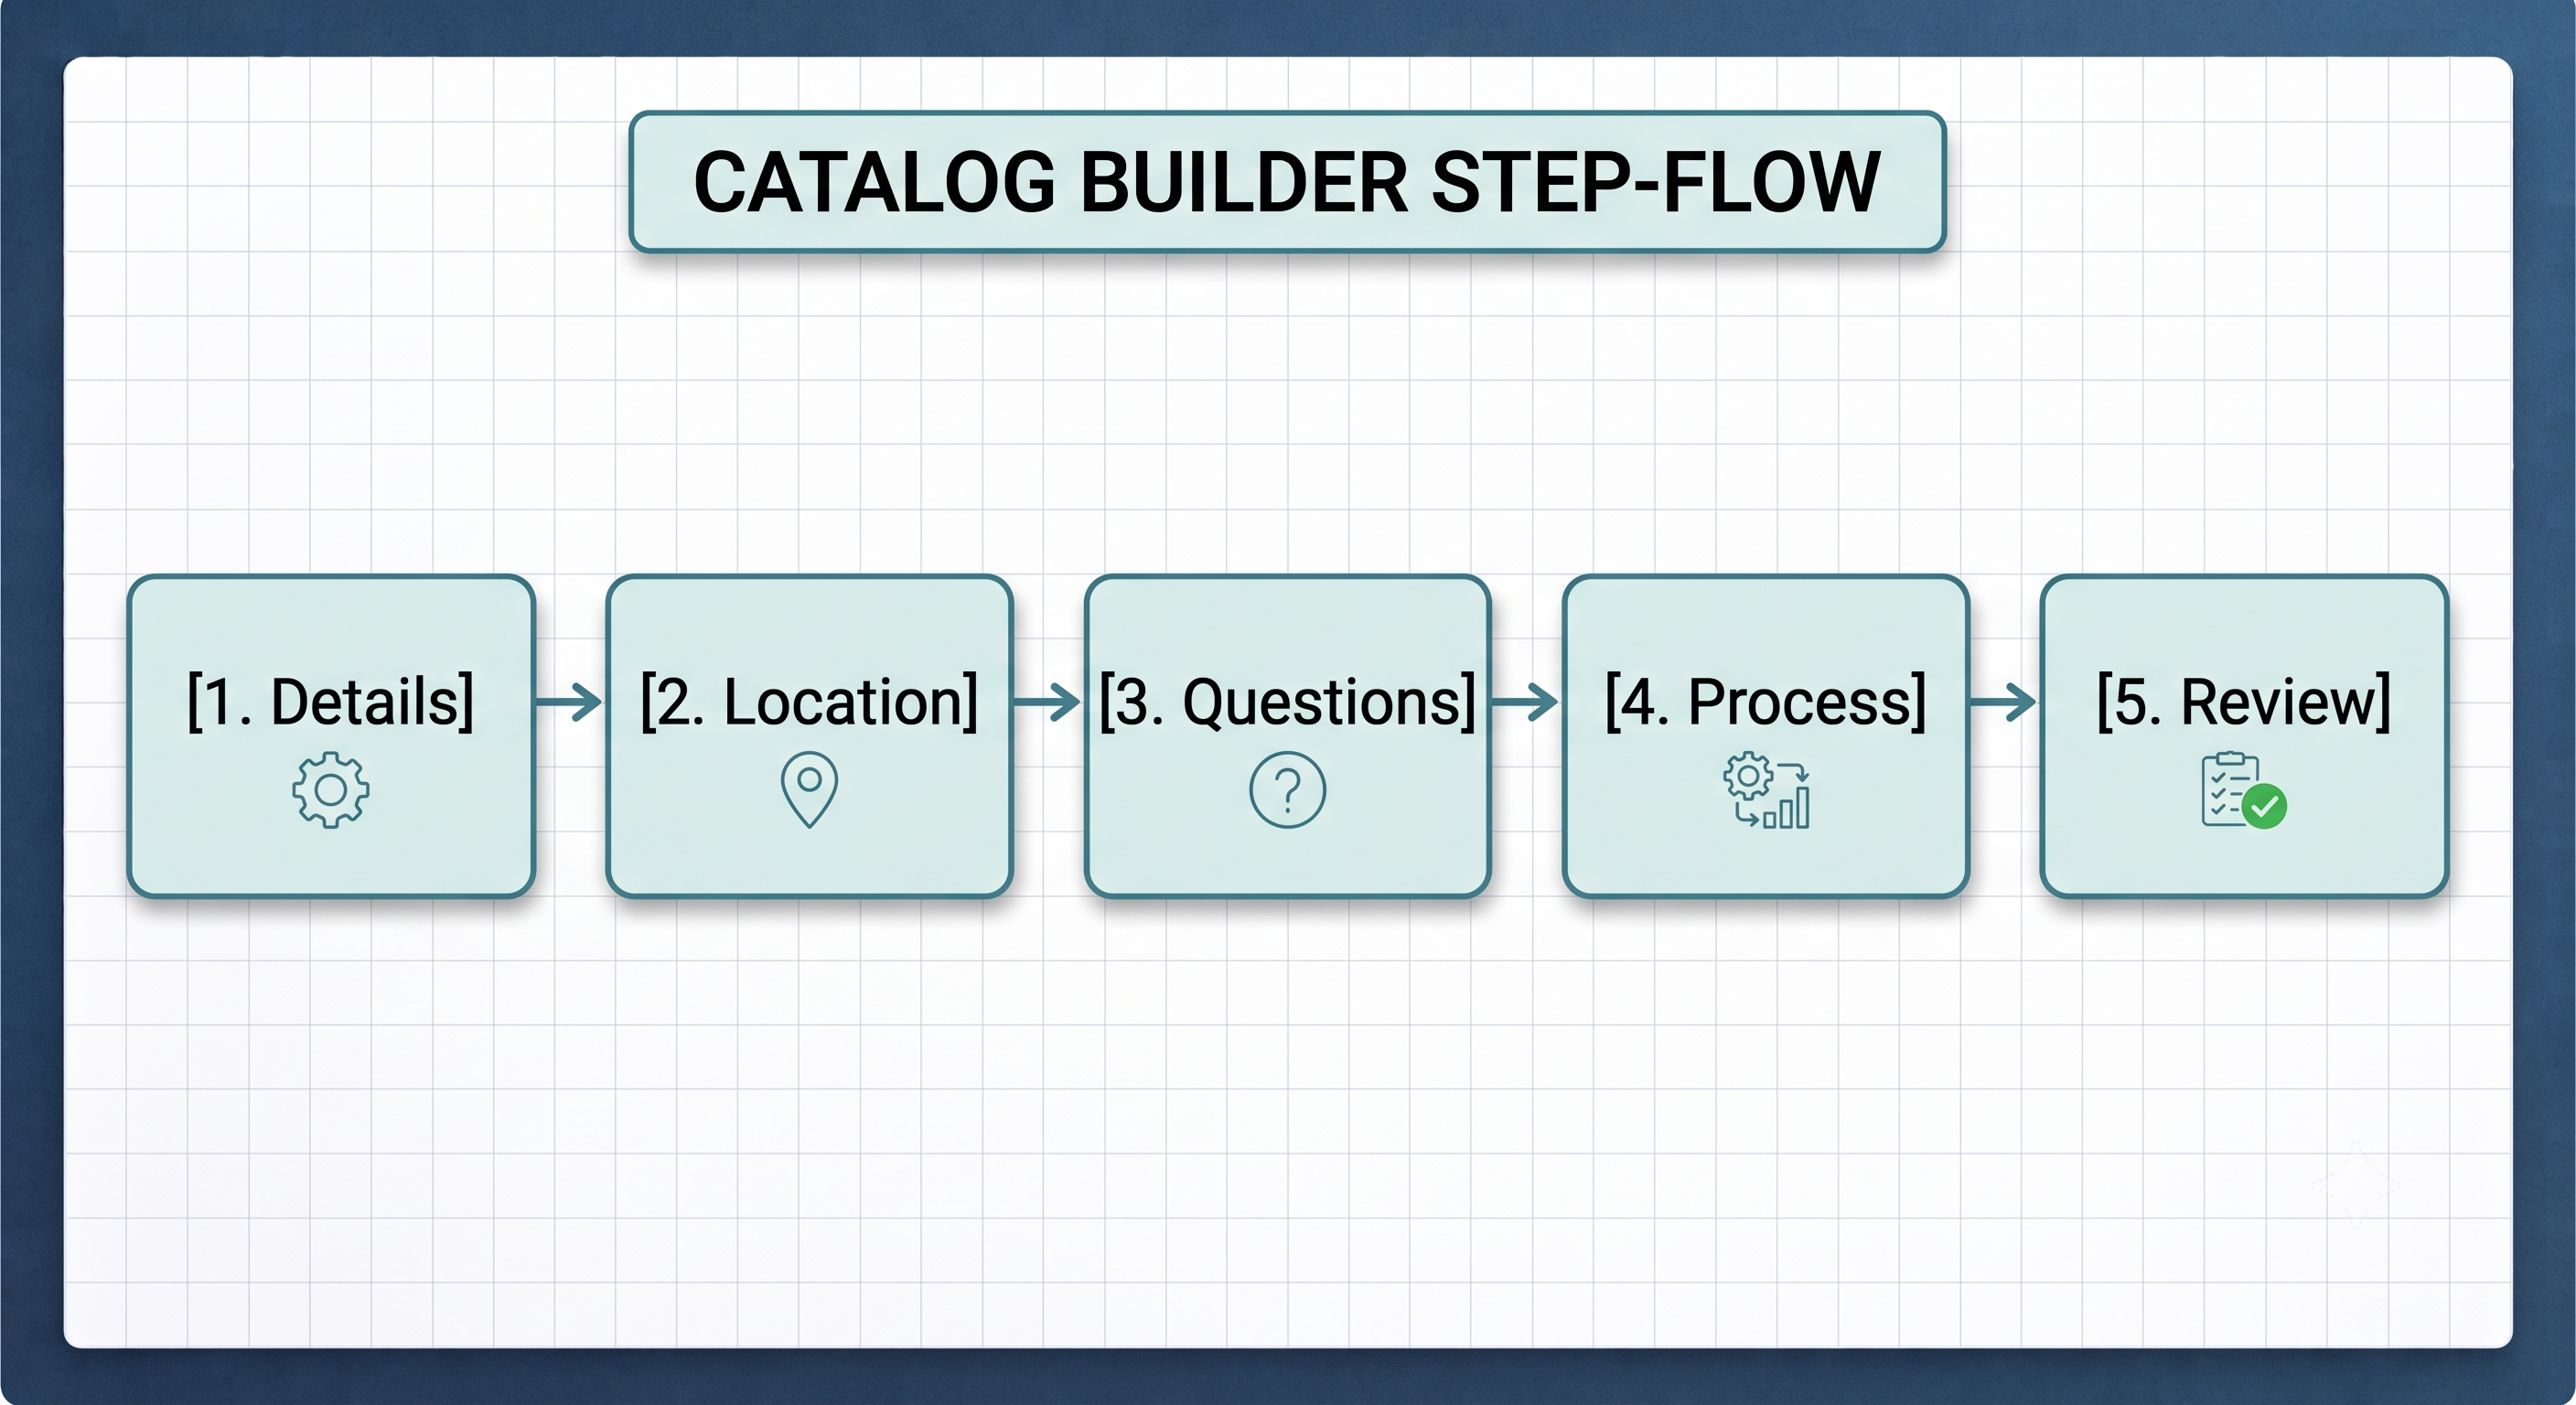
Select Step 4: Process.
Under the Fulfillment Engine, choose the Flow Section.
Choose your flow: Catalog – Developer Laptop Fulfillment.
Testing, Delegation and Access Control
Prior to being able to deploy the catalog item into the production environment, it is necessary to configure the security controls and do end-to-end testing.
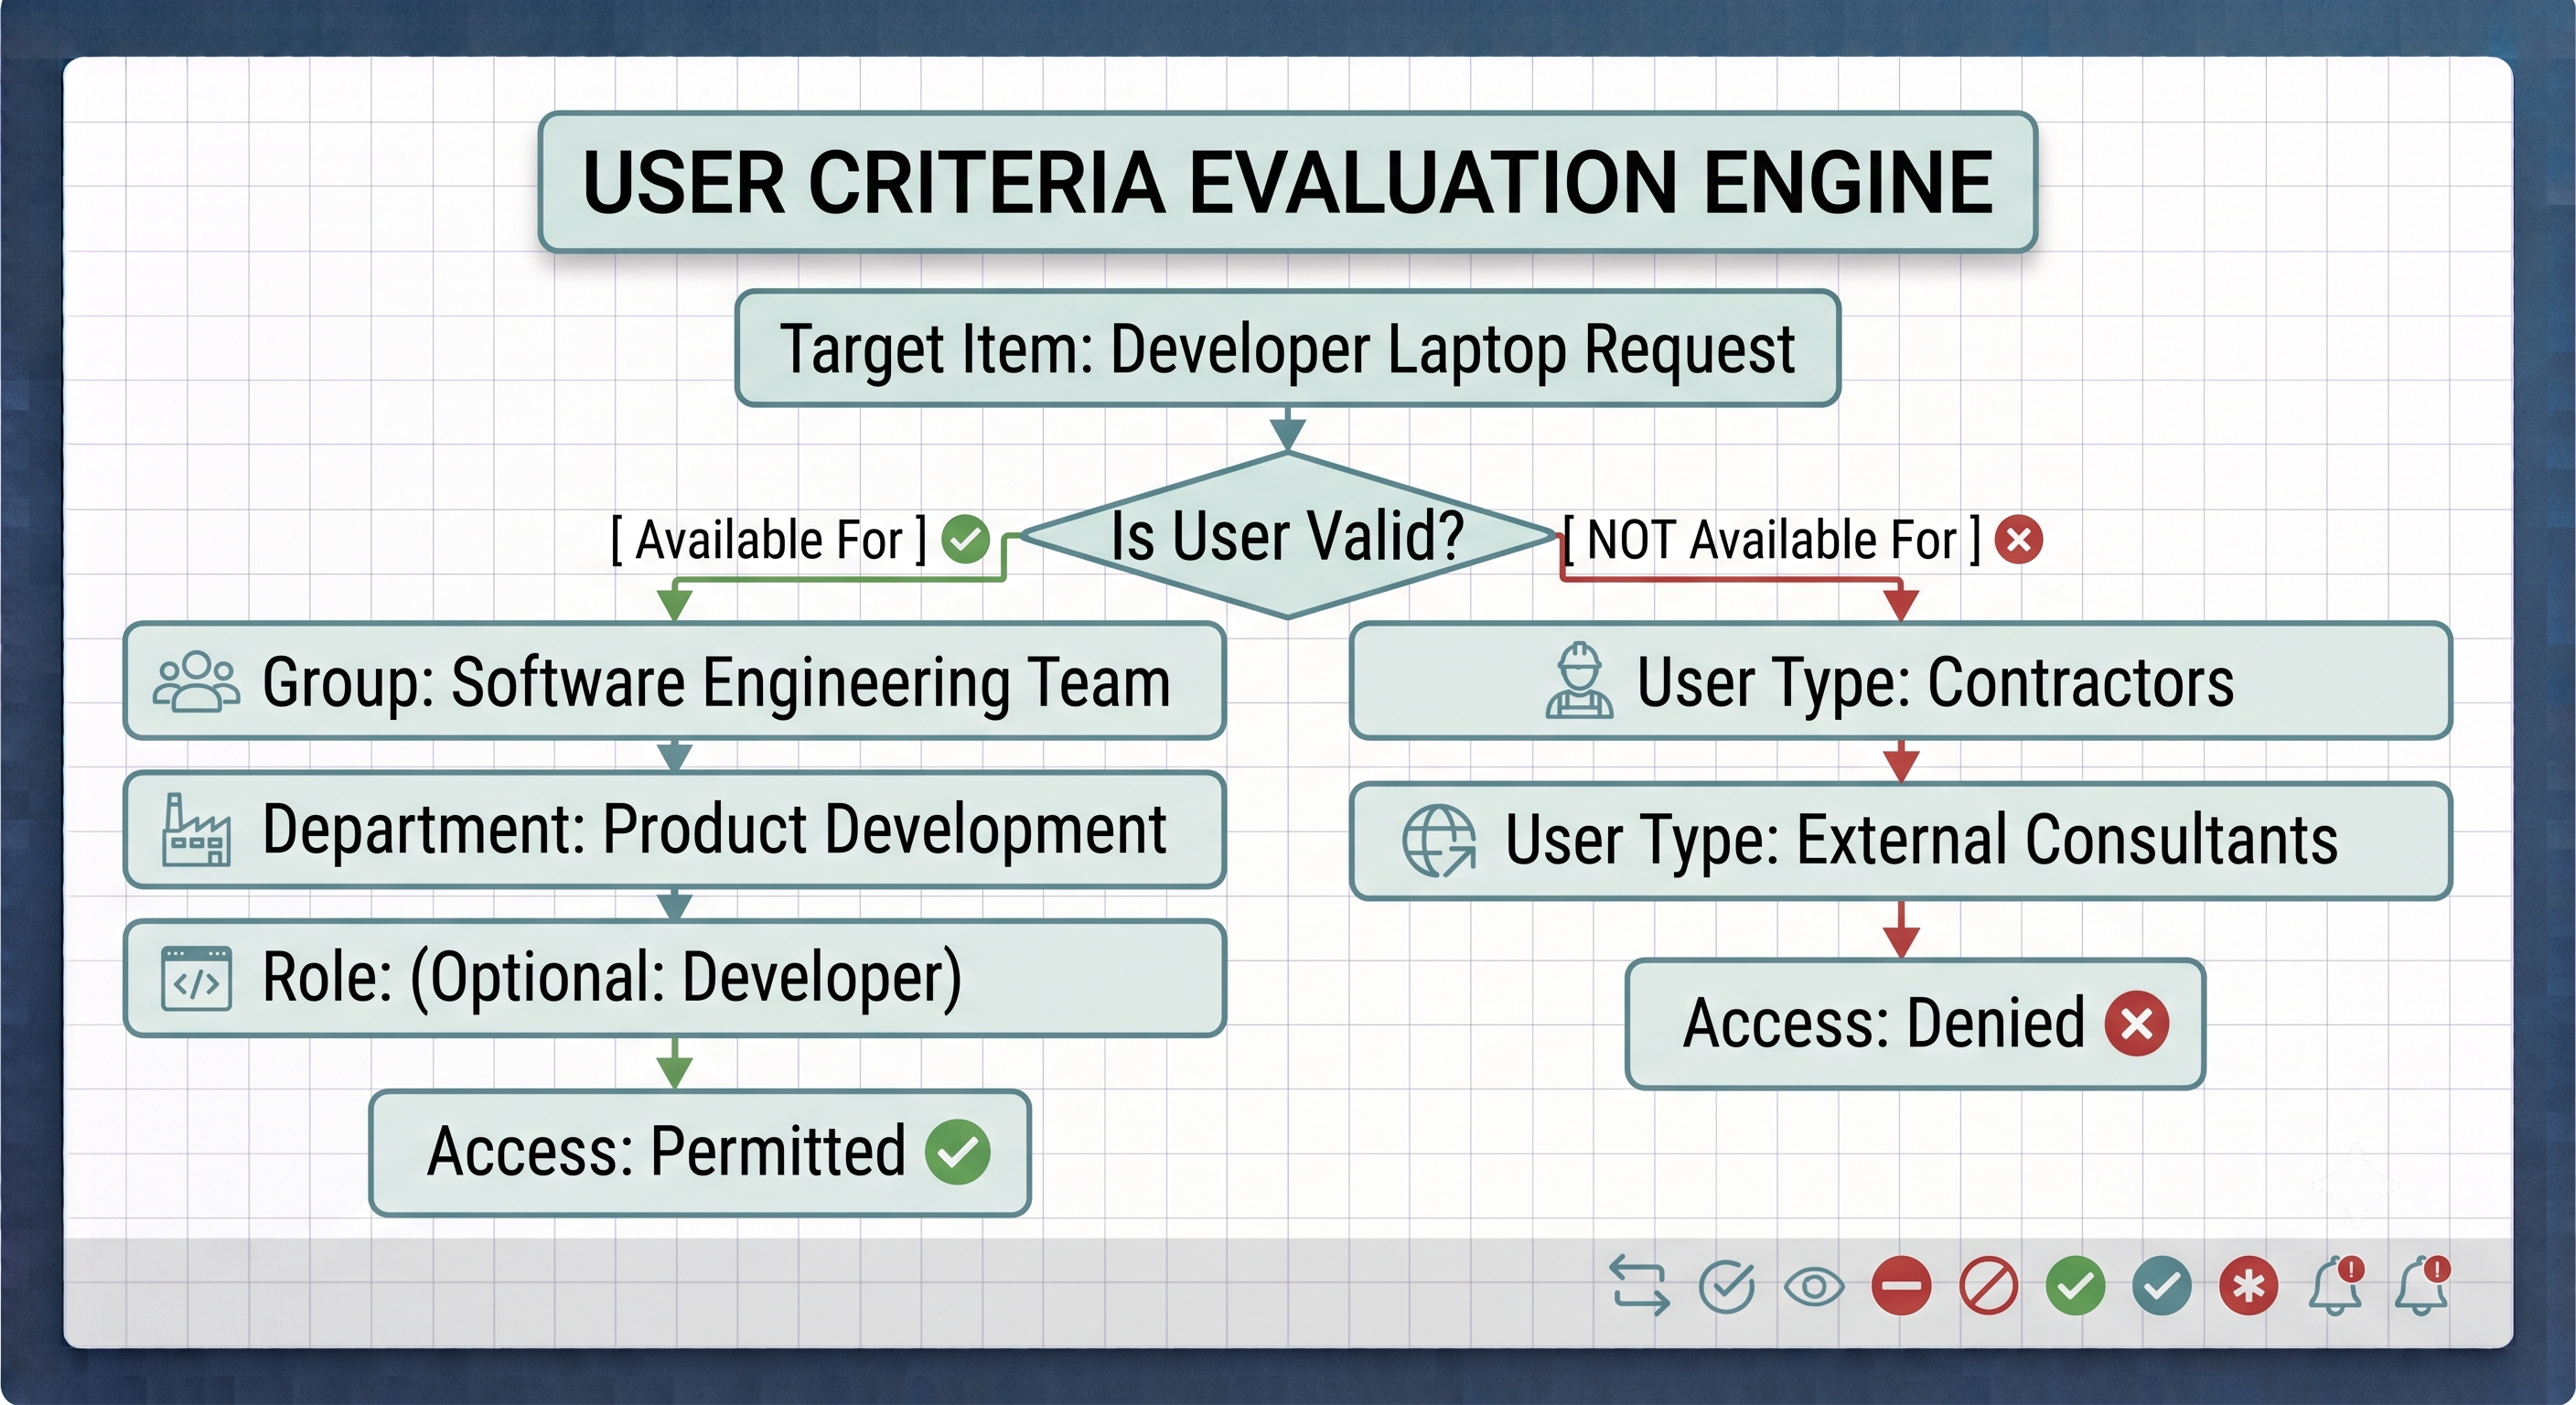
Using Catalog Builder, go to the Access section.
Under Available For, set the condition so that employees in the departments of Engineering or Product are able to view this item.
Under Not Available For, set the condition that will disable access for temps in case your company policy says that only standard equipment should be used for non-employees.
New to Catalog Builder is the built-in emulator, which allows to simulate the operation of forms prior to the actual publication.
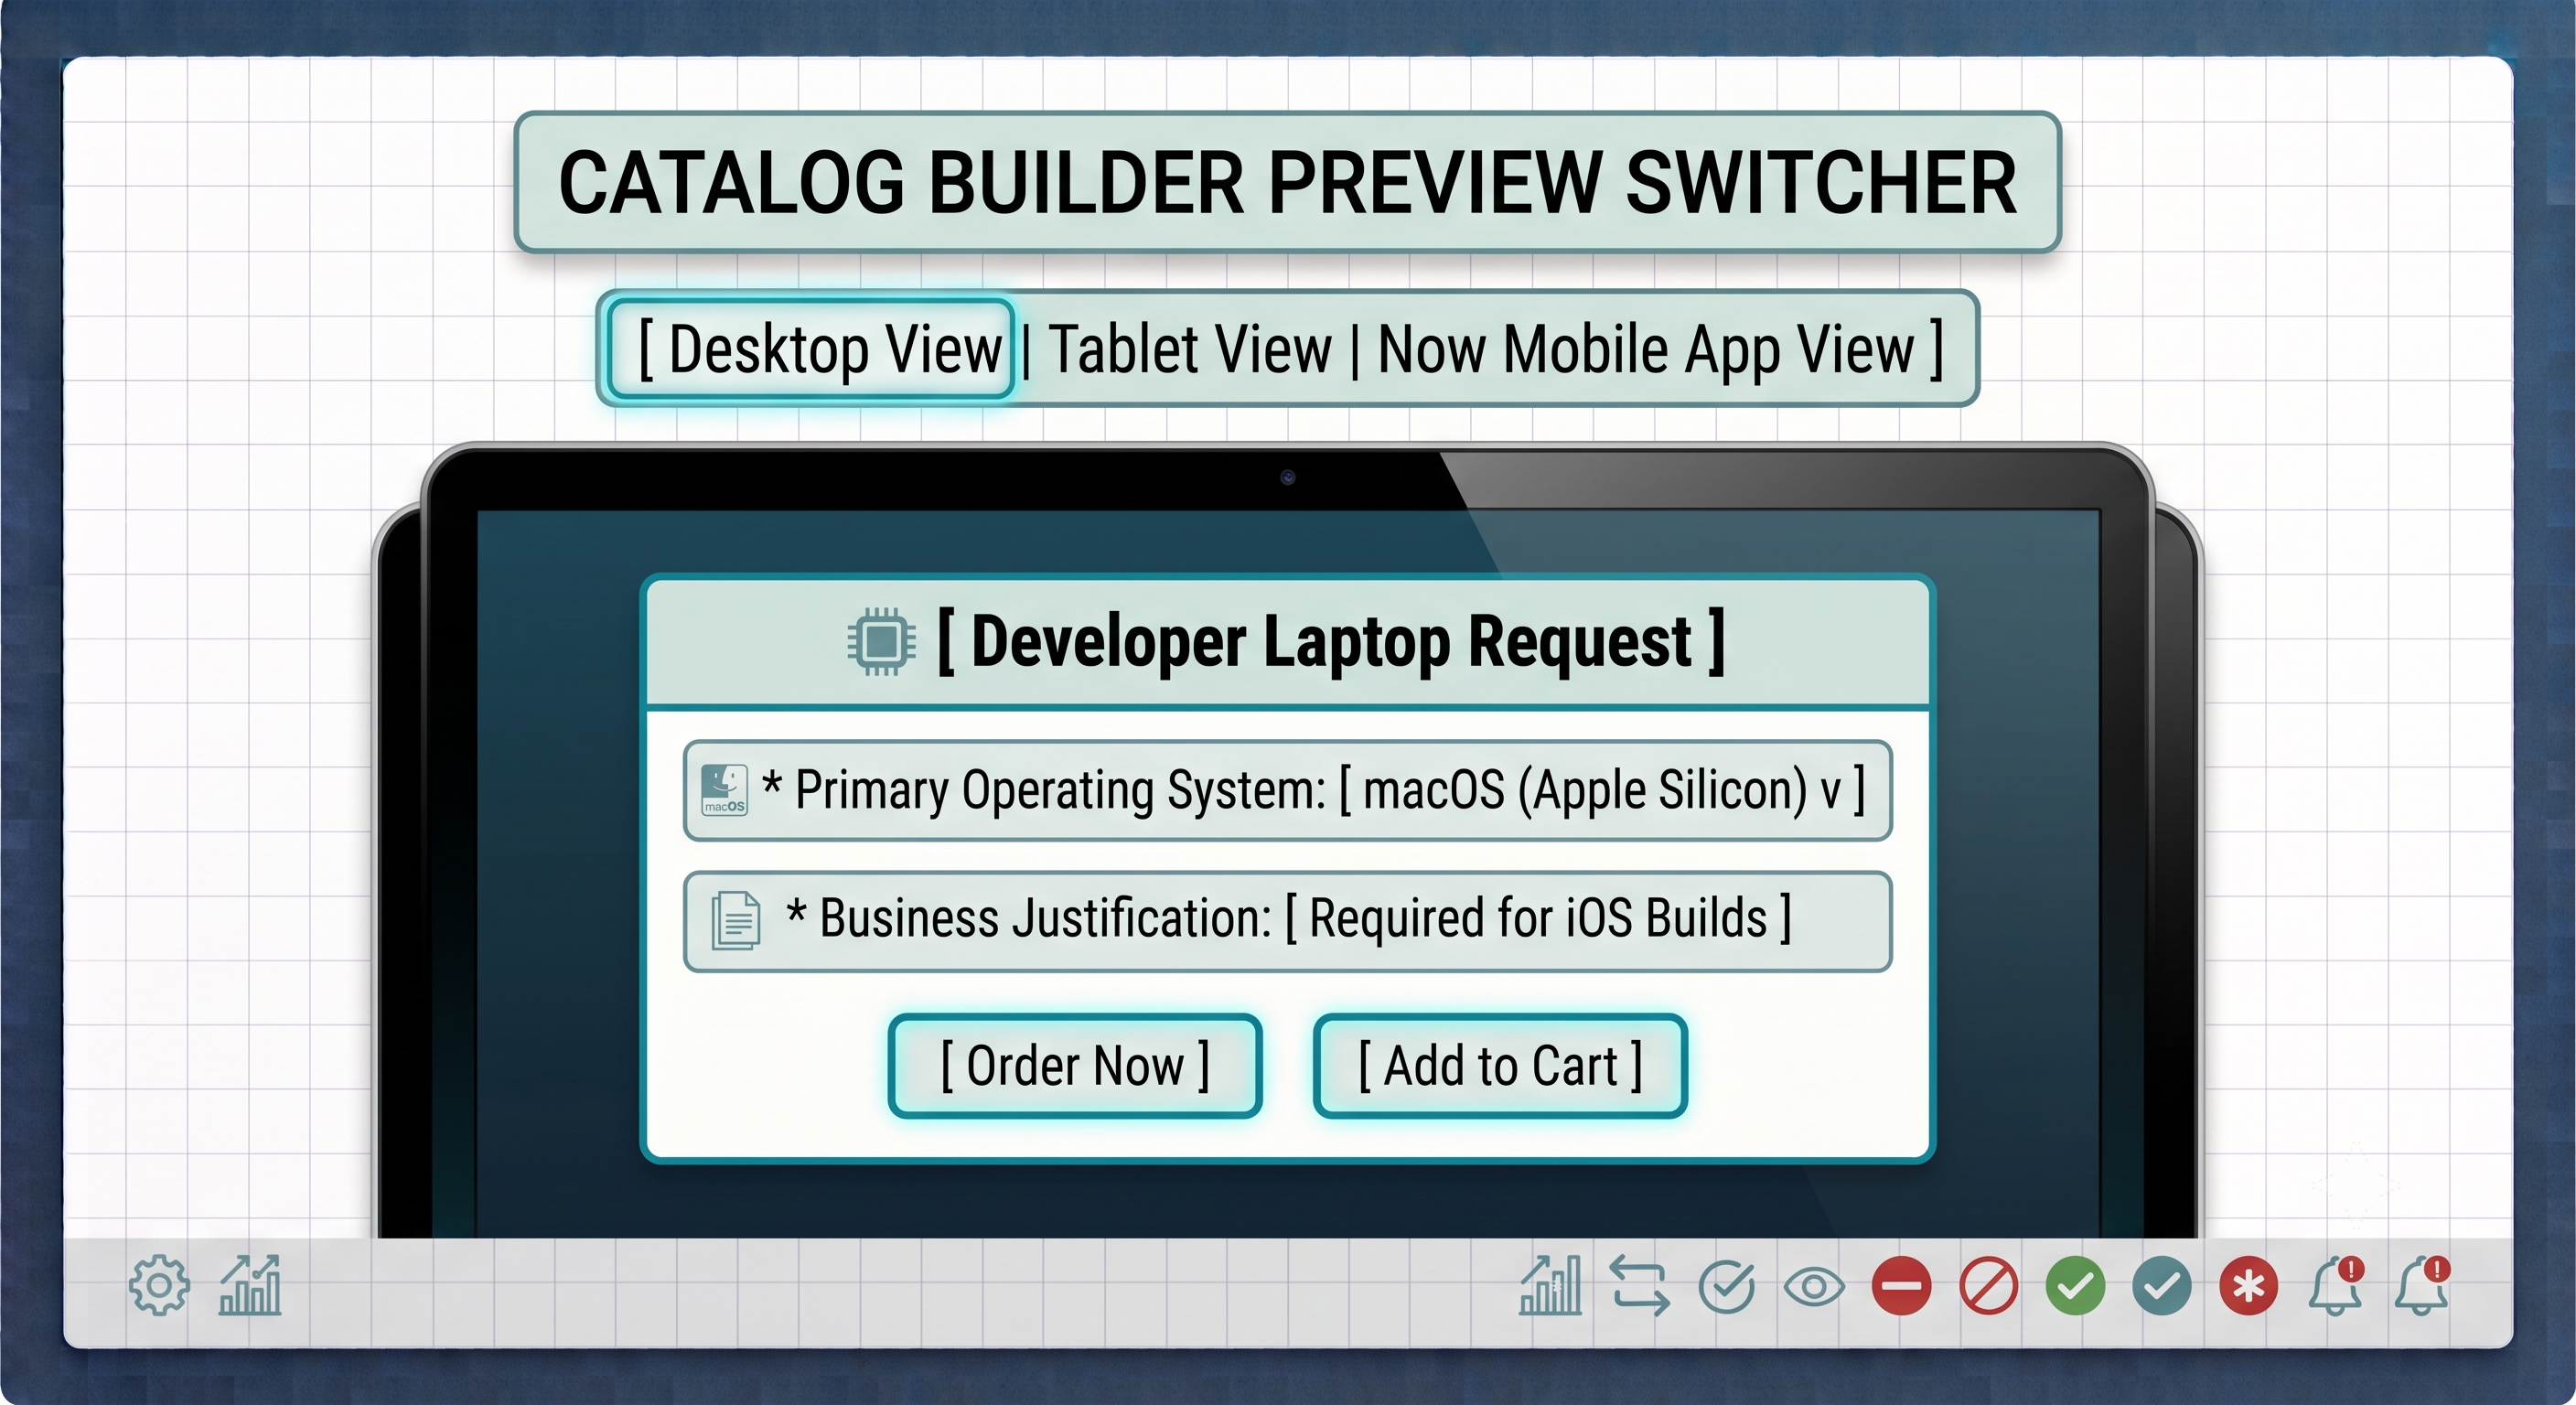
Press the Preview button situated in the upper right corner of Catalog Builder.
Switch between Desktop and Mobile viewpoints for form rendering inspection.
Select test options to check that fields are correctly hidden/shown by UI Policies.
Achieved:
After checks as above:
Ensure that your platform configuration is in the active Update Set.
Hit the Publish button in the Catalog Builder.
The catalog request goes to the Published mode and becomes instantly available for the users fulfilling the specified User Criteria.
Catalog Administration Reference Matrix
Bear this reference guide in mind when determining what catalog elements to use in different requesting situations:
Use Variables (item_option_new) for common inputs like text responses, choice list, or dates right in Catalog Builder > Questions. If you need to reuse similar field groups for many catalog items, you can create Variable Sets (item_option_new_set) located at Service Catalog > Variable Sets. When you need to obtain repeated data in tabular format, e.g. when applying for multiple guest passes, you apply the Multi-Row Variable Set (MRVS) using Catalog Builder > Add Variable Set.
Different configuration layers are employed for different workings of dynamic forms. You can hide, display, or set fields as mandatory without writing any code using Catalog UI Policy (located in Catalog Builder > Dynamic Behavior). If the situation requires more complex field validation against server data, you have to write Catalog Client Scripts (which can be found in Native View > Catalog Client Scripts).
Once you submit the form, you need to drive multi-layered approvals, messages, and task assignments through a connection to a Flow Designer Flow in the Flow Designer Workspace. Lastly, under Catalogue Builder > Access, use User Criteria (user_criteria) to restrict the visibility of catalogue items to certain conditions, for example, the user’s department or location.
Summary: Best Practices for Catalogue Builder
To be able to create scalable, easy to manage and user friendly catalogue entries within ServiceNow you need to find the right balance between simplicity for the end user and operational governance for the administrator. By following these four best practices, you can ensure that the platform will be accepted, technical debt will be minimised and service delivery will be accelerated.
1. Keep forms short and context-aware
4 Simplifying forms Form fatigue leads to incorrect submissions by users and more calls to the service desk. Use the available data to remove unnecessary fields from the system user table (sys_user). Use the script calls or attributes by requested person to pre-fill email, line manager, department, location and cost center information.
2. Use Standardized Architecture through Global Sets of Variables
Stop developing the same fields for each item in your catalog. Start creating your global Variable set, which will include common instances and elements (like shipping and billing addresses, personal details, invoicing codes, etc.) as early as possible after your implementation. By changing this global set anytime when something changes in your business or rules, you will be able to save significant resources during the long run.
3. Transfer Your Fulfillment Automation to Flow Designer
Old Workflow Editor solutions give you too many problems with maintenance and upgrades. Use Flow Designer for all your new catalog items’ fulfillment purposes. Flow Designer provides you with a modern low-code UI with inline testing, streamlined execution logs, and powerful integrations with IntegrationHub. It’s time to separate your business logic and data gathering.
4. Delegated Governance using Catalogue Templates
Business units are often held up by IT bottlenecks when it comes to publishing simple forms. This can be fixed with the help of Catalogue Templates and Delegated Governance in Catalogue Builder where department heads from functions such as HR, Legal, Facilities and Marketing are empowered to create and manage their catalogue items themselves.The predefined templates provided allow departments to meet their requirements while keeping complete control of security and platform stability in IT’s hands.
Want to be a Professional ServiceNow Admin?
Creating catalog items through Catalog Builder is one of many responsibilities of a ServiceNow admin. Enrolling in a specially designed servicenow administration course allows one to acquire necessary skills for working with ITSM, CMDB, and Security ACLs. The large part of study time is usually taken by practical activities involving tools of the software used in the course. No matter if you take an introductory or extensive service now admin course, having solid knowledge of relevant topics represents a good start for your career in enterprise service management.