
ServiceNow Navigation Guide: Exploring the Platform
Last updated on Nov 20, 2026
Enterprise software platforms are often perceived as dense, intimidating and hard to learn. For those new to ServiceNow, the breadth of capabilities available on a single screen when organisations adopt ServiceNow to manage IT services, human resources, customer operations or security workflows can be staggering. But beneath the skin of its massive architecture lies a remarkably logical, consistent and customisable user interface. The single most impactful thing any user, fulfiller or administrator can do to work faster and reduce daily friction is to master how to navigate ServiceNow.
Technical expertise or development experience is not needed to successfully find your way around the platform. Indeed, the navigation of the platform relies on understanding how information is structured in a predictable way within ServiceNow: the presence of a consistent global header throughout the entire session, the centralized navigation menu, list of records and forms where all work takes place. The knowledge of the platform by practicing or service now training online allows for easy usage of the enterprise platform whether Next Experience or classic platform.
ServiceNow Interface Architecture
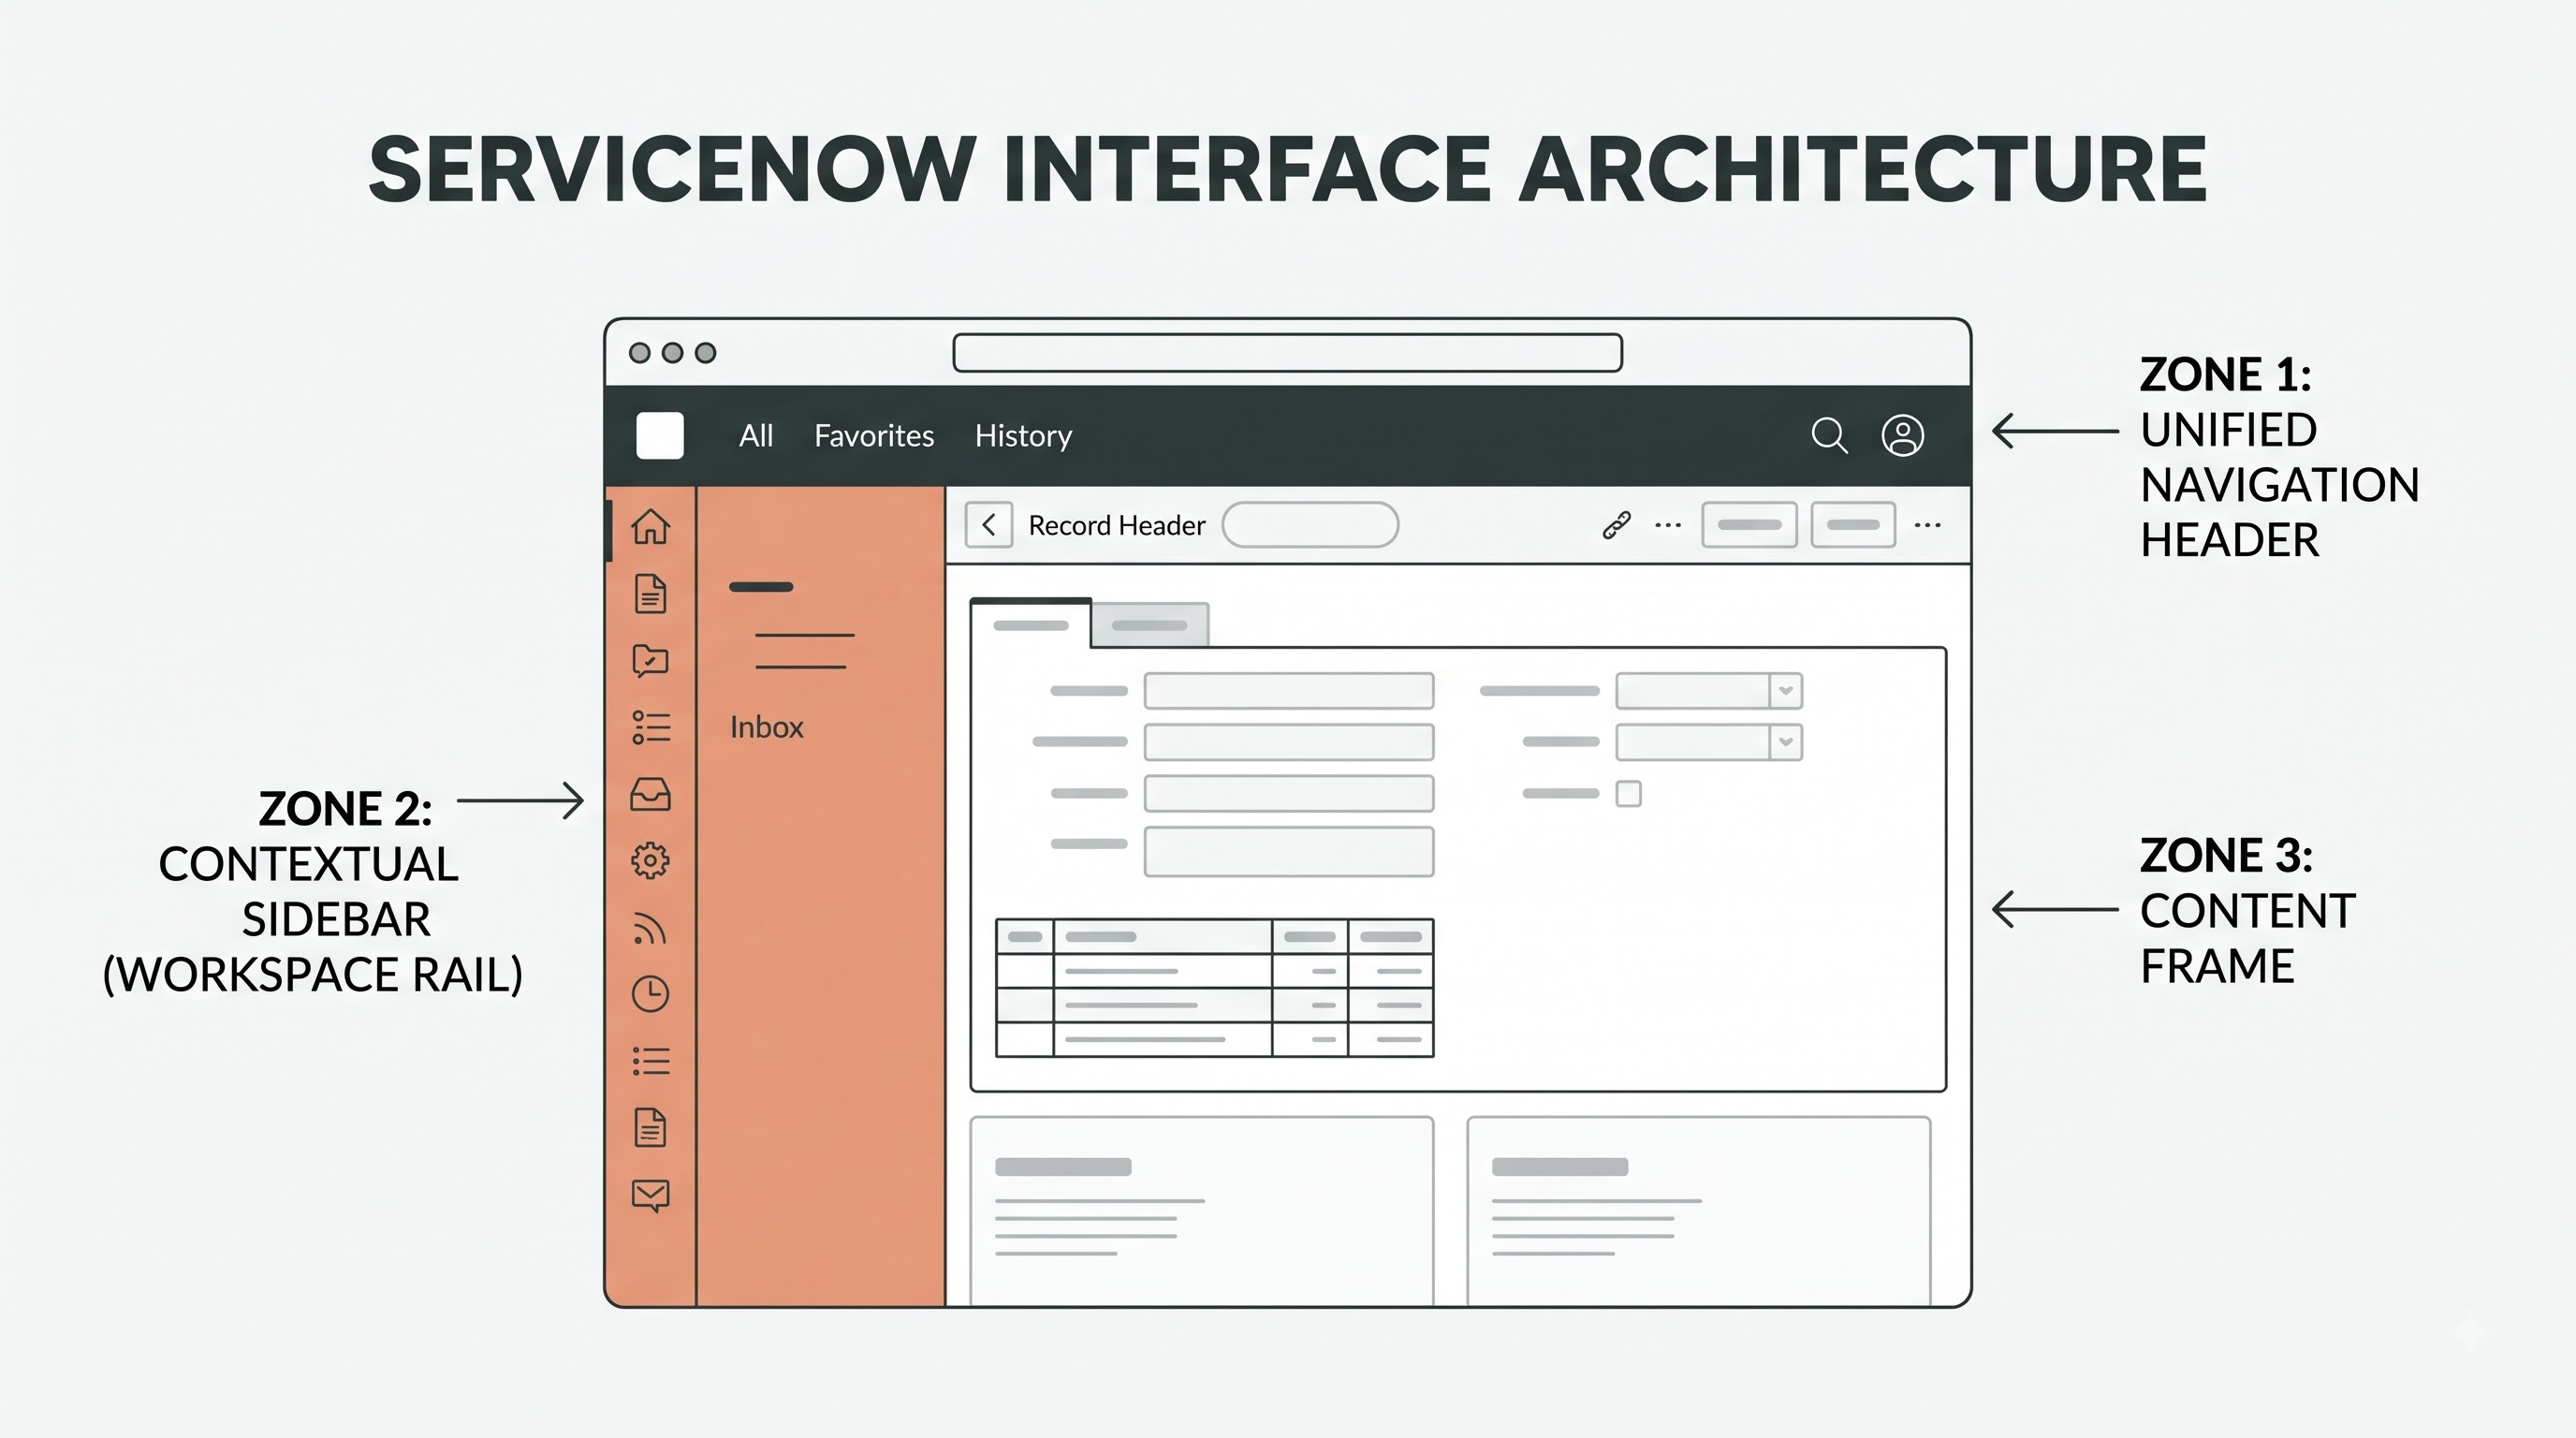
ServiceNow is a single-page web application in essence, so the tools you need are always at your fingertips, but most of your screen is dedicated to what you’re working on. Regardless of department or application you’re in, the screen is divided into three major sections that are consistent throughout the entire platform.
The first zone is the Unified Navigation Header, which runs the entire width of the top of your browser window. Think of this bar as your permanent home. No matter how deep you go into a ticket, a configuration record, or a reporting dashboard, the top header is always there. On the very left, you will see your organization branding logo. This is typically a home button that takes you back to your default landing page. Right beside the logo are the main navigation menus, most importantly the All, Favourites and History triggers in the Next Experience interface, as well as a contextual title that tells you exactly where you currently are in the system. On the right side of the header, ServiceNow groups global utilities: a system-wide search bar, scope and update set pickers for builders, access to help documentation, notification bells, and your personal user profile avatar.
The second zone is the Content Frame that takes up the vast majority of the screen below the header. This is your working space. Whatever you open, an unassigned incidents queue, a single hardware asset form, a knowledge base article, an executive analytics dashboard, everything is rendered inside the content frame. The header is static, but the content frame is dynamic. This means you always see your global navigation controls while working inside individual records.
The third zone is the Contextual Sidebar or Workspace Rail, which varies based on how your organization sets up your user experience. Modern Configurable Workspaces like Service Operations Workspace or HR Agent Workspace allow you to toggle between lists, inbox queues, analytics, and multi-tabbed records along a slim vertical rail on the far-left edge without leaving the workspace environment. Standard platform views include collapsable sidebars, so you can pin your navigation menu open, if you prefer a tree view that is always visible rather than a drop down panel.
Learning everything about Menu and Application Navigator
Usually, ServiceNow users begin in the All menu, which was previously known as the Application Navigator. When you click on All in the top header (or see the left-hand sidebar in Classic UI), ServiceNow displays a hierarchical directory of all applications and modules that your user role allows you to see.
To read this menu correctly , you will have to know the difference between Applications and Modules . An Application is a broad functional grouping that represents a particular business domain, such as Incident, Change, Service Catalogue, Knowledge or Self-Service. Under each Application Header are nested Modules. Modules are the individual clickable links that open specific views or actions. Typically you will see modules under the Incident application such as Create New, Assigned to me, Open, Open - Unassigned, and All. Each module connects to the exact same underlying incident data but applies a different pre-built filter or pops up a blank form ready for data entry.
With hundreds of applications and thousands of modules, scrolling through the directory manually is rarely efficient in a mature ServiceNow instance. But the Filter Navigator text box at the top of the menu is your main steering wheel. The navigator filters the entire menu tree in real time as soon as you start typing a keyword (incident, user, group, report, etc.). It hides sections that are not relevant to your search and highlights every application and module that matches your text.
For someone with ServiceNow experience or even having gone through servicenow training classes in a practical environment, the use of filter navigator becomes more advanced by virtue of understanding the shortcuts for navigating tables within the system. In ServiceNow, each record type is officially known to have a technical name within the system and lies within a database table. For instance, incident, sys_user and cmdb_ci. If you know the system name of a table, you can bypass the menu hierarchy entirely by typing the system name of the table plus a specific suffix directly into the Filter Navigator and pressing Enter. The name of the table followed by .list will bring up the full list view of that table in your current window. form opens a blank form to create a new record in the table. Perhaps most usefully, typing .filter brings up an empty list view with the filter builder expanded, allowing you to define narrow search criteria before the system loads thousands of records onto your screen. If you type any of those suffixes in all caps, ServiceNow will open the destination in a new browser tab, preserving whatever work you currently have open.
Favourites and Navigation History
The filter navigator is great for finding tools on the fly, but if you find that you are doing the same searches dozens of times a day it can slow down your workflow. ServiceNow has that solution: two personal productivity menus, right next to the All menu: Favourites and History.
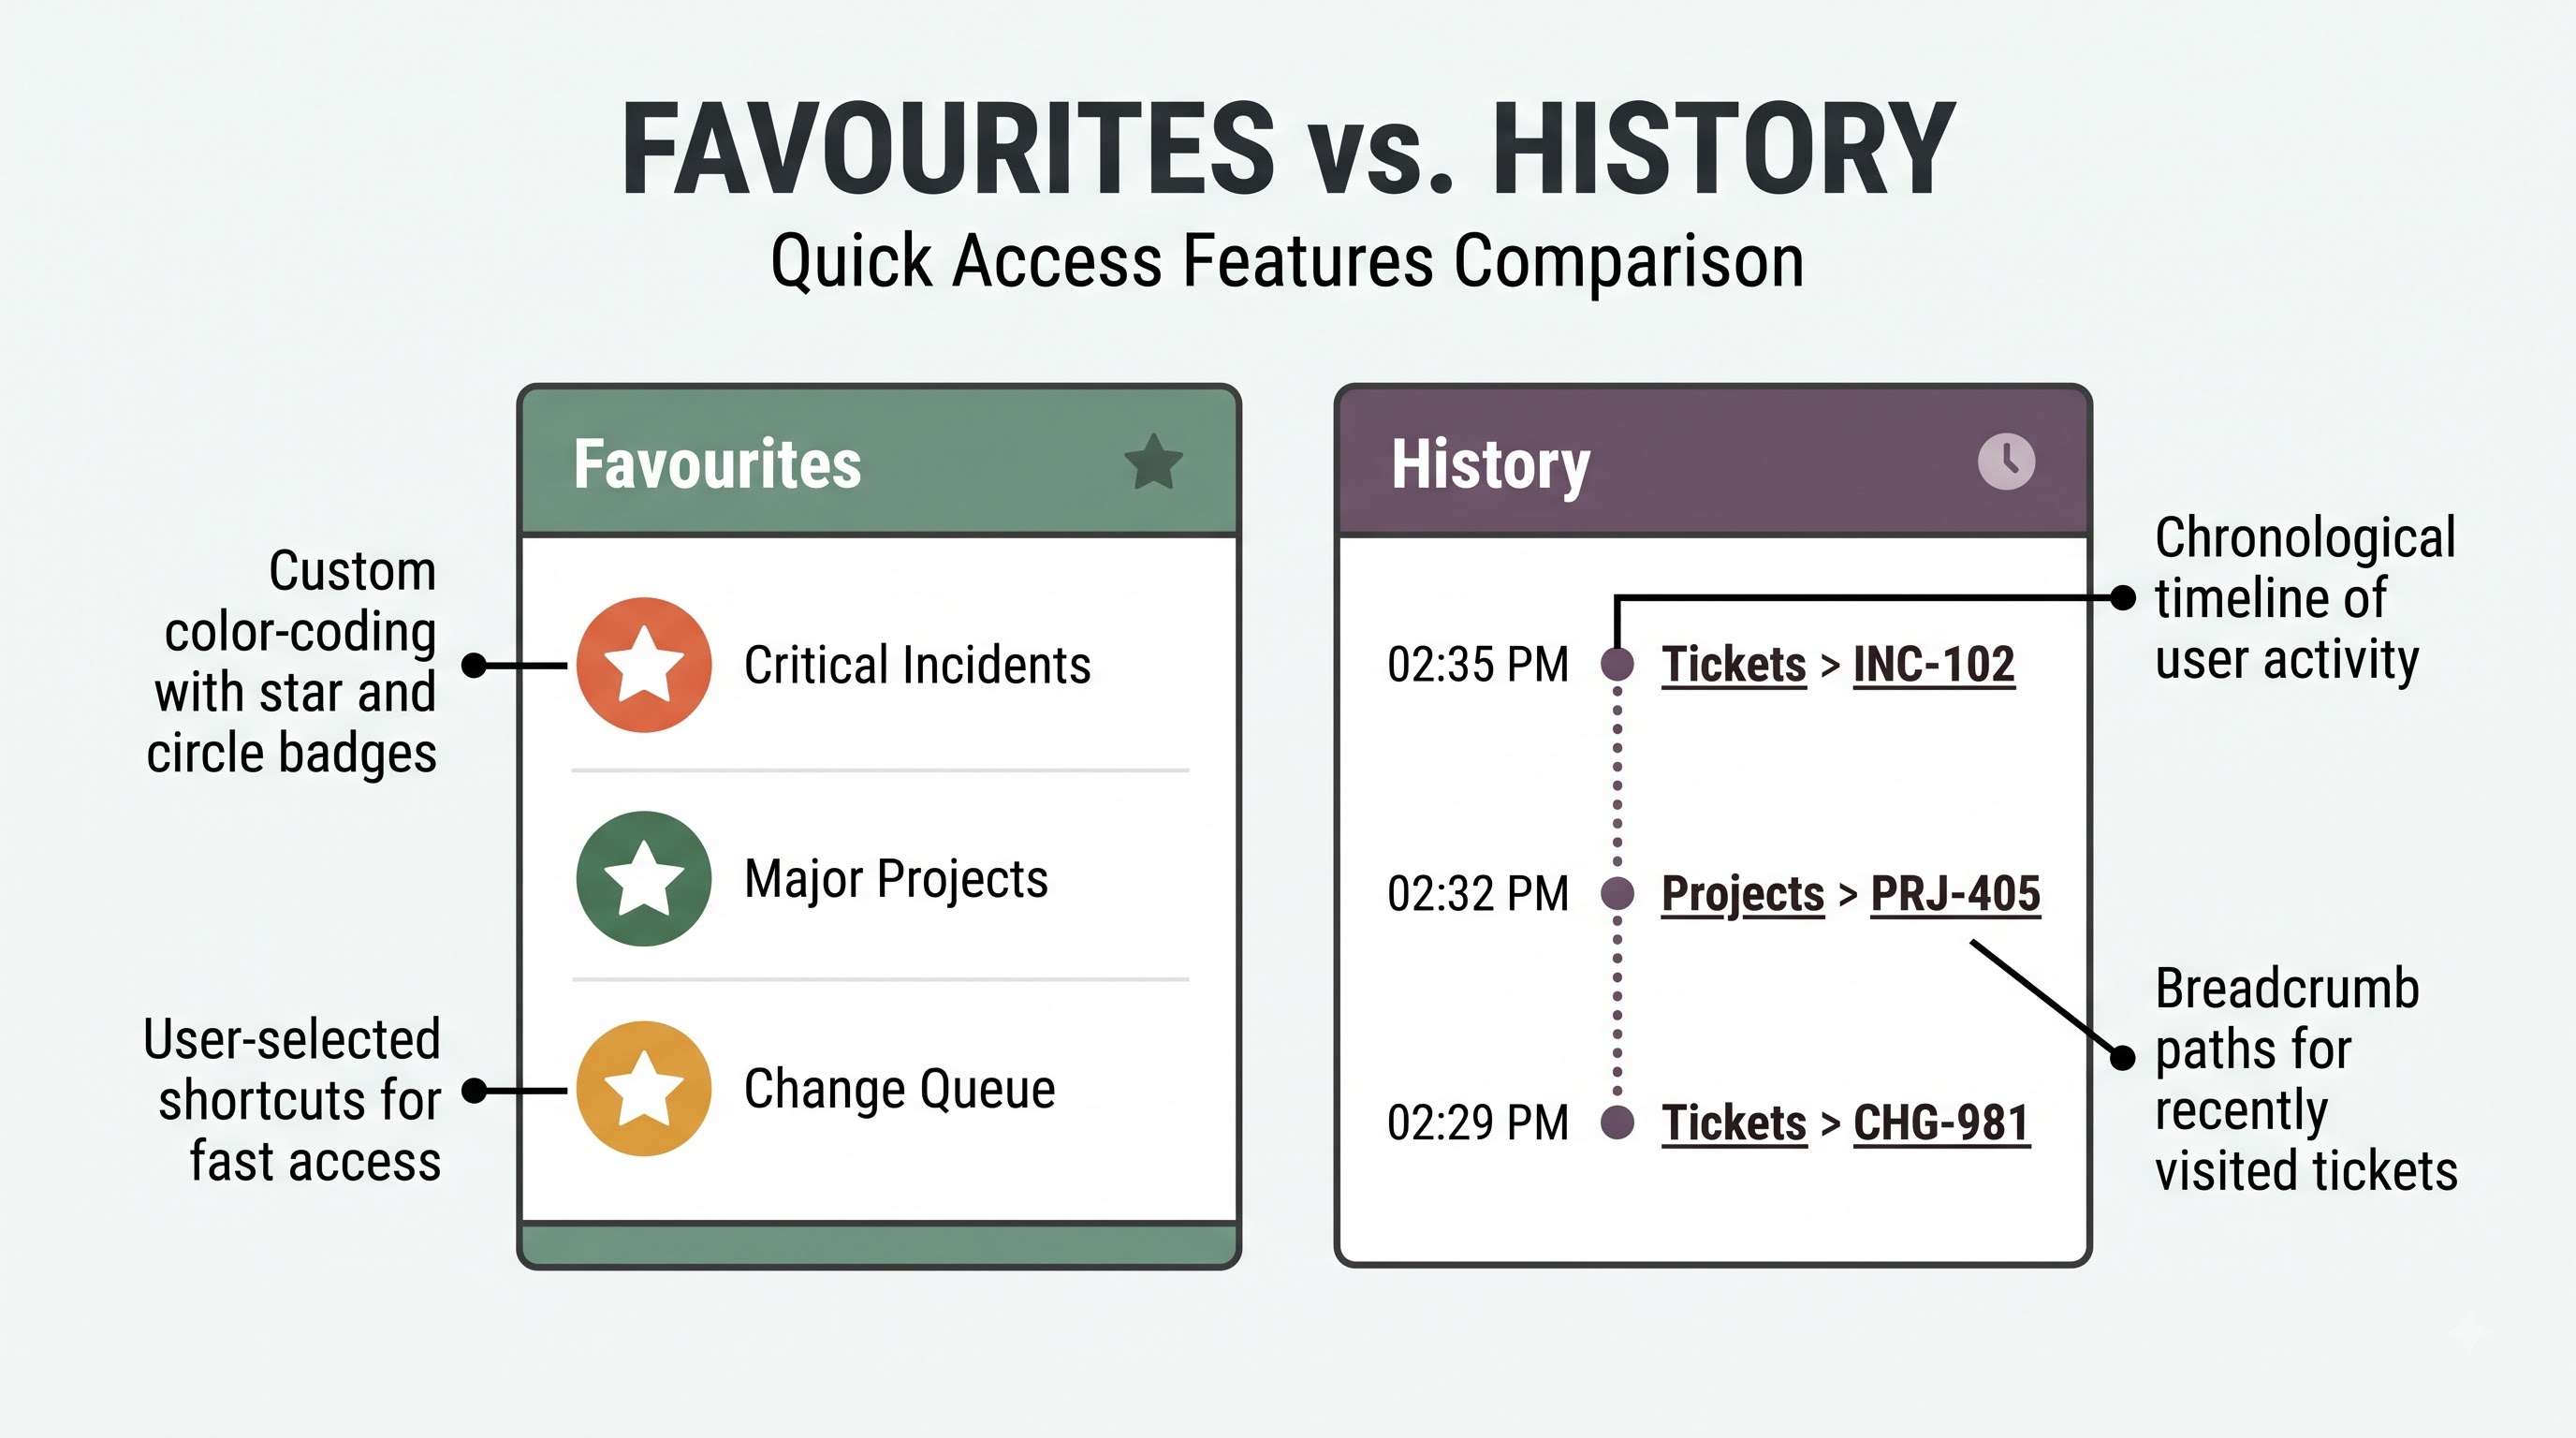
The Favourites menu is your own personal bookmark bar inside ServiceNow. Almost anything on the platform can be saved as a favourite. Hover over any module inside the All menu and you’ll see a little star icon appear next to the module title. Click that star to add the module to your Favourites list instantly. Favourites are far more flexible than mere menu links. For example, 10 minutes spent on creating a complex filter on a list of active tasks – filtering the results to high priority items assigned to your specific team that have not been updated in 3 days. Rather than recreating that filter every morning, you can drag the filter breadcrumb straight into your Favourites menu, or use the list context menu to save that exact filtered view as a favourite. You can even bookmark an individual record – e.g. a long running major incident or critical project plan – for one click return visits.
After you save items to your Favourites menu, ServiceNow provides a few ways to personalise their appearance. In the Favourites panel, you can select the edit option to rename bookmarks with simple and memorable labels, change the vertical order of the bookmarks, and assign a unique icon and colour to each bookmark. By colour coding your favourites (e.g., daily incident queues are red, change management modules are green, and reporting dashboards are blue), you create visual landmarks that your eyes can latch onto in a split second.
To the right of Favourites is the History menu, which is like an automatic chronological breadcrumb trail of your session. Each time you open a list, view a single ticket or go to a configuration page your History log is updated with a timestamp. When an unexpected phone call interrupts your work and you need to look up an unrelated user profile, you never have to remember the ticket number you were previously editing. You can open the History menu to see your recent stops in reverse chronological order, and with just one click jump right back to your exact spot.
Working with Lists and Creating Specific Filters
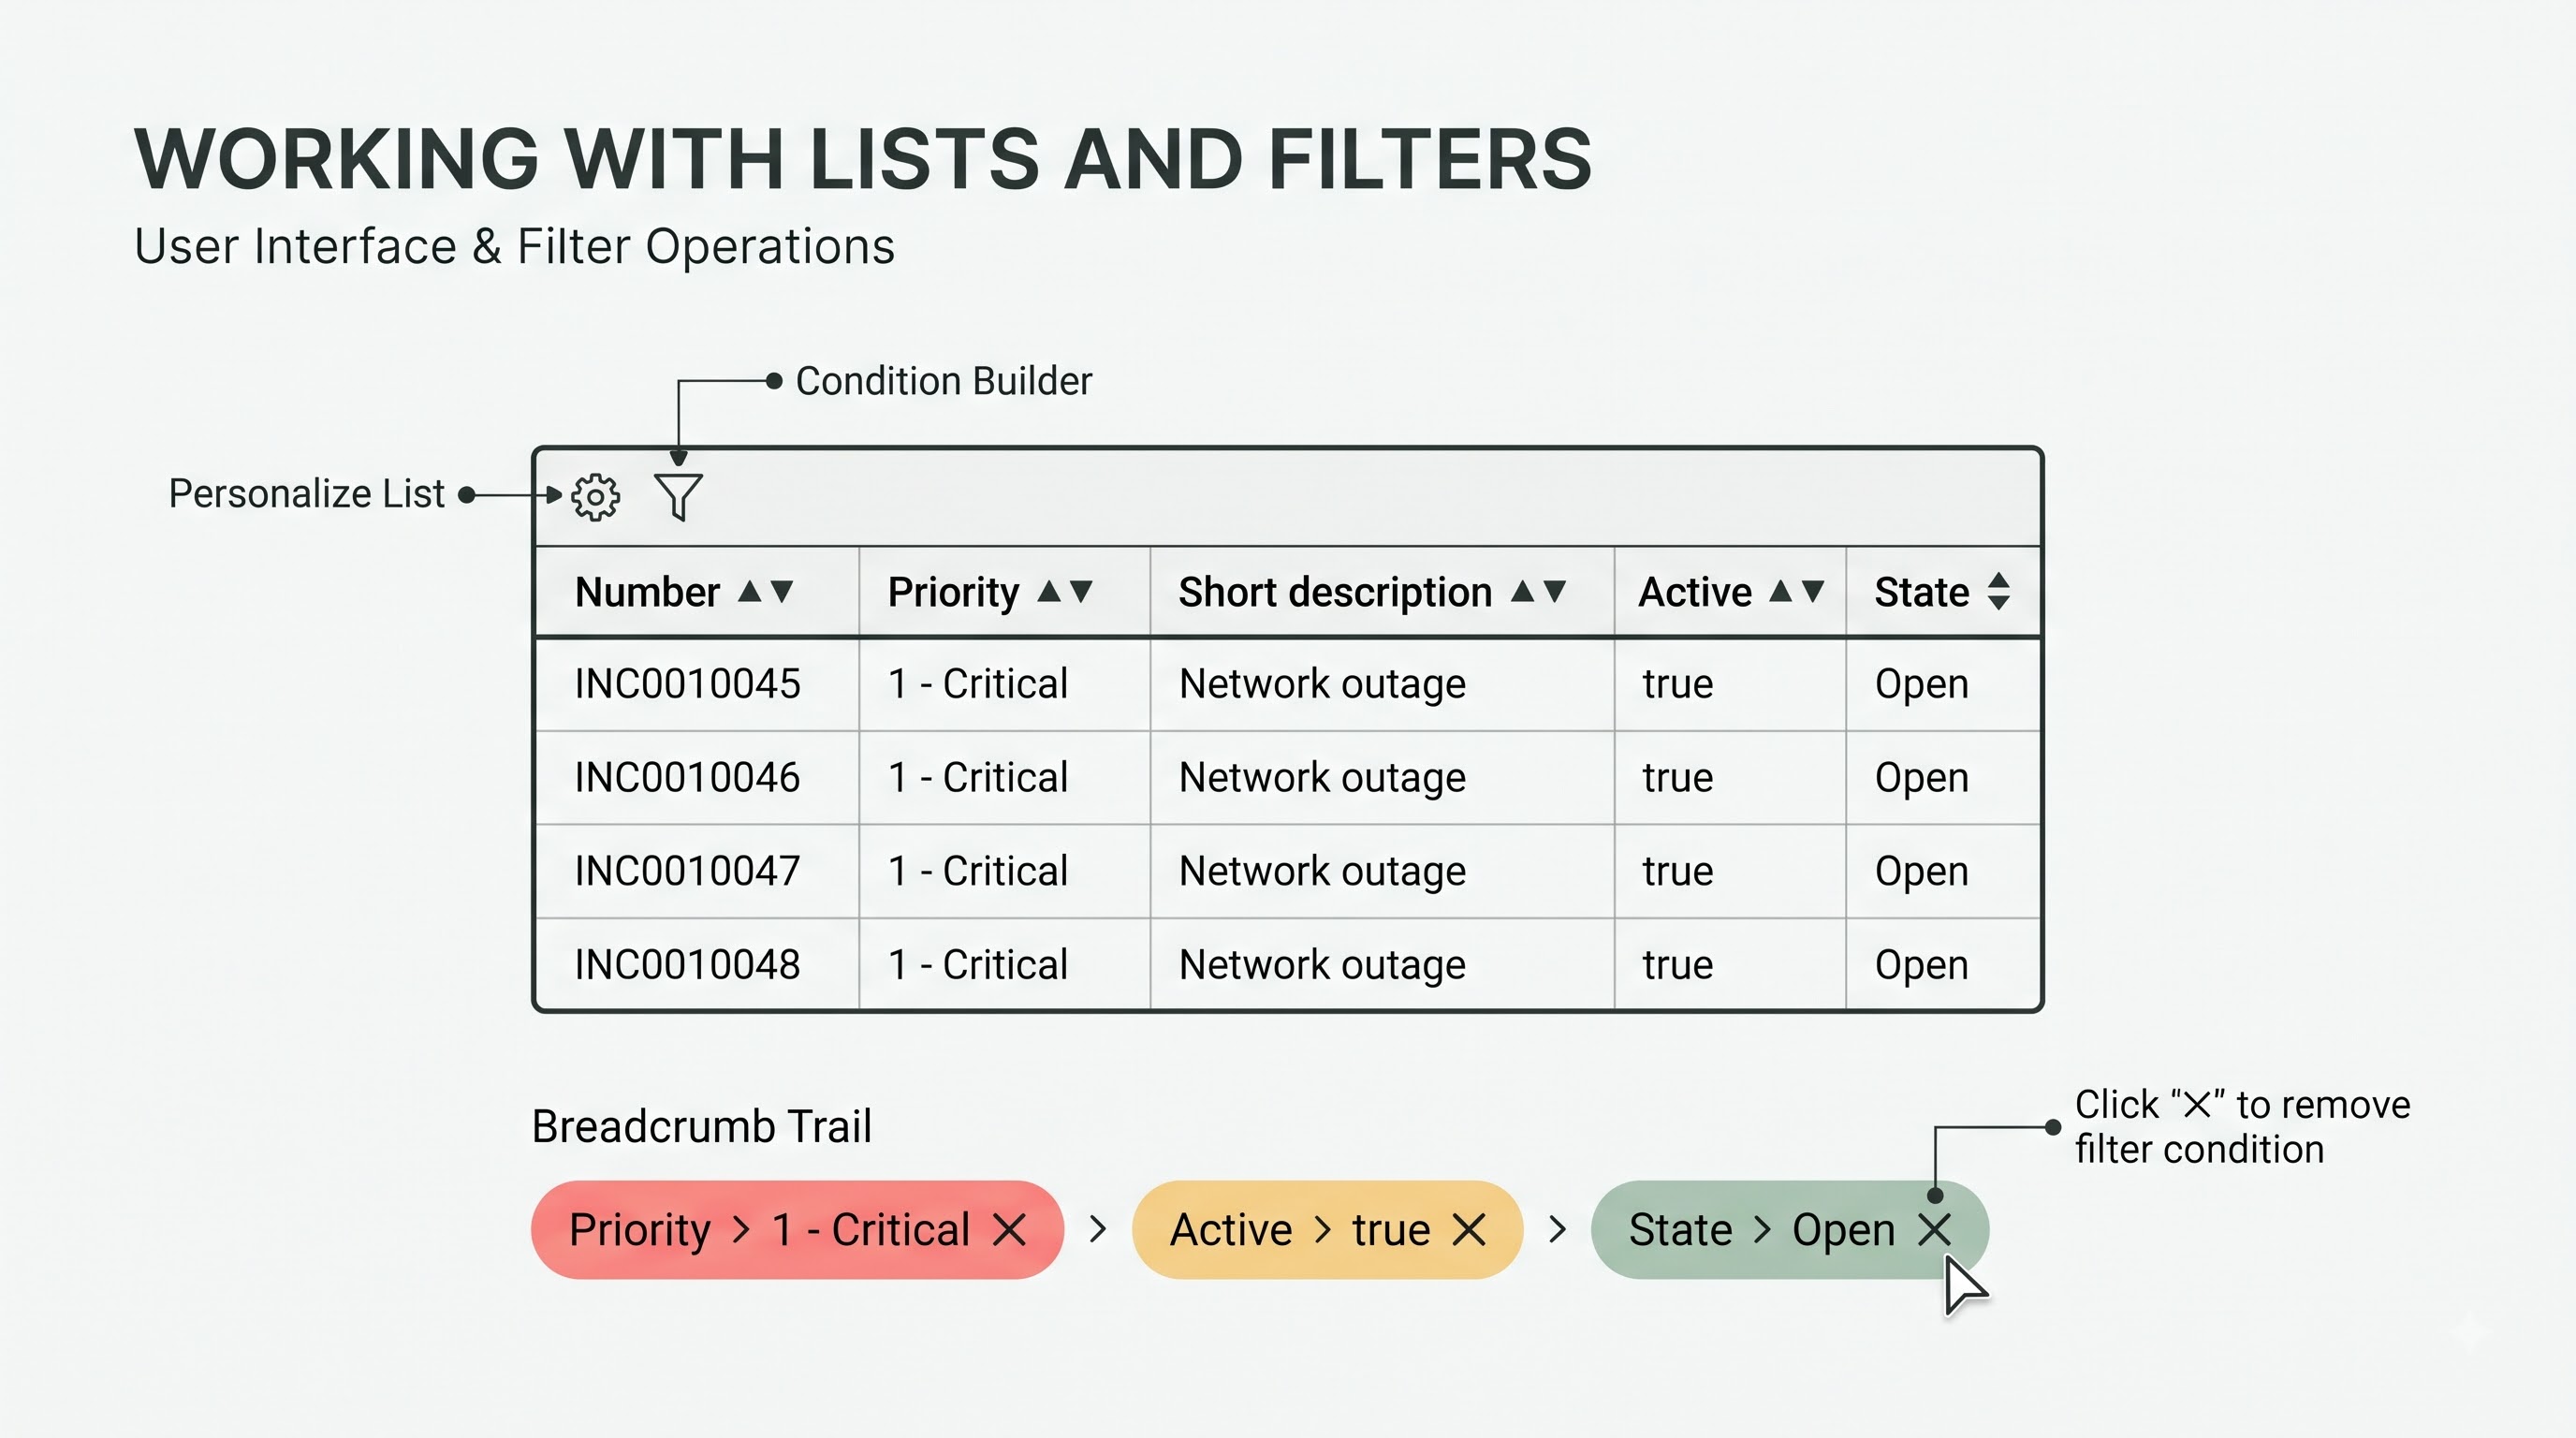
Clicking on almost any of the navigational modules will take you to a List View, which displays multiple records in rows and columns. Each row is a single record (for example, a single support ticket or employee profile). Each column is a specific attribute (for example, the record number, short description, priority, state, or assigned owner).
If you want to be able to navigate lists well you have to know how to sort and manipulate columns. If you click on any of the column headings, the whole list will be sorted alphabetically, numerically, or chronologically by that field. Clicking the same heading a second time will reverse the sort order between ascending and descending. If a list includes columns you don’t often need, or omits important information you do, then clicking the Personalise List gear icon in the top-left corner of the list will bring up a column selector. From there you can add, remove or reorder columns for your own user account only, without affecting what your colleagues see.
If you have a list that contains thousands of records, you can't visually scan it, and the Condition Builder is one of the most important tools in the platform. You can access the filter interface by clicking the funnel icon in the top left corner of any list. Each filter condition has three simple parts: a Field (the attribute you’re looking at, like State or Created), an Operator (how you’re comparing it, like is, is not, contains, starts with, or on or after), and a Value (the text, choice, date, or person you’re trying to find).
You can use AND and OR buttons to stack multiple conditions on top of each other to ask unbelievably specific questions of your data. You can use an AND condition to narrow your results by requiring that all rules be true at the same time. For example, you could search for records where Active is true AND Priority is 1 - Critical. An OR condition broadens your results by finding records that satisfy any of the listed criteria. Click Run, and ServiceNow refreshes the list, and displays a clickable Breadcrumb Trail across the top of the list frame.
Breadcrumbs are dynamic navigational elements, not just labels. Each piece of a breadcrumb is one condition in your active filter, separated by greater-than symbols. Click anywhere in the breadcrumb trail and you’ll delete any conditions to the right of it, instantly expanding your view. If you click on the greater than symbol immediately preceding a condition, it deletes that one rule only - everything else is left intact. Even better, if you see a specific value right there in the list itself such as a specific caller name or a specific category, right-click on that cell to get Show Matching and Filter Out options. Select Show Matching to instantly filter the list down to records with that exact attribute. Select Filter Out to hide them. You can slice through huge queues in seconds, and never even open the condition builder.
Overview of Forms and Related Records
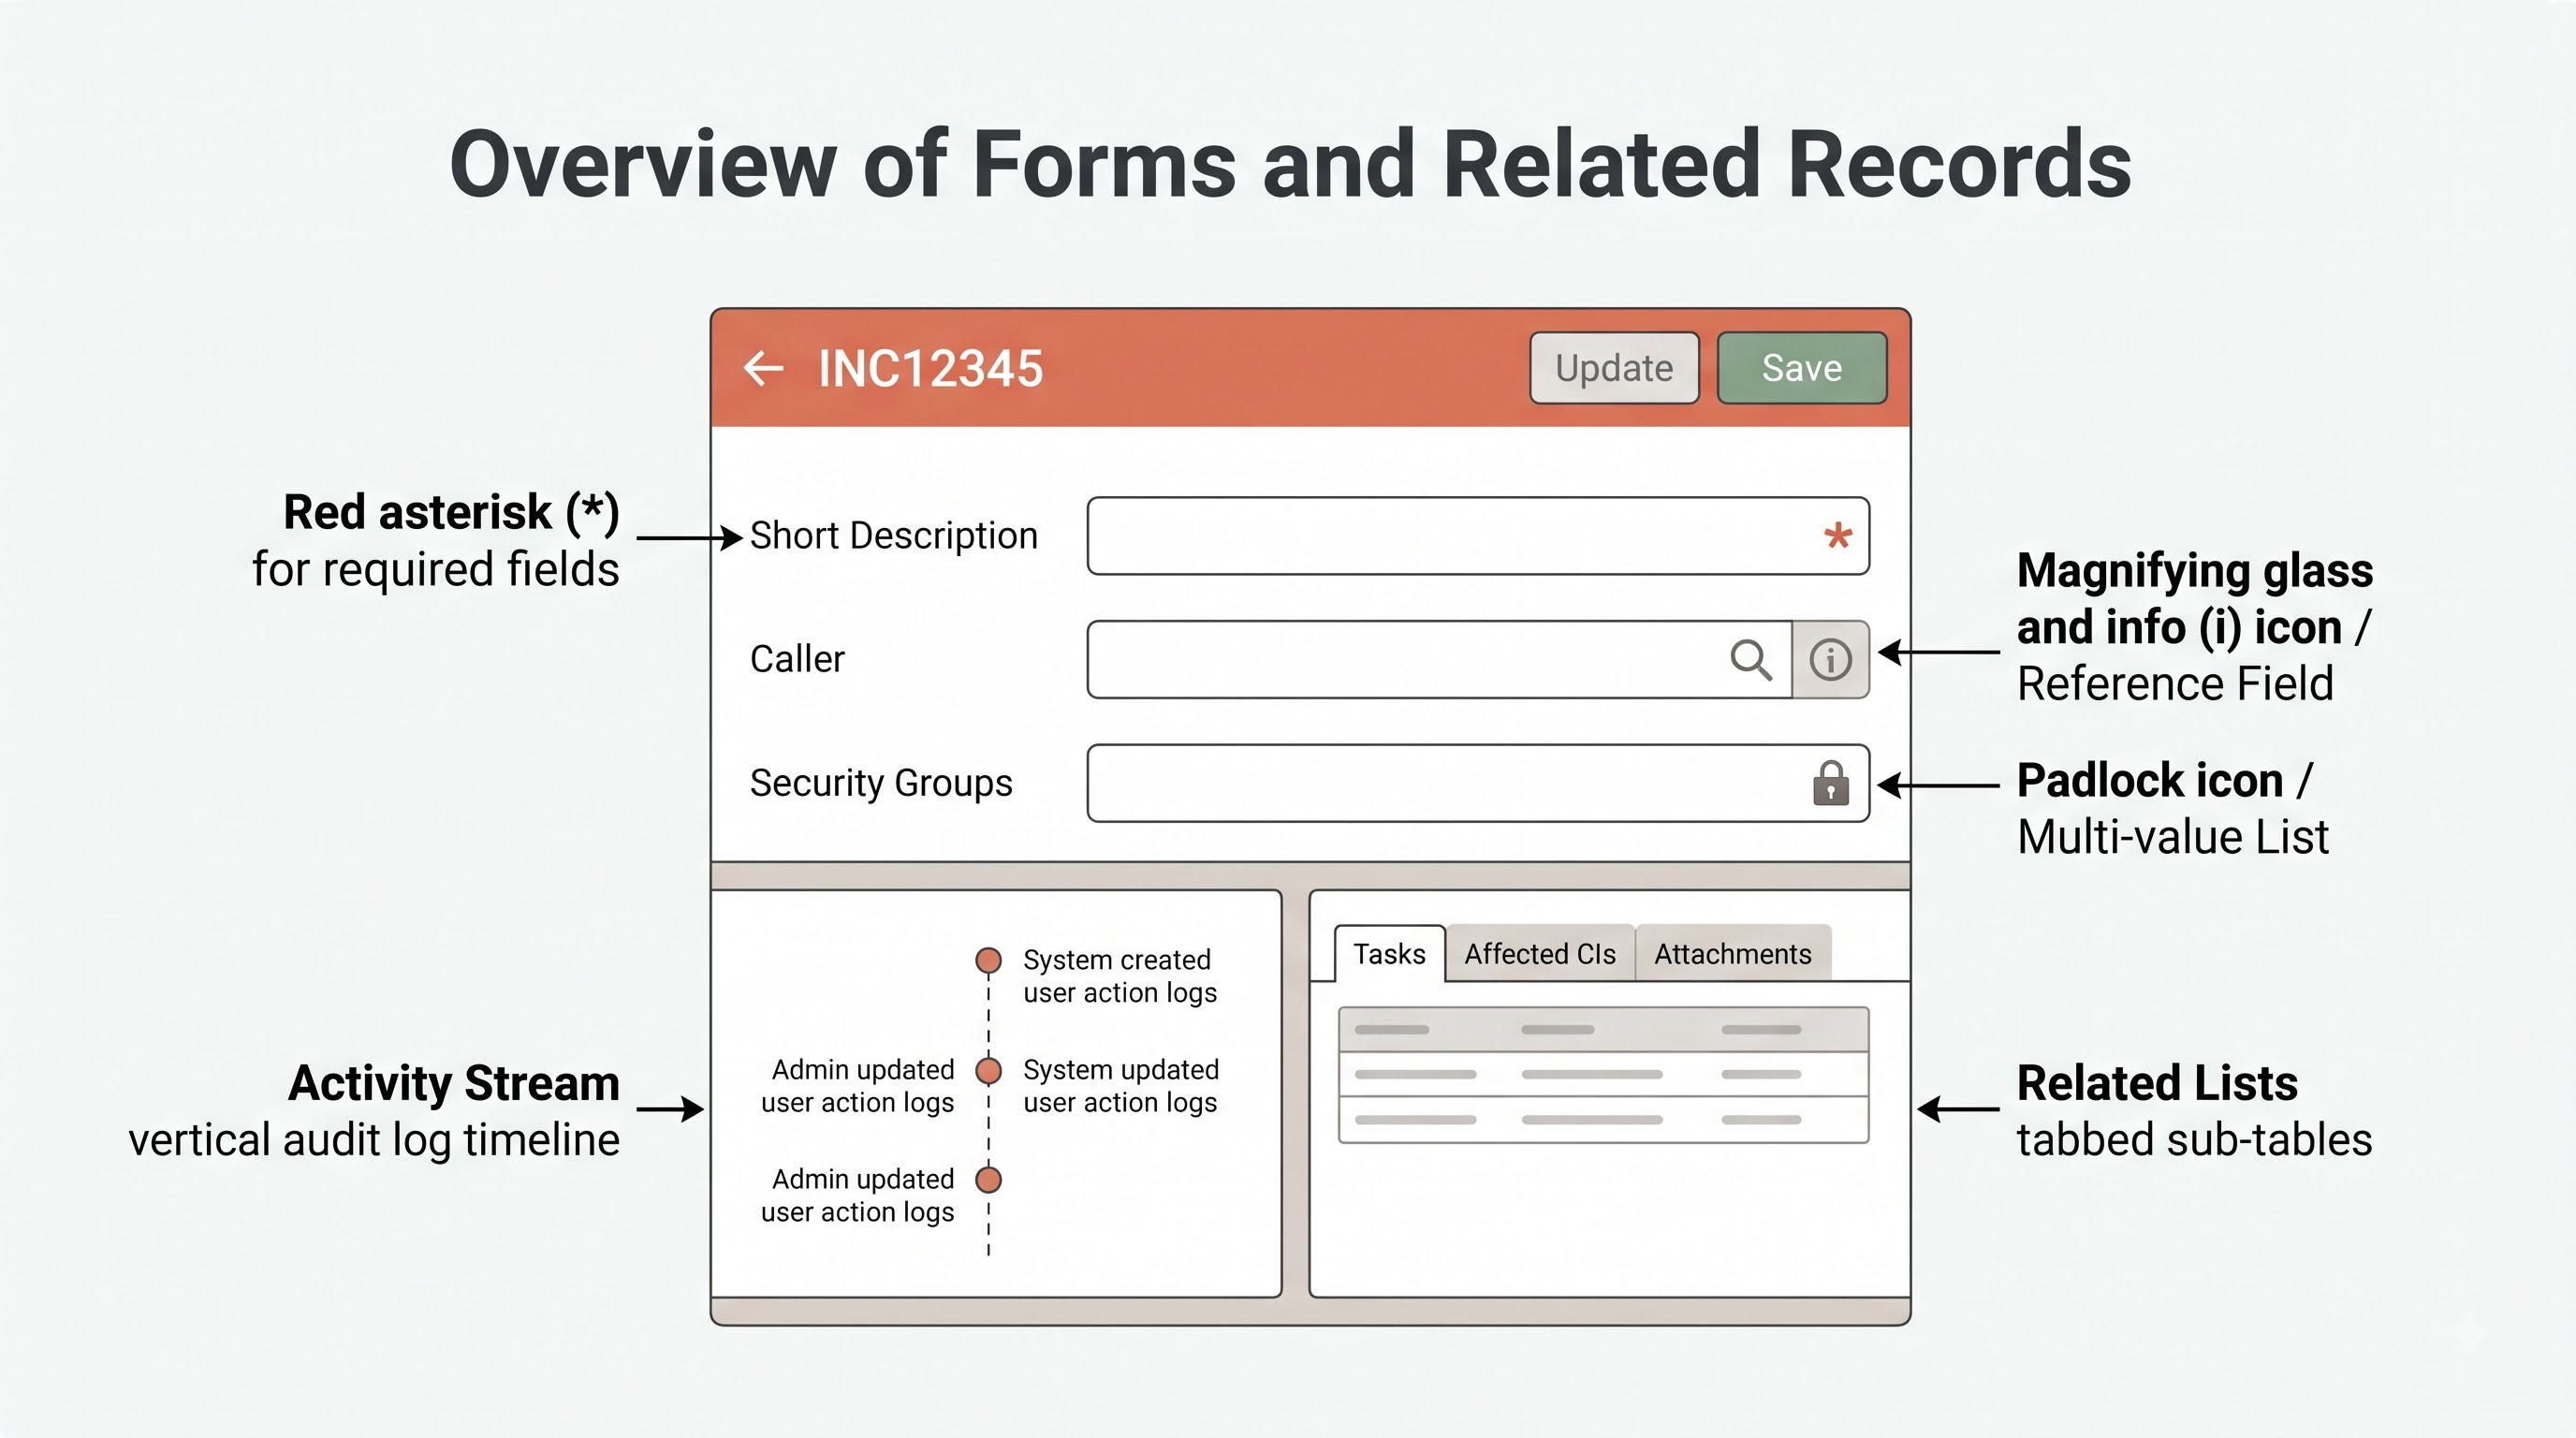
Any list. Choosing a particular record number changes your content frame from List View to Form View. A list will show many records with few fields . A form will show one record with all fields , history , and relationships laid out for viewing and editing in detail.
The Form Header is at the top of every form, and displays the unique identifier for the record, a back arrow to easily return to your previous list, and primary UI Action buttons like Update, Save, or Resolve. Knowing how Update and Save differ in behaviour will save you from a common navigation frustration. Clicking Update commits the changes to the database and immediately returns you to the previous list view. If you click on Save (usually found in the form context menu or in the header actions) your changes are committed to the database, but you remain on the current form and can continue your work.
Inside the form body, fields use visual clues to tell you their rules before you begin to type:
A red or grey asterisk next to a field label indicates a required field that must have a value before the record can be submitted or updated.
A magnifying glass icon appears next to a field when it's a Reference Field. This means the field links directly to another record somewhere else in ServiceNow – for example, a user profile, a department, or a hardware asset. Clicking the magnifying glass icon opens a pop-up lookup window. Clicking the information icon (an "i" inside a circle) next to a populated reference field allows you to preview or open that linked record directly.
Multi-value list fields are indicated by a padlock icon. You may unlock the field to select multiple items at once, and lock it again to save space.
Following the main form fields are two important areas of contextual navigation, the Activity Stream and Related Lists. Activity Stream provides a chronological audit log of every comment, work note, status change and email sent on the record, keeping all communication in one place. Related Lists are tabbed groups located below the activity stream that display child or associated records related to the item you are viewing. For example, you can see all of the tasks associated with a parent change request or all of the previous incidents opened by the same employee. You can drill down into root causes and operational dependencies using related lists without losing context on the parent record.
Global Search, Workspace, and Personalisation
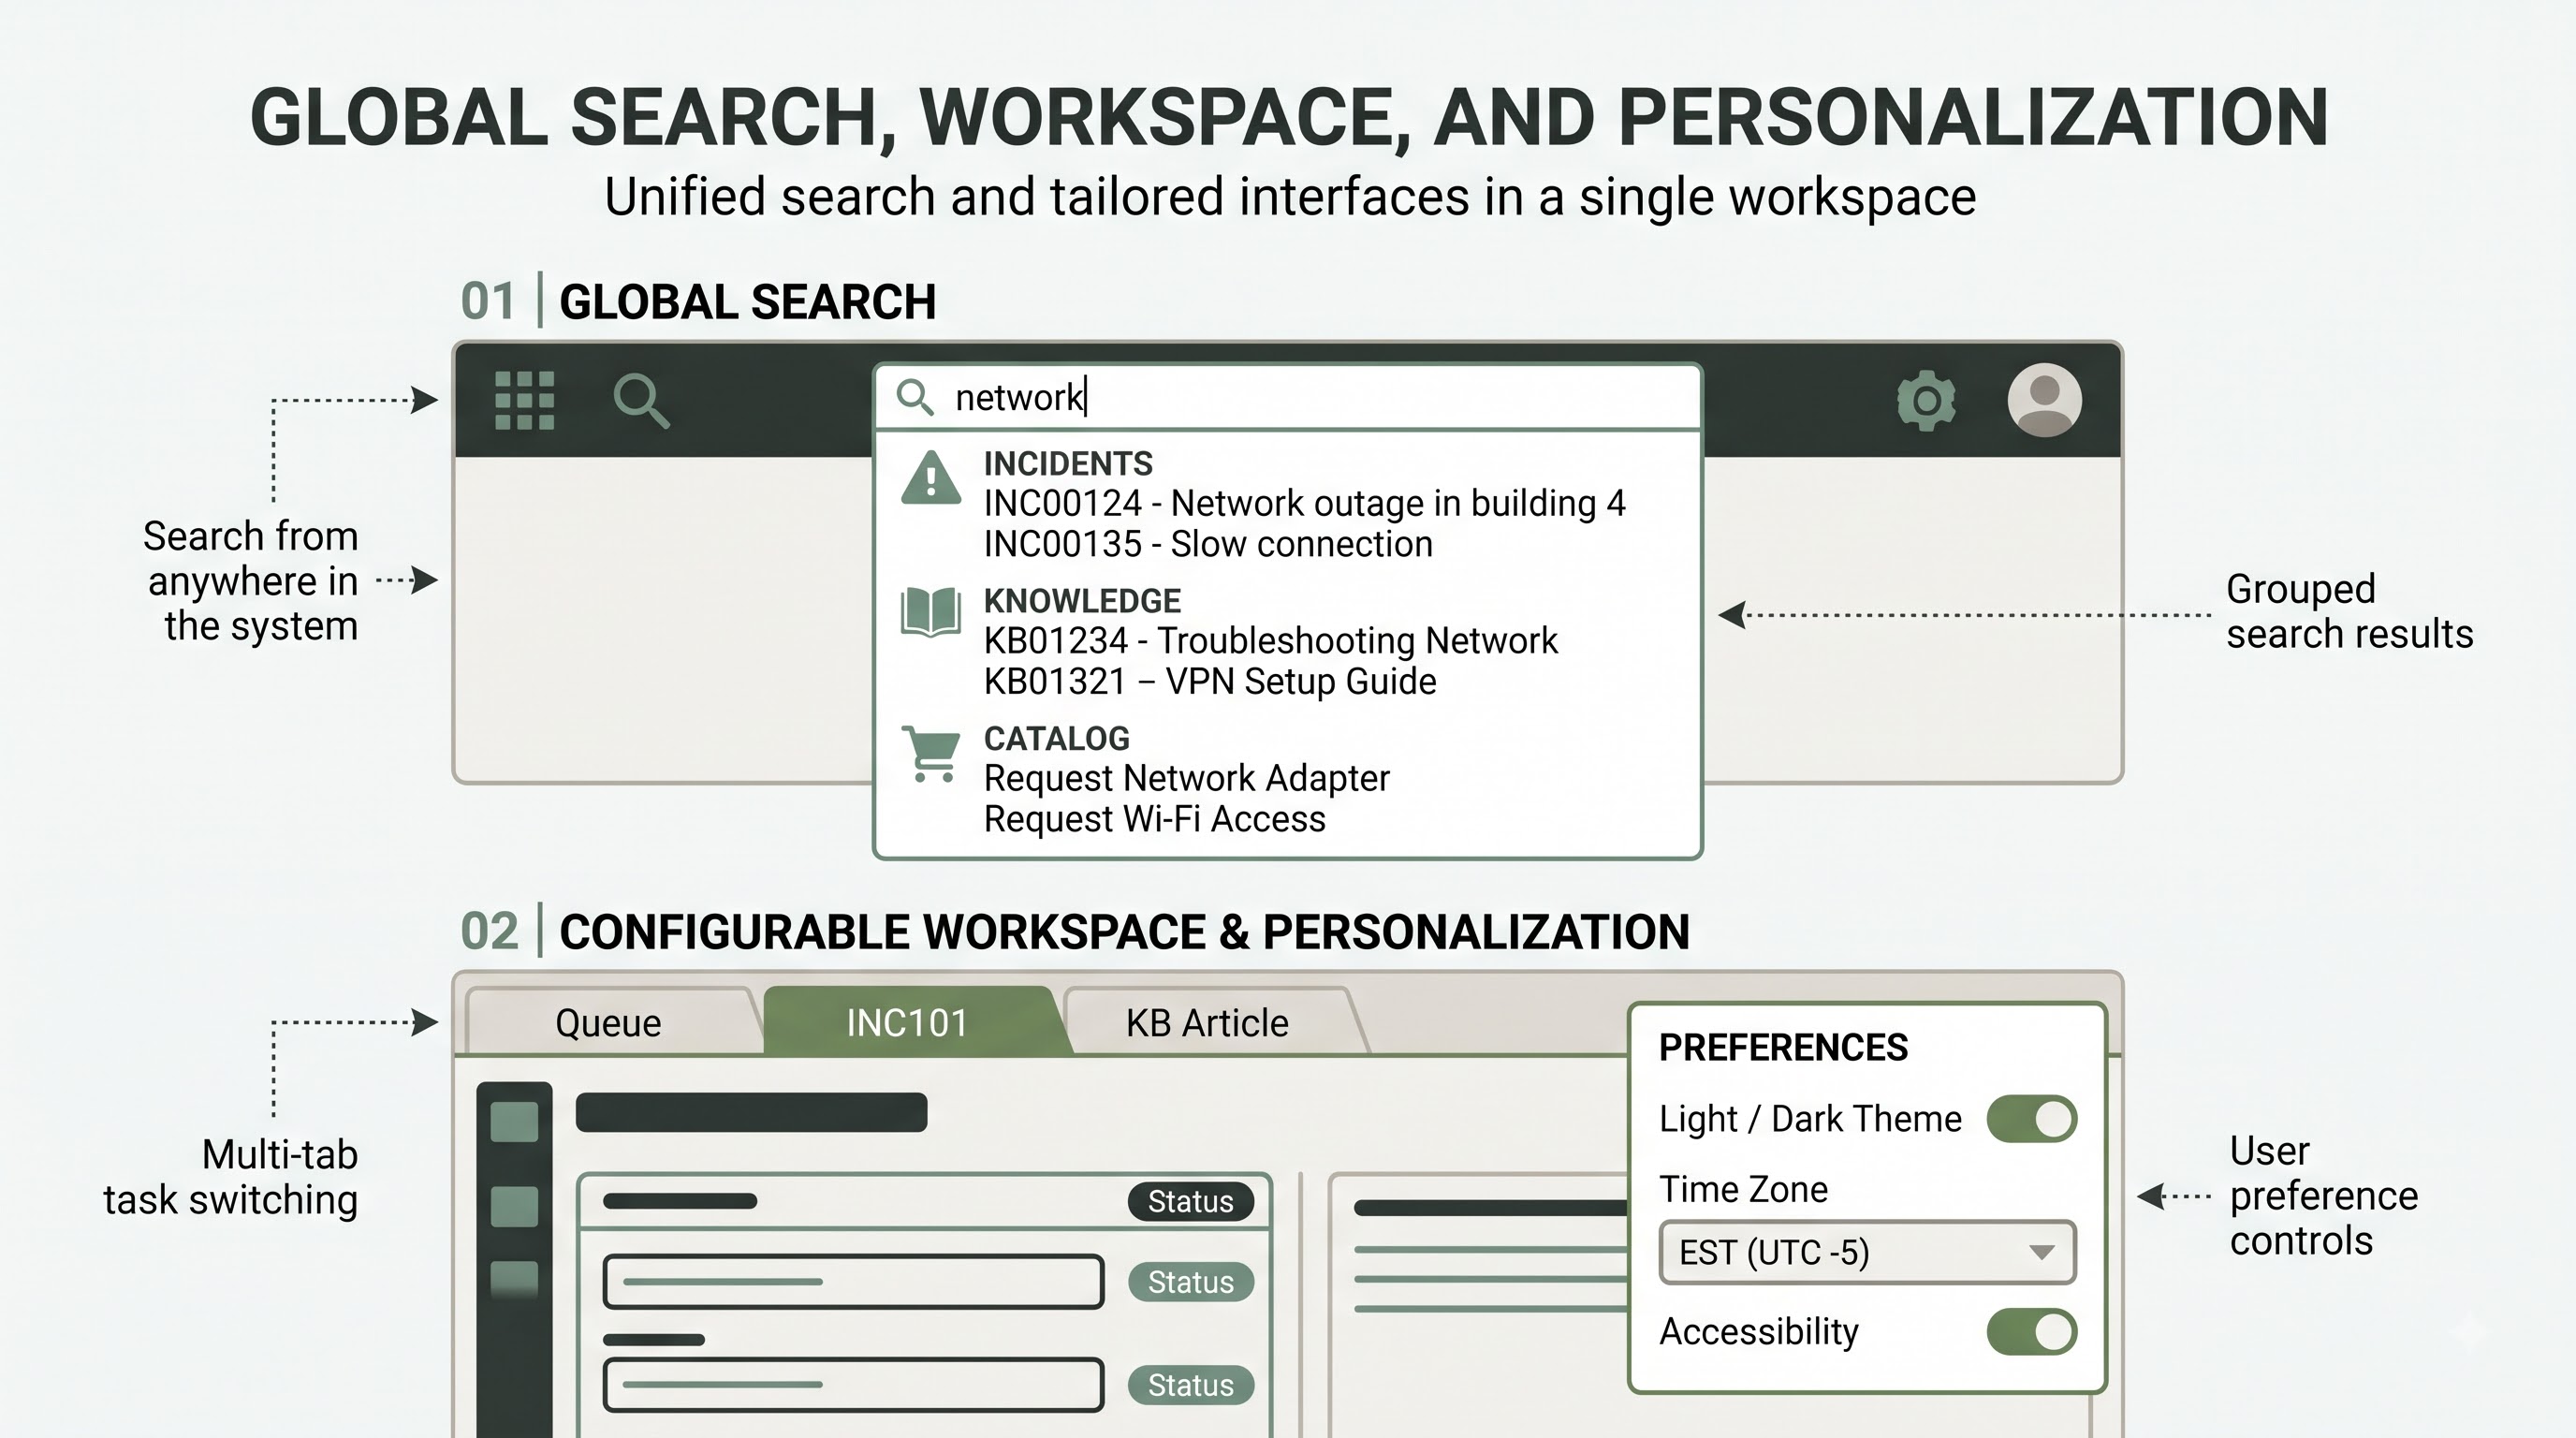
In addition to the structured menus and lists, ServiceNow also includes Global Search in the top header. Sometimes you know what you’re looking for—a ticket number, an error message, a serial number, or a person’s name—but you don’t know what table it’s in. When you type a keyword in Global Search, it searches multiple tables at the same time and groups the matching results by record type, like Incidents, Knowledge Articles, Catalogue Items, and Users. With Global Search, simply click on any result and you immediately open that record. It’s the fastest rescue tool when you’re handling live enquiries.
For fast-paced operational teams, ServiceNow’s Configurable Workspaces redefine navigation around multi-tasking. The standard platform moves through the content frame one list or form at a time. With a Workspace, tabs are added to the ServiceNow interface that operate like browser tabs. The agent can keep a queue open in the primary tab, while opening three different customer tickets, a knowledge base article and a problem record in adjacent sub-tabs, switching back and forth between active conversations without losing unsaved notes.
Finally, by adapting the environment to suit your own working habits you can increase everyday comfort and ease of access. The User Menu is opened by your profile avatar in the top-right of the unified header. Preferences lets you control a wide variety of personal preferences. In Preferences, you can toggle between light, dark and high-contrast visual themes, set your time zone and date formatting, enable keyboard shortcuts for faster navigation, and set your notification preferences. Spend five minutes setting your user preferences, starring your key daily modules, and practicing breadcrumb filtering, and ServiceNow will transform from a complex enterprise directory to a responsive workspace that is tailored to how you work.
Conclusion
At the end of the day, using ServiceNow is about going from passive browsing to purposeful, streamlined doing. The design behind it is based on a constant, repeatable logic across all departments and workflows, although the sheer volume of applications, modules and records on the platform might be intimidating at first. As users drill down into complex operational tasks, the persistent Unified Navigation Header, the dynamic Content Frame and contextual workspace rails work together to give them a stable sense of orientation.
The real efficiency comes from pairing these structural landmarks with ServiceNow’s embedded productivity accelerators. By mastering the Filter Navigator, using table shortcuts, and creating colour-coded Favourites, you can eliminate the repetitive friction of scrolling through endless menus or rebuilding the same searches each morning. Likewise, the combination of Condition Builder with interactive breadcrumbs, right-click list filters and Global Search allows fulfillers and administrators to rapidly pinpoint critical records in seconds instead of minutes. Once inside a record, knowing visual field cues, the difference between saving and updating, and how to track dependencies in the Activity Stream and Related Lists will help you work accurately and confidently without losing context.
Probably one of the most important aspects of ServiceNow is that it is designed to work around the individual working on the computer. In a matter of minutes, people can customize list columns, set up their personal preferences and configure workspaces in order to customize the whole database for the entire company and turn it into a command center. Whether it is support tickets, change requests or even service management operations, the knowledge of navigating this platform, which can be obtained through service now training classes offered by OnlineITGuru, is vital for efficiency.