
Today advancement of technology creates an equal amount of advantages and disadvantages. So day -to -day as web developers, hackers were also increased. So, at this peak moment, we need to protect the data. Because data is a heart in the IT industry. And these people were majorly opting the Phishing schemes. Besides, providing unnecessary access to lower level source users leads to internal security issues.
After developing an application, the app will be accessed by many people. Moreover, in an organization, the manpower will go on increasing. So whenever a new employee has entered into the organization, the app developer must provide access to that employee. So at this moment, the app developer needs to create a new user. And if an employee has quit, we need to delete the user. So in this block, we will see user creation and deletion.
so now let's move to the user management concept.
User login :
Salesforce environment provides a unique feature in identifying the user login. i.e it provides each user with a unique user name and password. Besides, it provides access to execute the task that is assigned to perform with the data. Moreover, an administrator can manage the users throughout the company by creating profiles and assign users to these profiles. And this user management deals with permissions as well as licenses. So depending on the salesforce edition and license, object level security has categorized into three types.
Organization-wide default (OWD)
Profile
Permission set
What is Organization wide default?
Organization-wide default (OWD ) is a part of object level security. It ensures object level security is specific to the user and creates a barrier between the users to access the records (or) created data. This OWD has three features. So let us discuss one by one in detail.
Public Read/ Write:
Like the administrator, anyone can view and edit the data. But only admin has an ability to ability to delete the data.
Public Read only:
Besides admin, the other users have the ability to view the data. But it does not have the user does not have permission to edit (or) delete the data.
Private:
Only the administrator has the ability to view, edit (or) delete the data. But other people do not have access to it.
public Full object:
This can be assigned only for the campaign object. Besides, all the users will have access to the campaign object. Here any user can access the records created by the other user.
Public Read / write and Transfer:
This OWD is applicable for LEAD and CASE. When you would like to delete the parent object, you need to transfer all the respective data to its child objects.
Control by parent:
This is applicable only when the objects are controlled by the Master-detail relationship. For example in the previous sections, we have seen Master-detail relationship between the Bank process and the Accounts. So all the parent (Account)_ process will be transferred to the child object(Bank process).
Also check the importance of Data security in Salesforce
How to access the OWD?
So now follow the Salesforce online courses website to create a user.
Step - 1 :
Click on the object (bank process). From the quick access, click on Object. In the search bar type roles. So in the Administer block, under Manager users, you will be finding Roles. Click on it.
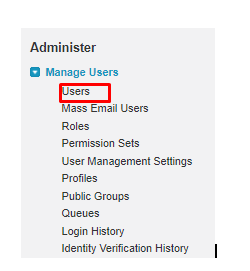
step - 2 :
Once you click on it, you will be finding the users list as shown below
If you observe the above screenshot, you will be finding 4 users as shown above. But out of four one will be created by you and the other three will be created by the Salesforce cloud.
step -3:
Click on New user.
step - 4:
Fill the details as shown below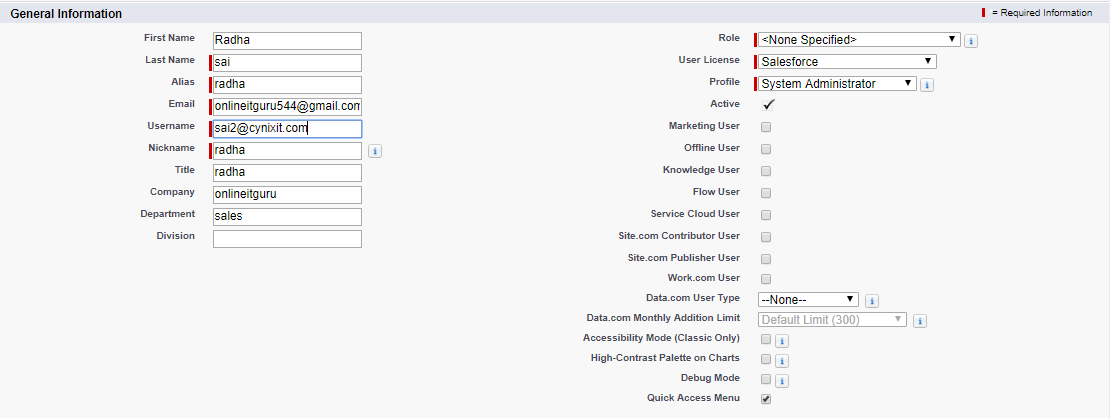

and finally, click on SAVE
step - 5:
Verify your account from the registered e-mail id. So after clicking the verification link in the mail. you need to create the password
And you will be entering into your account.
so like this a user will be created !
and you will be finding your user name in the user creation list as shown below.
similarly, when you click on the user, you will be finding an option of delete user.just click on it to delete the user. So once you have deleted the user, it takes a few hours to delete the user. So even after the user deletion, you can still access the account for some time. Besides, there is a freeze option in the user account. This will lock the user for some time.
So now let's move to the topic profiles.
what is a profile?
A profile is a part of object level security that gives access to the users who are accesses to the particular profiles. The profile applies to all the users in the department that leads to the accessing of the records.
salesforce environment provides profile access in both standard and custom levels. Today people prefer to the custom profiles because standard profiles do not allow to modify/ update all the object permissions. So now let's have a look on
How to customize a profile?
Developers/ salesforce community users must know that before going to create a profile, we need to clone the existing standard profiles. So in the Salesforce application ( Banking) click on Set up. In the search bar, search for profiles. So in the administer under manage profiles users, click on profiles.
so in those profiles, search for the Salesforce administrator and click on Clone. So once you have opted for Clone, you need to provide the profile name. Here, im providing the name as Custom System Admin and click on SAVE 
so you will be entering into the following screen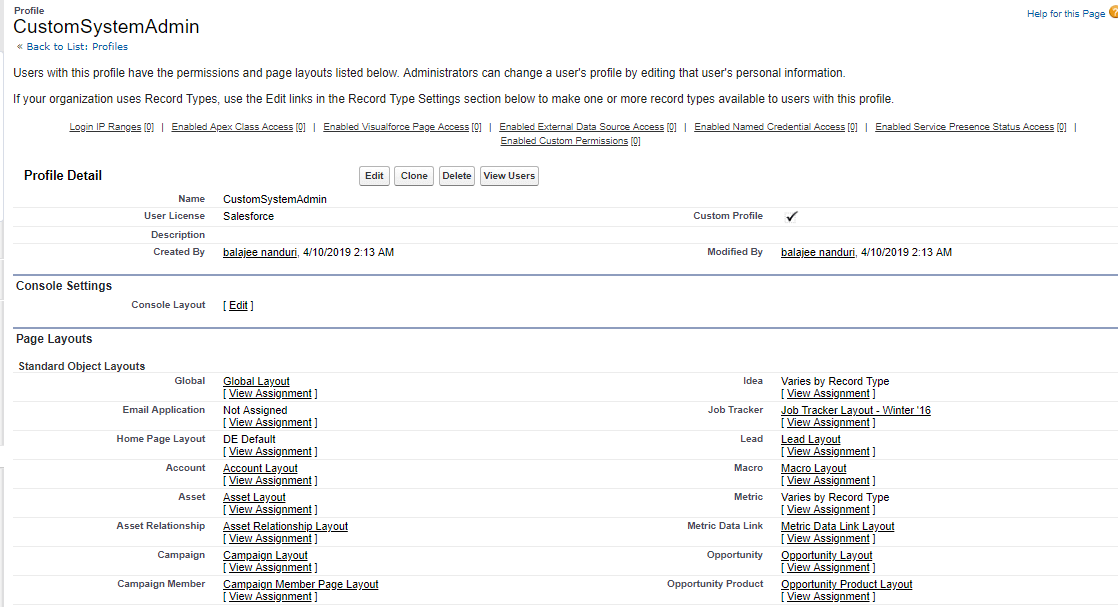
Here this allows you to edit the options/ settings as per the user requirement.
So once you have created a profile, you will have the following edits in the objects
1)controls access to object level and field level security
2)page layout assignments
3)Field level security
4)App settings
5)Tab settings
6)Record type assignments
7)object permissions
8)login hours
9)login IP
So get the real-time live explanation on all the above features at salesforce training in Hyderabad.
so now we will move onto the permissions sets
Permissions sets:
This is used to provide additional permissions to the users who are already in a profile
Permission set allows you to add/remove the permissions to the small subset of users at any time
Moreover, you can add multiple permission sets to the user
Besides user permissions sets only when user subsets need additional permissions.
Finally, if there is a lot of people in a profile need that permission then you can create a customer profile and can add permission directly to that user.
so now let us create the permission set
step - 1:
Click the object that you need to create permission. Click on Set up. So in the search bar search for the permission sets. So once given, you will be finding permission sets under the manager users. Click over it and click on NEW.
step - 2 :
provide the label as well as the API name. And select the license as salesforce and click on SAVE.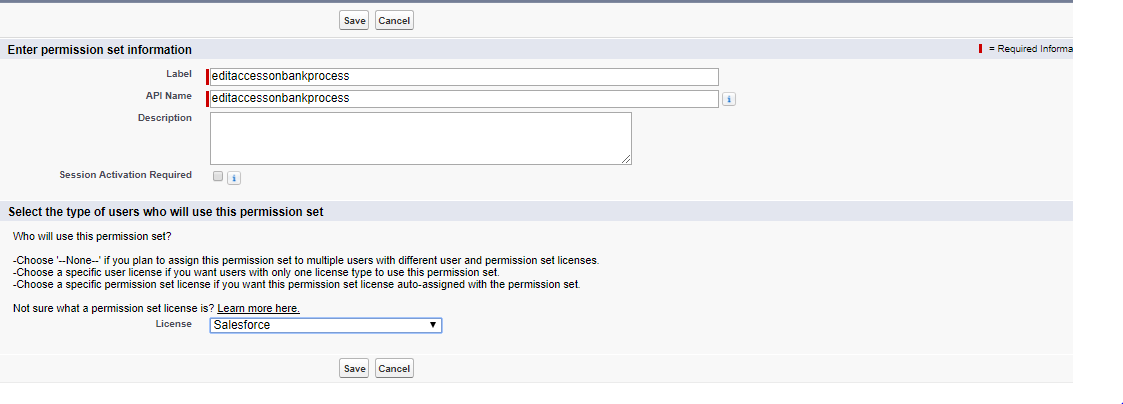
so a permission set has been created. And you can edit the options as per the requirement. Moreover, you can assign the permissions at both objects level as well as user level.
so now let's move on to the Permission set.
What is a Permission set?
It is a part of object level security. It gives special rights to the particular user to perform the actions. Here the user does not have any license set if he/ she gives NONE in the license set. Usually, this type of license is given to the high-level users (or) the users with special permission to continue the workflow without any disturbance.
So now let us see
How to create a Permission set?
step - 1 :
Visit the object (Bank process) and click on SET up. so from the search bar, search for the permission sets. And you will find this option under the manage users. So click over it. then you will be entering into the following screen and Click on NEW.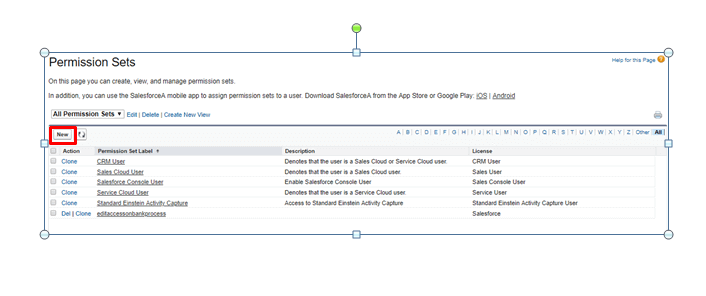
step - 2 :
Provide the label and the API name as Permissions set and click on SAVE.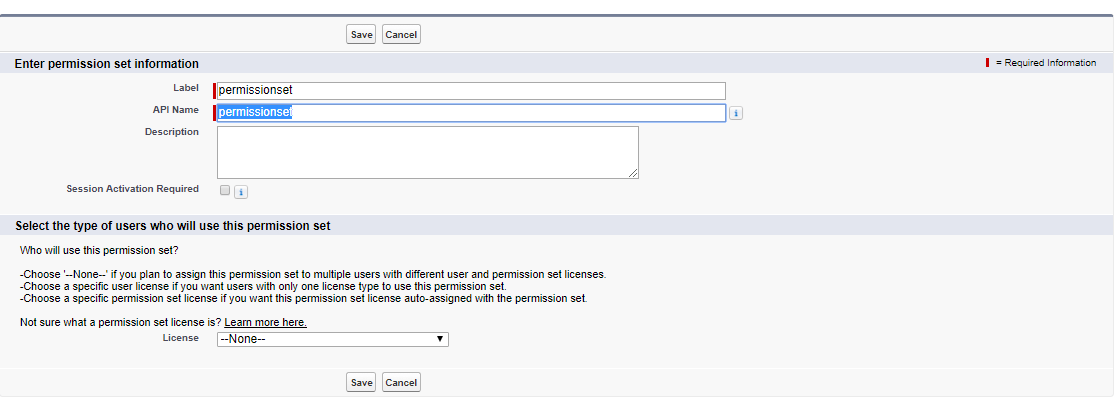
And you can navigate to the various process to edit/delete the permissions.
so now let's move on to the
Record level Security:
A record level security enables users to access the few records. Every record/ data is owned by the user and has full access to it. In this hierarchy, the users in the senior level will always have the access given to its juniors.
Today in the Salesforce environment, with roles we can modify the Salesforce profile and the permission. So let me first define you
What is meant by a role?
A role defines the access levels to the single user (or) a group of users. So other than OWD, the senior level users will have the same access levels as like juniors.
How to create a Role?
In the object(Bank process) click on Set up. So in the search bar, search for Roles. So under manage users click on Roles. So once you click on it, Click on Set up roles.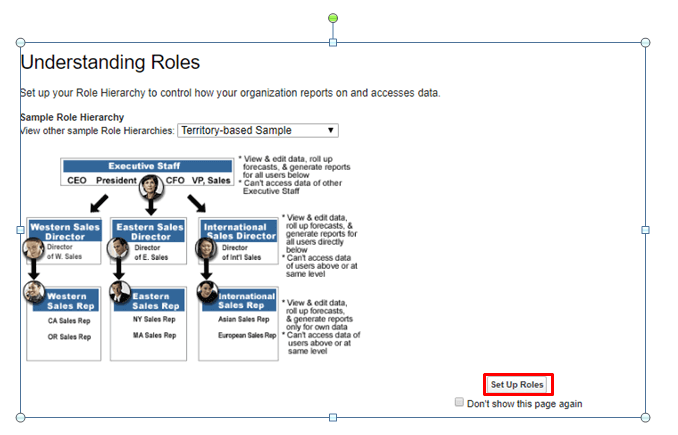
So here you can update the roles as per your requirement.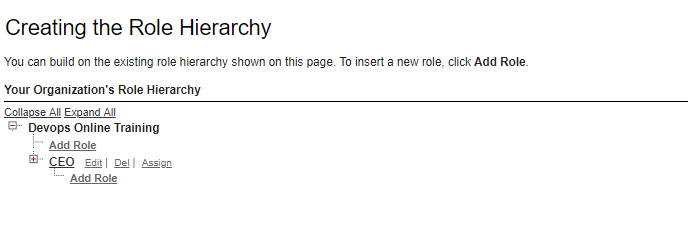
So if you have clearly observed the above screenshot, you will be finding an edit and Add role options. It means this community allows you to edit the existing roles (or) lets you create a new role.
So now let's have a look on
what is meant by a sharing rule?
Sharing rules permit to make the expectations automatic to rog - wide setting for a set of users. Besides, they provide access to the records, that they do not own (or) cannot view the records. Besides sharing rules permit additional access to the records. But one should remember that should serve than OWD settings. This sharing rules now will be divided into two types.
Ownership - based sharing rules:
It shares the records based on role, role and subordinate and public group ownership.
Criteria -based sharing rules:
It shares records based on values of fields in the records, irrespective of the record owner.
So now, we will see
How to create a sharing rule?
Usually, records are shared via the public group. So now, let's create a public group. So let's start sharing through the public groups.
Select the object(banking process) click on Set up. In the search bar, search for public groups. So soon after typing, under Manage users, click on public groups and click on NEW.
step -2 :
provide the label name as TEST group. And you add roles to the group. And you can add roles to the group by simply selecting the Roles from the search drop down. Likewise, you can also add Roles and subordinates as well as the users. So as of now, I would like to add users and click on save.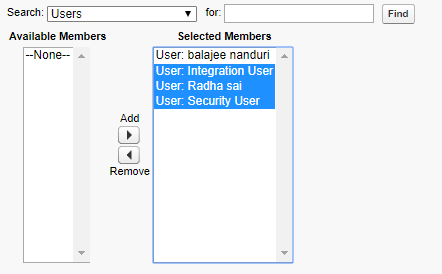
So now let's move on to the sharing settings in the search bar. So scroll down the page, and navigate to the position sharing rules and click on NEW.
This screen consists of 5 steps. Follow the steps mentioned below to process further
step - 1 :
So here provide the name as Sharing rule example.
step- 2:
As said above, we can share the records w.r.t either on based on record owner(or) based on criteria. Based on criteria usually refers to the certain condition from where the records need to be selected and needs to be selected.
step -3:
So as of now, we will select, the rule type as based on record owner. Besides you can select the records from the Public groups, Roles and Roles and Subordinates. So as now, we will select the Public Groups. Since we have previously created a public group, we will select from that group(Test Group).
step -4:
So now its time to select the people to share with the people. And we can select the single person(or) a group to share the records. So as of now, we will Public group(Test Group). It means any member creates a record in that group will automatically get shared with other people in the group.
step- 5 :
After that, you can select the permissions like Read-only (or) Read and write to people (or) to the group. Here I would like to provide the Read and write permission.
And finally, click on SAVE.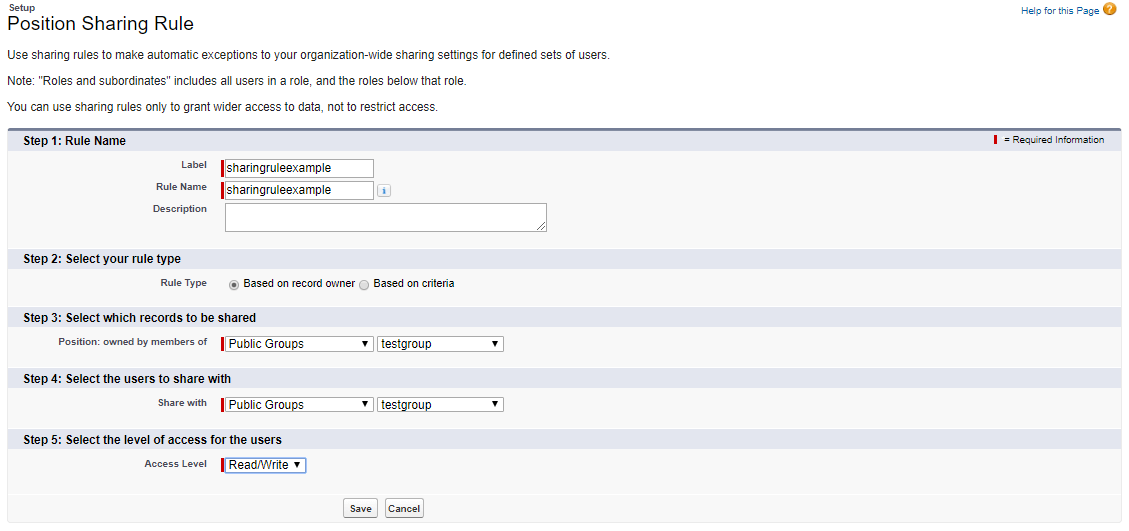
Besides, you will be finding a confirmation mail like shown below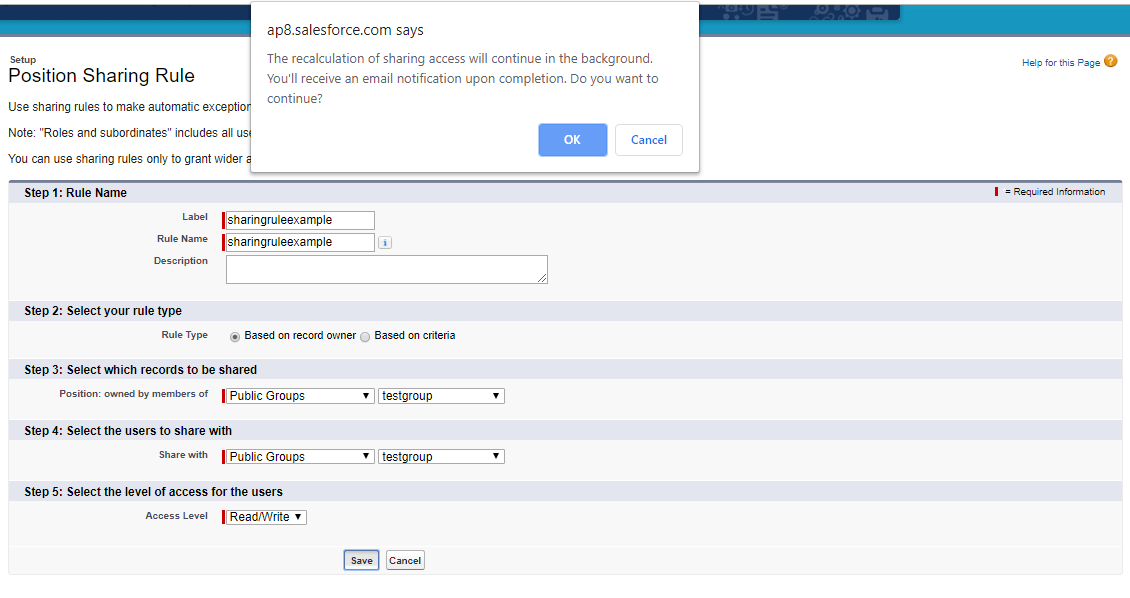
And finally, we will be entering into the following screen.
That's it we were done !!!
Scenario:
In real time projects, there will be some situations, where the Owner would like to share the record to the single person only. So in those cases, we use the concept Manual sharing
Manual sharing:
This kind of sharing can be done in classic mode only.
This is used to share the individual records with others
Here, the records can be accessed, through the sharing button on the records detailed page.
This is available, only if the OWD is public read/ private only.
Enroll for salesforce course to get the real-time explanation on this.