So in the previous blocks, we have learned regarding launching the instance, creating the security groups. And once if you have created the instance, you need to connect to the system using the AWS IP address. And the amazon platform has divided this IP addresses into various types. So lets us discuss them in detailed.
Amazon EC2 Instance Ip Addressing:
Both Amazon EC2 and Amazon VPC support IPV4 and IPV6 protocols. By default, both Amazon EC2 and Amazon VPC uses the IPV4 addressing protocol. And you cannot disable this behavior. So whenever you create the VPC you must specify the IPV4 CIDR block. Besides, you can optionally assign an IPV6 CIDR to your VPC and subnets. Moreover, through the internet, we can access these IPV6 addresses.
Public IPV4 Addresses:
A public IP address is an IPV4 address that is reachable over the internet. You can use this public address for communication between your instances and the internet. Besides each instance that receives the public IP address also contains an external DNS hostname. Moreover, outside the VPC, we can also resolve the external DNS hostname to the instance public IP address. And for the private IPV4 address, we can resolve the hostname inside the VPC. And through Network Address Translation (NAT) the public IP address is mapped to the primary private IP address.
Whenever you launch an instance in default VPC, we assign it a public IP address by default. So whenever you launch an instance to the non-default VPC the subnet has an attribute that determines the instances launched into that subnet determines the public address from the public IPV4 address pool
Amazon pool of public IPV4 addresses assigns the public IP addresses to your instance. So whenever an IP address is disassociated from the instance, it is sent back to the address pool but not the AWS account. And you cannot manually associate (or) disassociate public IP address from your instance. But you can release a public IP address from your instance (or) assign it a new one. And if you use the dynamic DNS to map an existing DNS name to the new Instance IP address, it may take up to 24hrs to propagate through the internet.
Private IPV4 Addresses:
A private IPV4 address is an IP address that is not reachable over the internet. And you can use the private IPV4 instance to communicate between the instance in the same VPC. When you launch an instance, this platform allocates the primary private IPV4 address. Each instance is also given an internal DNS hostname that resolves to primary private IPV4 addresses. Besides, you can also use the internal DNS hostname for the communication between the instances in the same VPC. And we cannot resolve the internal DNS hostname outside the VPC.
An instance receives the primary private IP address form the IPV4 address of the subnet. If the user doesn't specify the primary private IP address when you launch an instance this platform selects the available IP Address from the IPV4 subnet range. Unlike the primary private IP address, the secondary private IP address can be reassigned from one instance to the other. And when the instance is stopped and restarted, the private IPV4 addresses remains associated with the network interface. And the platform releases the address when the address terminates
Why Elastic IP?
Basically AWS platform allocates different IPs to create an instance. And for every time, you started an instance, the IP address will be allocated dynamically. But there are some situations where the user needs a static IP address to connect to this instance. So in those cases, we people use the elastic IP addresses.
What is an Elastic IP?
An Elastic IP is a static public IPV4 address for dynamic cloud computing in your account. In the user account, it allows the user to allocate the elastic IP address with any instance (or) the network interface for any VPC. Besides with elastic IP address, you can mask the failure of any instance by rapidly remapping the address to another instance in your VPC. This platform automatically allocates the IP address until you release it. Moreover, in a single step, you can move the network interface from one instance to the other.
Click here to know Why AWS opened a new cloud for the US government?
Elastic IP characteristics:
The elastic IP consists of the following characteristics by default:
- To use an Ip address, you must first allocate the one in your account and associate it with the instance (or) the network interface.
- Whenever you associate an elastic IP address with an instance (or) the primary network interface, the public IPV4 address instance was sent back to IPV4 address pool. And we cannot reuse the public IPV4 address
- This platform allows users to disassociate an Elastic IP address from a resource and reassociate with the different resource. Any open instance continues to work even after you disassociate its elastic IP addresses and reassociate with the other instance.
- An elastic IP is available for use in a specific region only
- If you associate an elastic IP address with an instance that has public IPV4 addresses the DNS hostname of the instance changes to match the Elastic IP addresses
So new will see how to create an Elastic IP practically
step - 1 :
Login to your AWS account and go to the services tab
step - 2:
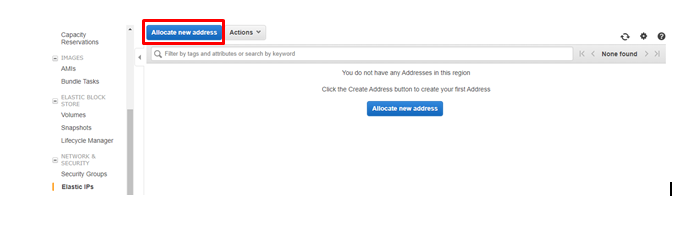
Go to Elastic IP and click on Allocate New Address

step - 3 :
Click on Allocate

step - 4 :
And once you allocate you will be moving into the following screen
