
So till now, we have seen the instances and their types. So in this block, we will discuss AWS backup EC2.
Among various services in the EC2 platform, EC2 and S3 were the popular services. Between these two EC2 is meant for the computing service and S3 is used for the storage service. In a real-time project, these instances contain the data in large amounts. But in some cases, there is a chance for deleting (or) stopping the instance. And it is a big problem if the instance contains important information. So to get this information, we people need to create a snapshot for a backup purpose and then restores the instances.
In disaster management, creating backup and recovery modules was the best practice. So with these methods in case of any data loss, you can use these backup for the business not to be effected. Hence today in this module, we will create the snapshot and then restore it from the snapshot.
So prior to the snapshot creation, let us discuss some concepts
What is the EBS Volume?
EBS stands for Elastic Block Storage. It provides raw block-level storage which can be attached to Amazon EC2 and also used in Amazon RDS. EBS allows you to mount these volumes as devices on your instances. Besides, it allows you to mount multiple volumes on the same instance. But each instance volume is attached to only one instance at a time. Hence you can create a file system on the top of these volumes. Furthermore, you can dynamically change the volume configuration attached to the instance. These EBS volumes are highly available and reliable storage volumes that can be attached to any running instance in the same availability zone. Amazon EBS can be deployed on a broad range of workloads, such as relational and non- relational databases, enterprise applications, file systems, and media workflows. This EBS is used for
- Frequent Data Storage
- Data that need the long term persistence
- Databases with more read and write operations
- Data that needs constant updates
- Storage for Database applications
What is an EBS Snapshot?
Amazon allows you to backup your data on your EBS volumes to Amazon S3 by taking the point in time snapshots. Snapshots were the incremental backups. It means for every change in the device blocks the snapshot is taken automatically and the most recent snapshot will be saved. So due to the automatic snapshot creation, we can minimize the time for the snapshot creation and also saves the storage cost. Moreover, Whenever you delete the snapshot, only the unique data to that snapshot will be removed. And each snapshot contains the information that you need to restore the data.
When you create an EBS volume based on the snapshot a new volume will begin as the exact replica of the original volume. And this replicated volume loads the data in the background so that you can begin using it immediately. And if you access the data that has not been loaded yet, the volume immediately downloads the requested data from Amazon S3.
Click here to know about the Visualize instance software inventory for EC2 System Manager
Multi-volume Snapshots:
Snapshots were meant to create the backup of multiple workloads such as large databases (or) the file systems. This span across the multiple EBS volumes. Moreover, multiple snapshots allow you to take the exact point in time, data coordinated and crash-consistent snapshots across multiple EBS Volumes.
Can you share the snapshots?
AWS platform allows you to share the Snapshot across the AWS Account by modifying the access permissions. AWS allows creating the own Snapshot copies as well as the snapshots that were shared with you. Basically AWS restricts the snapshots in its region. So whenever you create the new EBS snapshot volume, this platform allows to user to create the new volumes in the same region. Besides users can also copy the snapshots across the regions and makes it possible to use the multiple regions for geographical expansions, data center migration as well as disaster recovery.
How can you restore the EC2 Snapshot?
Users can create and restore the snapshot through the following steps
Instance Creation:
Step - 1:
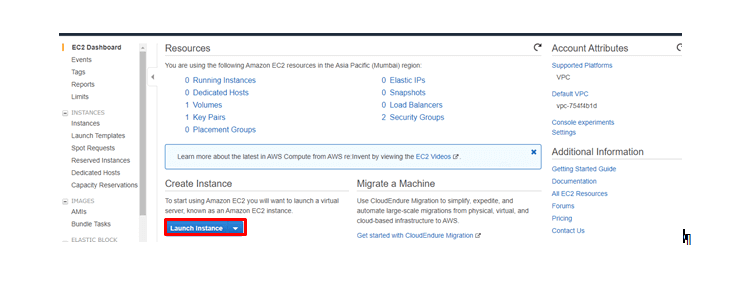
Login to your AWS account and click on Launch Instance
step - 2 :
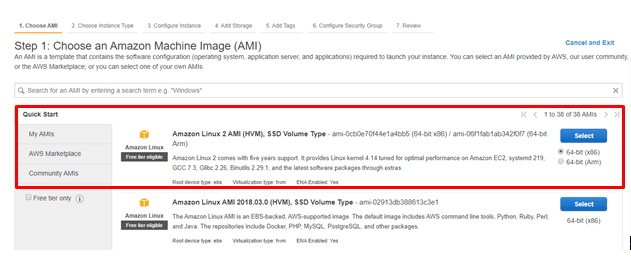
Select the image type.
step - 3:
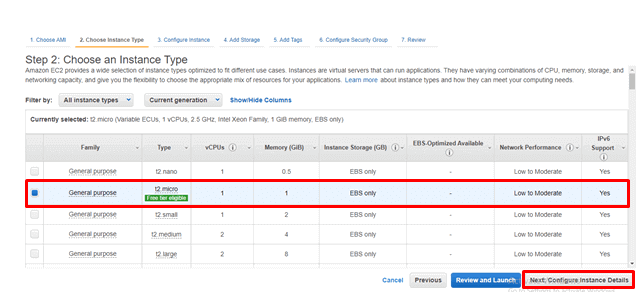
Select the instance type
step - 4 :
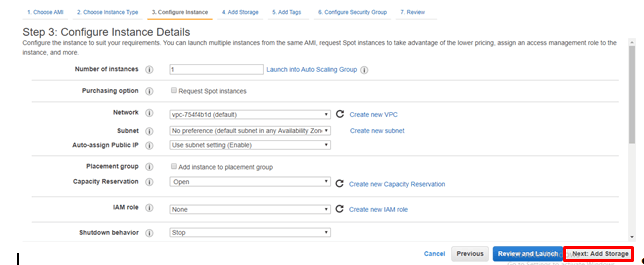
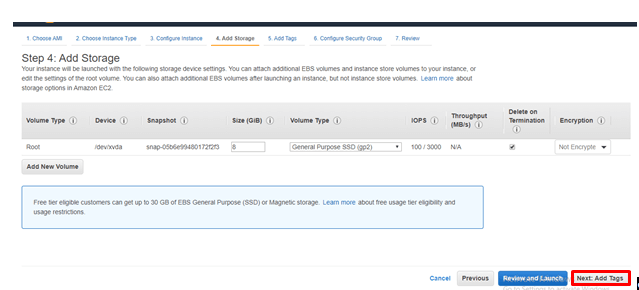
Select the number of instances and click on Add storage
Step - 5 :
Click on Add tags
step - 6:
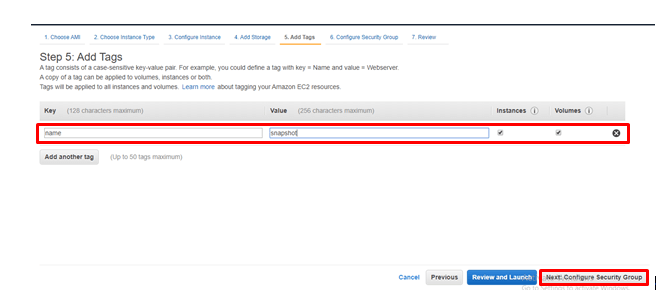
Click on Add tag and provide the key-value pair.
step - 7 :
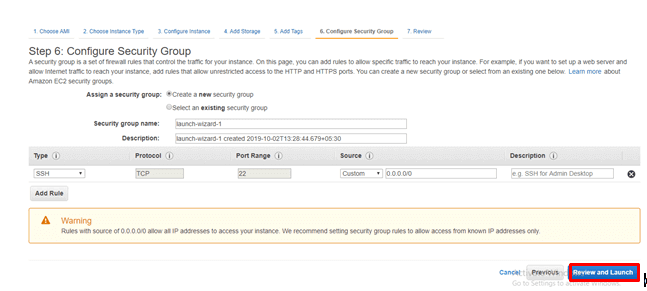
Click on Review and Launch
Step - 8 :
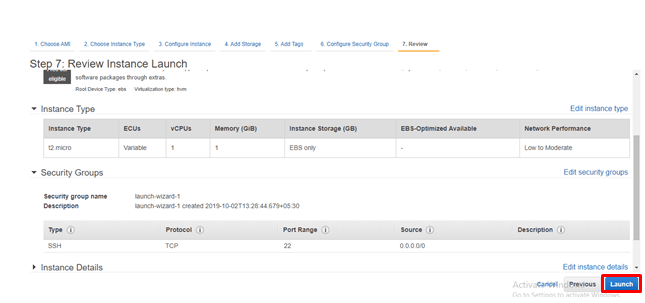
Click on Launch
step - 9 :
Click on select New Key Pair. And download the key pair.
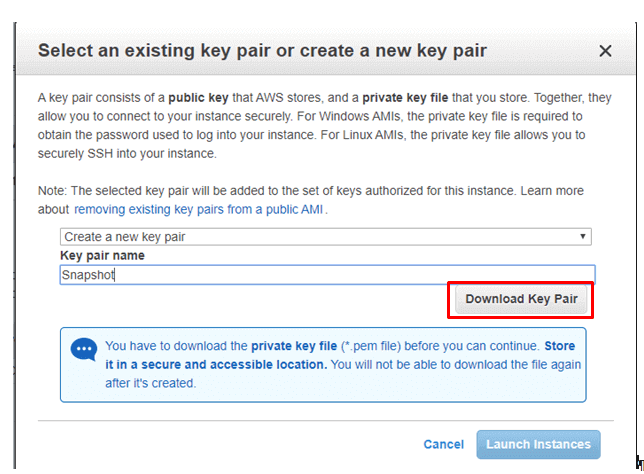
Click on Launch Instances
step - 10 :
Once you click on Launch instance, you will be entered into the following screen
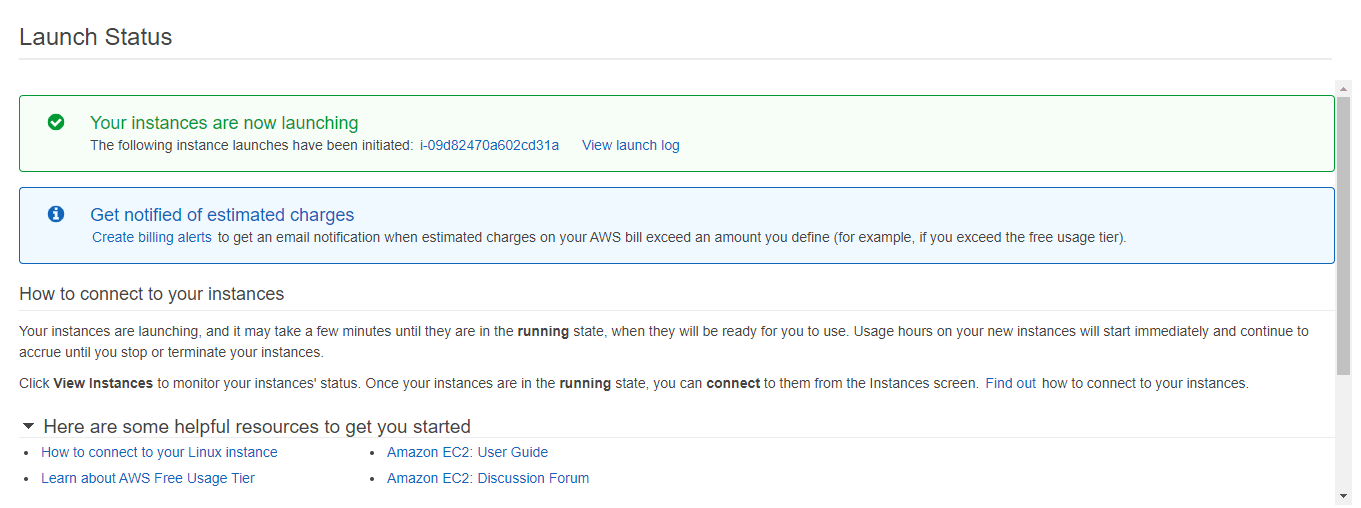
And I hope you people were successfully launched the instance. And if you people struck up anywhere feel free to contact AWS online training India
Snapshot Creation:
step - 11:
So now go to the volume column and Select the instance that you were created, and click on Actions.

step - 12 :
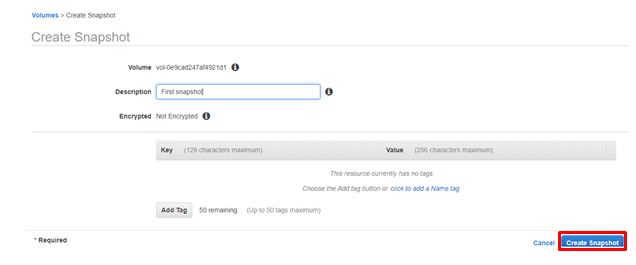
Provide any name and click on Create snapshot
Instance Deletion:
Step - 13 :
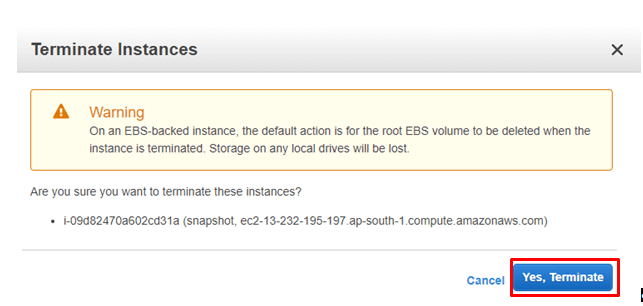
So now go back to your instances and select your instances and click on Terminate

Step - 14:
Click on Yes terminate
Restoring the Instance :
Step - 15 :
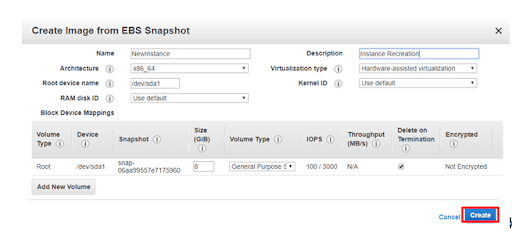
Now go back to your Snapshot block and select the snapshot and select the Actions.

Step - 16:
Provide any name as well as the description and click on Create
step - 17 :
So now go back to your instances and Click the Launch Instance.

Step - 18 :
Go to MyAMI's and select the image that you have created before.

Follow the steps that were have done while creating an Instance.
Once if you have completed all those steps then you will be entered into the following screen

So once you have entered into the above screen then verify your machine by connecting to Putty Software.
Adding Store volumes to your EC2 Instance:
So I hope you people have successfully installed an instance on your computer. Besides this platform allows the users to attach (or) remove the volumes to the instances. so now we will discuss these topics in detailed.
EBS Volumes:
Whenever you create an instance, the Amazon platform allocates you the 8GB of storage. But in real time scenarios, there may be a chance that the default allocated volume is not sufficient. So there is a necessity to increase the volume in the instance. Besides this platform allows you to specify the EBS Volumes and Instance store volumes to your instance through the block device mapping. And each entry in the block includes the device name and the volume that it maps.
Besides the AMI specifies the default block that you use. And it allows the users to specify the block device mapping while launching the instance. Moreover, a block device mapping always specifies the instant root volume. And the root volume can either be the EBS Volume (or) Store instance Volume. Besides this platform mounts the root volume automatically. The AMI varies the volume offered by the instance store volume. And the maximum volume that the AMI allocates for each volume is 10 GB. Besides this platform allows the users to attach additional EBS volumes even after your instance starts running.
Click here to know about SQL Server Implementation with AWS
Instance Volumes:
On the other hand, you can add the instance volumes, to the instance only when you launch an instance. And once the instance has launched we cannot add the instance volume. Besides if you change the instance type, the new instance type will not be stored in the instance store. And depending upon the instance type, the number and the size of the available instance store the instance volume will be varying. And if the instance type you choose supports the instance store volumes, you must add them to the block device mapping. So whenever you launch the instance, you must ensure that the instance volumes were formatted and mounted before you them. The root volume of an instance stored backed instance is mounted automatically.
So now we will now create these volumes manually
step - 1 :
Login to your AWS Account and start any instance which you have created
step - 2 :
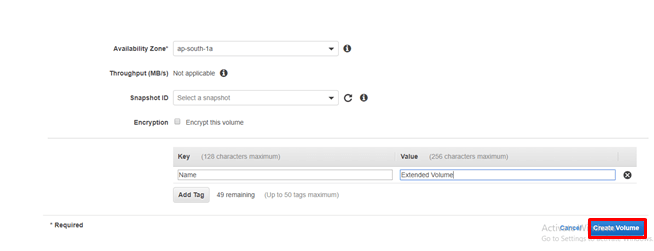
Go to volumes and click on Create Volume.

step - 3 :
Select the volume type and size and click on Create Volume
Step - 4 :
So once you entered you will be seeing the following screen and then click on Close

step - 5 :
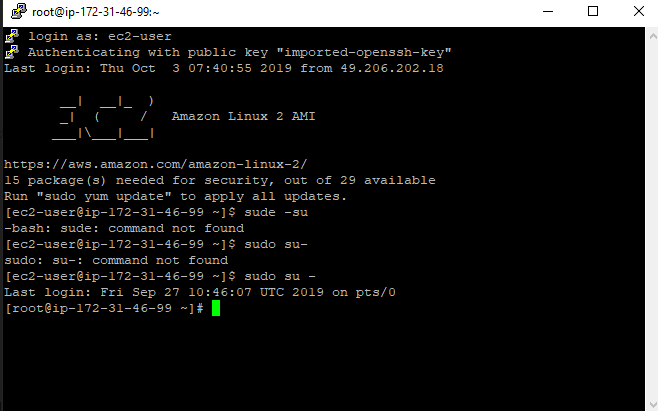
Log in to your instance using the putty session. And once you logged in go to the home directory
step - 6 :
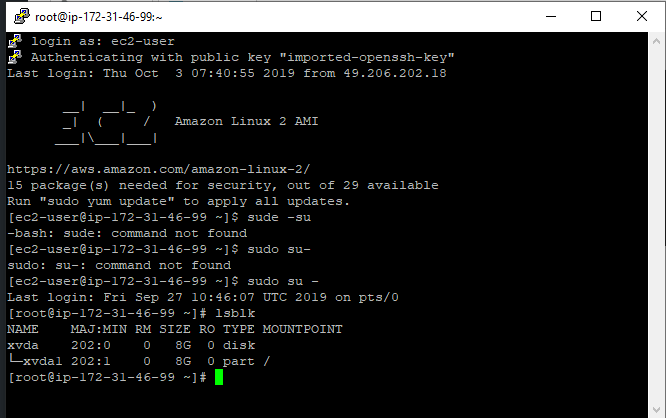
Check the volume occupied using lsblk
step - 7 :
The above screen shows the volumes occupied in that instance. It initially has 8Gib of storage. And in the following steps, we will add this created volume and will check this volume once again
Step - 8 :
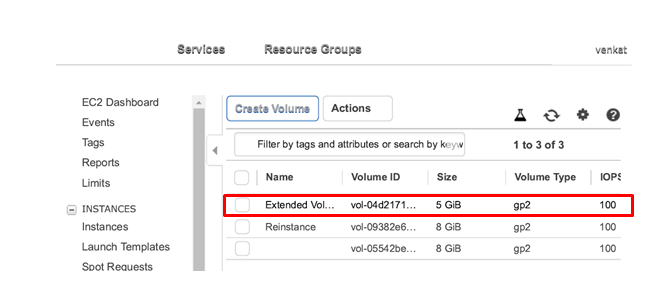
Go to Volumes and select the volumes that you have created now and then click on attach the volume.
step - 9 :
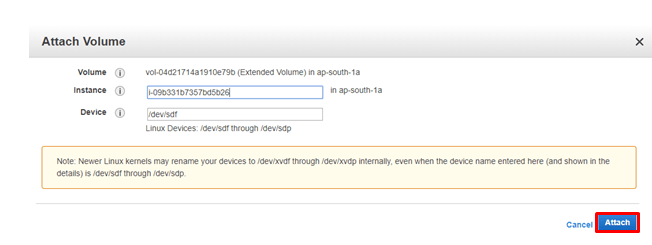
Select the instance that you want to attach this volume. And Click on Attach image
step - 10 :
Now go back to your Ec2 Instance once and check the volume occupies in your instances.

So it means the volume has attached successfully
step - 11:
Since the volume has attached we can check whether the volume contains any information.
so it clearly says that the volume is empty.
step - 12 :
Since the volume does not contain any information, we can format the volume using the following command
Step - 13:
Since we have formatted the data, we need to create the directory to mount this volume. And we can do this using the following command
step - 14 :
Mount the volume to the new volume directory using the following command.
step - 15:
In the terminal, now change the directory to the new volume directory
step - 16:
Check the volume occupied in this directory.
And this command displays the following output
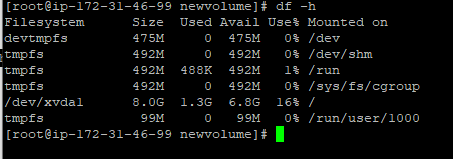
So it means the volume has been successfully added to the instance
And likewise, we can also detach this attached volume through the following command
unmount /dev/xdvf
Note:
In some cases, the newly attached volume may not be sufficient for further use. So there is a necessity for the volume to update. And the AWS platform allows the users to update the created volume as per the requirement.
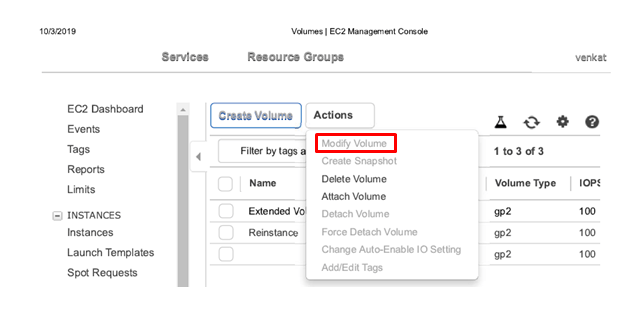
So, whenever you click on this modify volume, you will be entered into the following screen
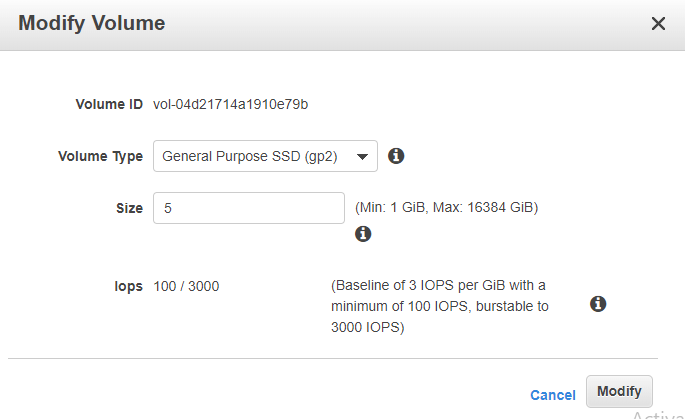
So here as shown in the above screen, the user can update the volume as per the requirement and click on Modify. And the users can check the updated volume in the terminal as shown before.
Visit AWS Course for a more detailed explanation